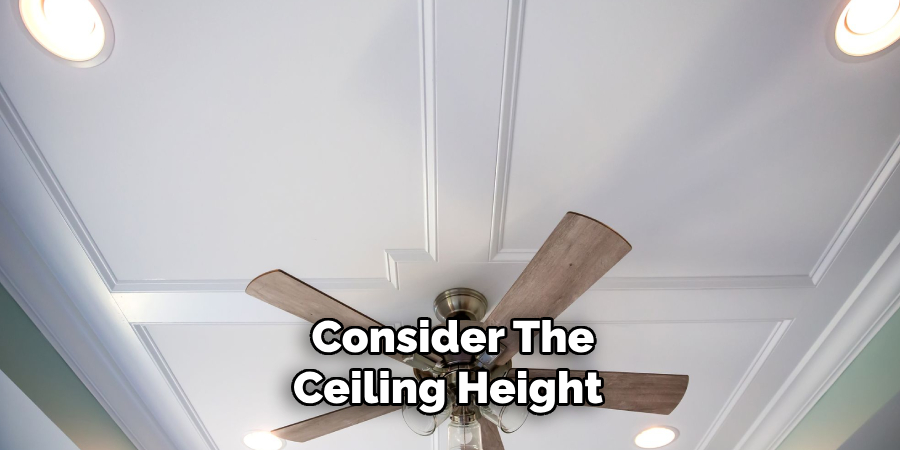
Vaulted ceilings already offer a striking visual element to a room’s architecture, adding a sense of openness and grandeur. Incorporating crown molding into such spaces can further elevate their aesthetic appeal, introducing a touch of elegance and structural depth.

This decorative feature highlights the vaulted ceiling’s unique angles and planes, creating an interplay of shadows and light that enriches the room’s character. Whether aiming for a modern minimalist look or a traditional ornate style, crown molding is a versatile design tool that enhances the overall ambiance of any living space.
When it comes to how to put crown molding on vaulted ceilings, the importance of proper installation techniques cannot be overstated.
The complexity of working with angled surfaces requires precise measurements and cuts, underscoring the need for meticulous planning and execution. Proper techniques ensure that the molding not only fits perfectly but also complements the architectural features of the ceiling, creating a cohesive and visually appealing outcome.
Additionally, correct installation methods guarantee the longevity and durability of the crown molding, enabling it to withstand the test of time. From choosing the right tools and materials to understanding the intricacies of cutting angles, every step is paramount in achieving a professional-looking finish that transforms the space.
Understanding Vaulted Ceilings
A. Overview of Vaulted Ceiling Designs and Structures
Vaulted ceilings are architectural marvels that have graced structures from ancient cathedrals to contemporary homes. Characterized by their arching design, vaulted ceilings rise above the standard flat ceiling, creating a sense of expansiveness and volume within a space.

There are several types of vaulted ceilings, including barrel, groin, and cathedral styles, each offering unique visual dynamics and structural characteristics. Barrel vaults appear as a simple continuous arch, while groin vaults feature intersecting barrel vaults that create a complex, ribbed structure.
Cathedral ceilings, perhaps the most recognized form, mirror the roof’s pitch, creating a dramatic peak that often includes exposed beams or rafters. The architectural design of a vaulted ceiling not only defines the space’s aesthetic but also influences the room’s lighting and acoustics, contributing to the overall ambiance.
B. Benefits of Crown Molding for Vaulted Ceilings
Crown molding on vaulted ceilings provides a myriad of aesthetic and functional benefits. Aesthetically, it is a transitional element that beautifully accentuates the transition between the walls and the ceiling, emphasizing vaulted designs’ unique shape and height.
This architectural detail can draw the eye upward, making the ceilings appear even more majestic and the rooms more spacious and elegant. Functionally, crown molding can help to hide imperfections where the ceiling meets the walls and can also serve as a means to conceal wiring or speakers, maintaining the space’s streamlined look.
Additionally, installing crown molding in a room with a vaulted ceiling can increase the property’s value by adding a luxurious touch that appeals to prospective buyers.
Beyond its visual appeal and functionality, crown molding embodies timeless elegance, ensuring the space remains stylish and appealing for years. Its adaptability to various decor styles, from classical to contemporary, makes it an ideal choice for enhancing the sophistication and character of any vaulted ceiling.
How to Put Crown Molding on Vaulted Ceiling: Planning and Preparation
A. Assessing Ceiling Angles and Measurements
Successfully installing crown molding on vaulted ceiling hinges upon accurately assessing ceiling angles and measurements. This stage is critical as it lays the foundation for the entire project, ensuring that the molding aligns perfectly with the ceiling’s unique contours.
1. Identifying Pitch and Slope
The pitch and slope of a vaulted ceiling determine the angle at which the crown molding will be installed.

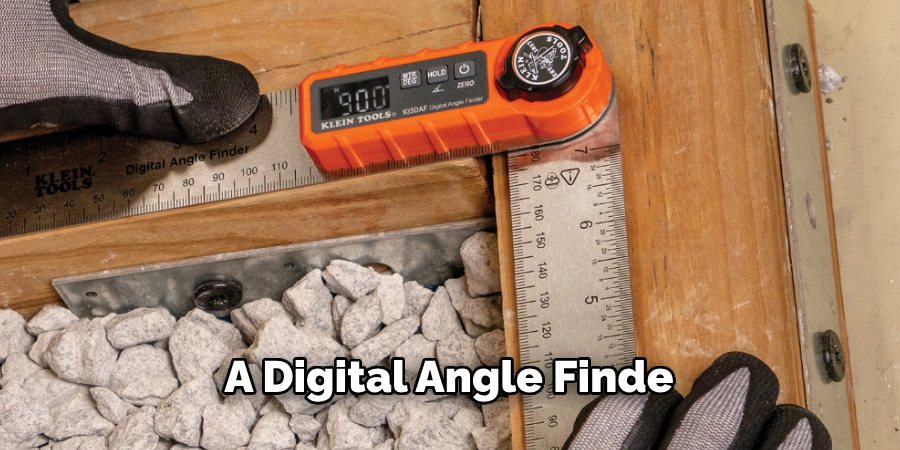
Identifying these elements requires a robust understanding of geometric principles and the use of tools like an inclinometer or a digital angle finder. The pitch refers to the steepness of the ceiling, often expressed as a ratio or angle. Understanding the pitch is essential for cutting the molding at the correct angle, ensuring a seamless fit.
The slope, on the other hand, describes the directional rise of the ceiling. Accurately determining both these factors enables homeowners and installers to make precise cuts, avoiding gaps or misalignments that could detract from the finished look.
2. Determining Molding Profiles and Sizes
The profile and size of the crown molding significantly impact the aesthetic appeal of the vaulted ceiling. When selecting molding, consider the ceiling height and room size; larger, more intricate profiles tend to complement spacious rooms with high ceilings. Conversely, smaller profiles may be more suitable for ceilings with a lower pitch or in rooms with limited space.
Additionally, the molding’s shape and contour profile should harmonize with the room’s architectural style and décor. Offering both decorative and functional benefits, the right crown molding profile enhances the vaulted ceiling’s appearance, creating a cohesive and visually dynamic space.
B. Gathering Necessary Tools and Materials
The correct tools and materials are paramount for successfully installing crown molding on a vaulted ceiling. Preparing these in advance facilitates a smooth installation process.
1. Miter Saw and Coping Saw
A high-quality miter saw is indispensable for making precise angled cuts, a common requirement given the complex angles of vaulted ceilings. The versatility of a miter saw allows for adjustments to cut the molding at the specific angles dictated by the pitch and slope of the ceiling.

For intricate joins or tighter fits, a coping saw becomes necessary. It allows for finer cuts and adjustments, ensuring that the molding pieces meet perfectly, especially in corners and irregular angles.
2. Adhesives and Fasteners
Selecting the right adhesives and fasteners is crucial for firmly securing the crown molding. Heavy-duty construction adhesive provides a strong bond, which is especially important in vaulted ceiling installations where gravity poses a challenge. Additionally, using fasteners such as nails or screws suited for the wall and ceiling materials ensures that the molding remains securely attached.
Choosing fasteners of an appropriate length is important—they must penetrate deeply enough to anchor the molding but not so deep as to damage electrical wiring or plumbing hidden behind walls or ceilings.
How to Put Crown Molding on Vaulted Ceiling: Cutting and Installing Crown Molding
A. Cutting Crown Molding Angles
Precision cutting crown molding angles is pivotal for achieving a polished look, especially for vaulted ceilings where angles can be more complex.
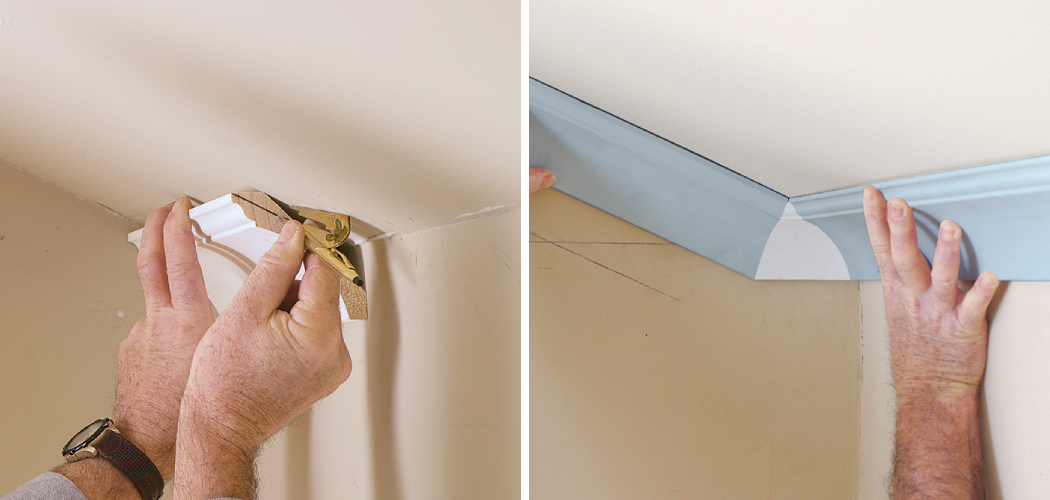
1. Coping Inside Corners
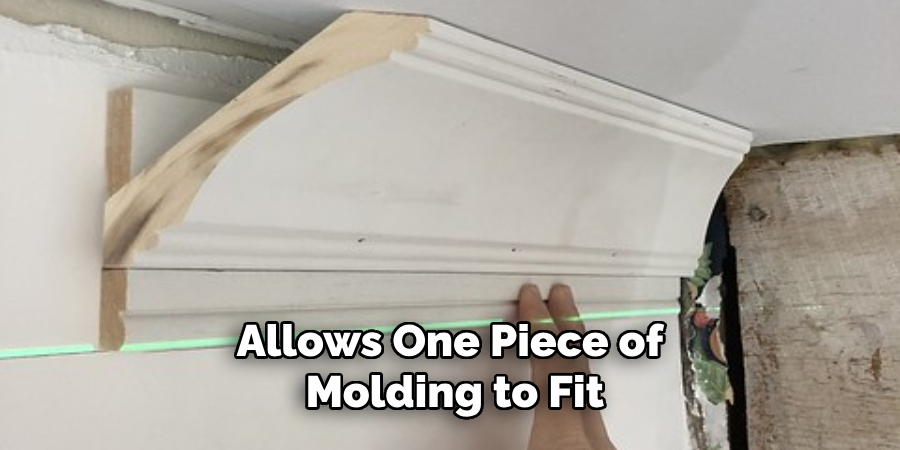
Coping inside corners involves a detailed cut that allows one piece of molding to fit snugly over the other, creating a seamless joint even if wall angles are not perfectly square. This technique begins by cutting the first piece of molding at a 45-degree angle with a miter saw, presenting the profile in a way that exposes the molding’s face and intricate design.
The next step involves using a coping saw to carefully follow the cut’s profile, back-cutting slightly to ensure a tight fit. The coped piece will then slide into place over the adjoining piece of molding, significantly enhancing the overall appearance and eliminating gaps.
2. Mitering Outside Corners
Mitering involves cutting two molding pieces at complementary angles to fit together precisely at the corner. For outside corners on vaulted ceilings, each piece of crown molding must be cut at an angle that mirrors the ceiling’s pitch and the corner’s degree.
This often requires adjusting the miter saw to cut at both the angle and bevel for the outside corner, considering the ceiling’s slope to determine the correct tilt of the blade. Precise measurements and cuts are essential to ensure that the molding aligns seamlessly, creating a smooth, continuous line along the outside corners.
B. Attaching Molding to Ceiling and Walls
Successfully attaching crown molding to vaulted ceilings and walls requires careful preparation and execution. The combination of adhesive and fasteners provides a secure hold, accommodating the ceiling’s unique contours and angles.
1. Using Adhesive for Vaulted Ceilings

Adhesive plays a critical role in securing crown molding along vaulted ceilings, providing immediate hold and reducing the reliance on mechanical fasteners. Heavy-duty construction adhesive should be applied along the back edge of the molding, where it will contact the ceiling and wall.
It’s important to press the molding firmly in place, allowing the adhesive to bond fully as per the manufacturer’s recommended curing time. Adhesives offer the benefit of filling minor gaps, ensuring a clean, professional finish between the molding and surfaces.
2. Securing with Nails or Screws
While adhesive aids in the initial placement and hold of the crown molding, nails or screws ensure long-term stability. For vaulted ceilings, where the angle of the ceiling can add stress to the molding, using nails or screws at strategic points helps distribute the weight and secure the molding firmly.
The fasteners should be driven into studs or other structural members behind the drywall or plaster, using a stud finder to locate these supports. For the best results, the length of the fasteners must be chosen carefully to penetrate through the molding and into the structural supports without protruding through the front of the molding. Sometimes, using a nail gun with an angle adapter can facilitate this process, particularly when working with hard-to-reach vaulted ceilings.
Dealing with Challenges
A. Coping with Irregular Angles and Slopes
Installing crown molding in rooms with vaulted ceilings often involves managing irregular angles and slopes, which can present significant challenges even for seasoned DIY enthusiasts.
These irregularities require a bespoke approach to both measuring and cutting. The key to success lies in the meticulous preparation of your workspace and the precise calibration of your tools.
A digital angle finder becomes an invaluable tool in this context, accurately assessing any given angle on the ceiling. This device ensures that the measurements reflect the actual slope and angles of the vault, facilitating accurate cuts.
Another strategy involves creating a series of templates or mock-ups out of cardboard or scrap wood. These can be used to test fits before committing to cutting the actual molding, significantly reducing the margin for error. This iterative approach allows for adjustments to be made on the fly, ensuring a perfect fit despite the irregularities.
It’s also crucial to allow for flexibility in your installation method. Coping saws, for example, allow for fine adjustments and can be used to tweak the fit of each piece of molding until it snugly accommodates the unique contours of the ceiling.
The patience and precision exercised during this stage pay off in seamlessly integrating the molding into the space, effectively masking the irregularities of angles and slopes.
B. Adapting to Ceiling Transitions and Joints
Transitions and joints in vaulted ceilings can further complicate crown molding projects. These are the points where different angles or slopes meet and require seamless molding integration to maintain a consistent aesthetic. Addressing these transitions requires a combination of advanced planning, precise execution, and sometimes creative problem-solving.
One effective method is to employ transition blocks or corner blocks. These pre-made elements can bridge the gap between different angles or slopes, offering a smooth transition and reducing the need for precise miter cuts. In addition to their practical application, these blocks can also add a decorative touch to the molding, enhancing the overall design.
For a more customized solution, fabricating your own transition pieces from the same material as the crown molding can ensure a perfect match. This approach involves cutting pieces to match the specific angles of the ceiling transitions, requiring a high degree of accuracy and finesse.
Using a compound miter saw, adjustable to both the angle and bevel required, is essential for this task. It allows for cuts that accommodate both the slope of the ceiling and the angle of the transition, ensuring a snug fit.
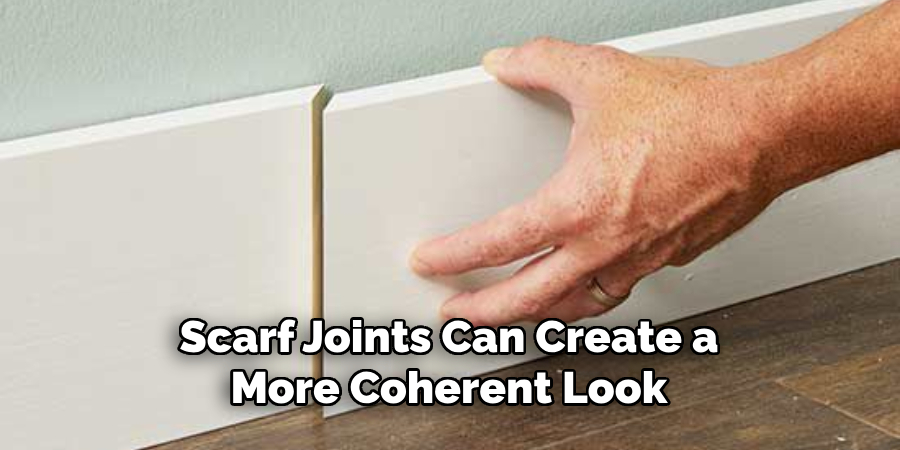
When dealing with joints, especially in long stretches of molding, scarf joints can create a more coherent look. These joints involve cutting the molding ends at complementary angles so they fit together seamlessly, disguising the joint. This technique demands precision but results in a nearly invisible seam, maintaining the flow of the molding across the ceiling.
Throughout this process, keeping a keen eye on the alignment and uniformity of the molding ensures that the finished project maintains a cohesive look despite the complexity of transitions and joints in vaulted ceilings. Patience, precision, and perhaps a touch of creativity are the linchpins of success in these endeavors, transforming challenges into triumphs in the realm of home improvement.
Finishing Touches and Trim Work
A. Filling Nail Holes and Gaps
Once the crown molding is securely affixed to the vaulted ceilings, the next crucial step involves addressing any nail holes, gaps, or imperfections that may disrupt the smooth, continuous appearance of the installation. Filling these minor but noticeable imperfections is essential for achieving a polished finish.
A lightweight, shrink-resistant spackle or wood filler should be used to fill nail holes. It’s important to apply the filler using a flexible putty knife, pressing it firmly into the holes and ensuring a level fill that’s flush with the surface of the molding.
After the filler has dried completely, fine-grit sandpaper is used to smooth the filled areas, removing any excess material and creating a surface that’s ready for finishing touches. A paintable acrylic-latex caulk is recommended for gaps along the edges where the molding meets the ceiling or wall.
A caulking gun can be used to apply a bead of caulk into the gaps, and a damp cloth or fingertip can be used to smooth the caulk, ensuring it fills the gaps entirely without overflowing onto the surrounding surfaces.
This meticulous attention to detail in filling and smoothing not only enhances the aesthetic appeal but also contributes to the overall durability of the molding by sealing out moisture and dust.
B. Caulking and Painting for a Seamless Finish
The final step in crown molding installation, particularly on vaulted ceilings, revolves around adding those finishing touches that unify the molding with the room’s overall aesthetic.
Caulking plays a pivotal role here, providing both a seal against moisture and dust and a smooth transition between the molding and the ceiling or wall. A high-quality, paintable caulk should be applied along these seams.
Applying the caulk evenly is crucial, ensuring that it fills any remaining gaps without creating bulges or uneven lines. A wet finger or a caulk finishing tool can be used to smooth the bead of the caulk, wiping away excess to create a seamless join.
Once the caulking has dried, which typically takes about 24 hours, the molding is ready to be painted. Painting protects the molding and integrates it into the room’s design. For a cohesive look, the molding can be painted to match the ceiling or walls or given a contrasting color to highlight its architectural features.
Using high-quality interior paint with a finish that’s suitable for the room’s lighting and use is crucial. A semi-gloss or high-gloss finish is often recommended for crown molding because it highlights the molding details and is easier to clean.
For the best results, a primer should be applied before painting, especially if the molding is made from a porous material like wood. The primer ensures that the paint adheres properly and provides a uniform color.
Applying two coats of paint, allowing ample drying time between coats, ensures a durable and visually appealing finish. Attention to detail during these final steps—caulking, priming, and painting—transforms the installed crown molding into an elegant and integral feature of the room, contributing to a polished and sophisticated overall aesthetic.
Conclusion
The installation of crown molding on vaulted ceilings encompasses a series of meticulous steps that ensure the home’s functionality and aesthetic refinement. From initial planning to the final touches of painting, each phase requires attention to detail and precision.
Starting with selecting appropriate molding and accurate measurement, the process evolves through the cutting and joining of pieces, fitting them with precision against the unique angles and curves of vaulted ceilings. Employing techniques such as using transition blocks for smooth angles, crafting custom transition pieces, and applying scarf joints for seamless connections are crucial.
Filling nail holes, caulking gaps, and applying a finishing coat of paint are the final steps that elevate the look, ensuring a seamless blend with the room’s overall design. This comprehensive approach enhances the visual appeal and the value of the property.
Tackling a project on how to put crown molding on vaulted ceilings may seem daunting at first, but it’s a rewarding endeavor that enhances both the beauty and value of your home.
With patience and attention to detail, DIY enthusiasts can achieve professional-looking results. Remember, each step, from planning, measuring, cutting, and installing, contributes to the project’s success. Utilizing the right tools and techniques, such as transition blocks and scarf joints, can significantly simplify the process.
Besides improving your living space, completing such a project provides a profound sense of accomplishment and could inspire further home improvement ventures. Don’t hesitate to take on this challenge. With a methodical approach and a bit of creativity, transforming a space with crown molding is an achievable and worthwhile DIY project.