
Are you looking for a durable and easy-to-maintain option for your bathroom floor? Epoxy floors have long been a favorite of builders and DIYers alike, thanks to their toughness and resistance to moisture. With the right preparation and materials, it’s quite simple to handle an epoxy job on your own—so don’t sweat it if you feel intimidated.
We’ll cover everything from prepping the surface to choosing which epoxy is best suited for your project in this comprehensive guide on how to epoxy a bathroom floor!
Why Do You Need to Epoxy a Bathroom Floor?
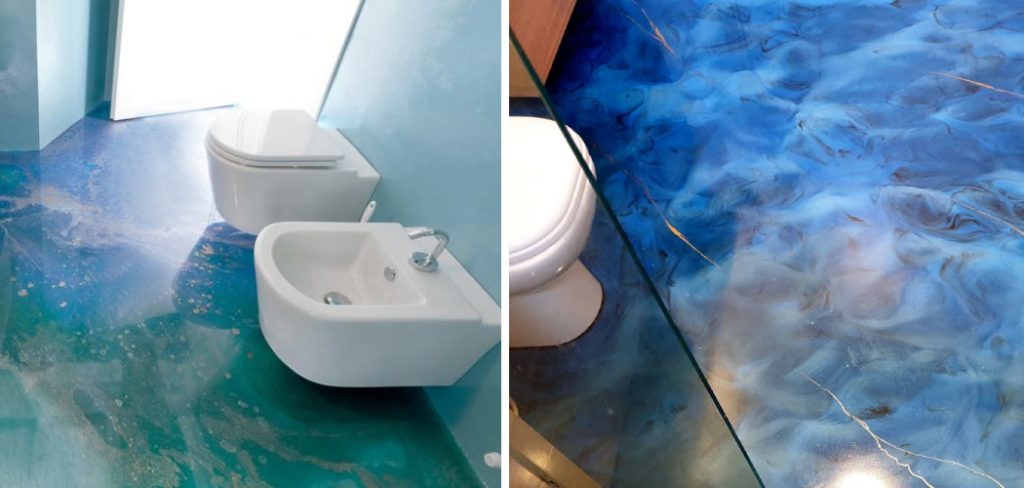
Epoxy is a popular choice in bathrooms due to its durability and water-resistant qualities. It can prevent moisture from seeping into the subfloor while also providing protection against mold, mildew, and bacteria buildup.
Additionally, epoxy flooring comes in a variety of colors and textures that are sure to give your bathroom a unique look! This type of flooring is also easy to maintain—requiring only regular sweeping and occasional mopping.
Needed Materials
Given below is a list of materials that you will need to epoxy your bathroom floor.
- Epoxy Resin
- Mixing Bucket
- Mixing Stick
- Trowel
- Safety Goggles and Gloves
- Drop Cloths or Tarps
- Masking Tape
- Hairdryer or Heat Gun
11 Step-by-step Guidelines on How to Epoxy a Bathroom Floor
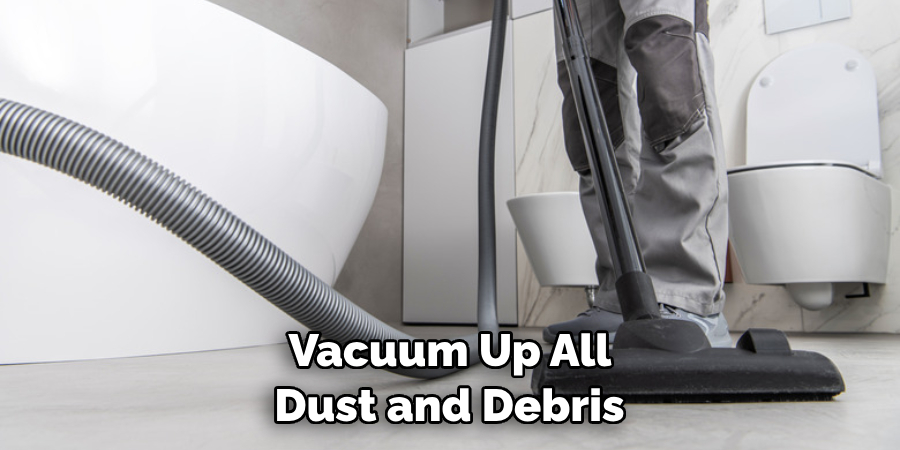
Step 1: Prepping the Surface
The first step in preparing to epoxy a bathroom floor is to make sure that the surface is clean and dry. Start by removing any existing flooring, such as tile or linoleum. If necessary, use a drill to remove screws and nails. Vacuum up all dust and debris before proceeding. if any mold or mildew is present, make sure to clean it up with the appropriate cleaner. This will ensure that the epoxy adheres properly.
Step 2: Repairing Cracks or Holes
If there are any cracks or large holes in the subfloor, make sure to repair them prior to epoxying your bathroom floor. Use an appropriate patching compound for this task. Once it’s dried completely, sand the area down using 120-grit sandpaper until it’s smooth and even with the rest of the surface. It is important to make sure that the patchwork is completely dry before proceeding.
Step 3: Applying a Primer Coat
Next, apply an epoxy primer coat to create a bond between the substrate and the epoxy layer. Make sure to follow the manufacturer’s instructions carefully! This process is especially important if you’re using a water-based epoxy.
Allow the primer coat to dry completely before proceeding. This could take up to 24 hours. This will ensure that the epoxy adheres properly. It is important to make sure that the primer coat is completely dry before proceeding.
Step 4: Mixing the Epoxy Resin
Mix your epoxy resin and hardener according to the product’s instructions, using a mixing bucket and stirring stick. Ensure that you mix it thoroughly—this will help create an even finish and prevent air bubbles from forming in your epoxy. It is important to note that once you begin mixing, the epoxy will start to harden quickly. So make sure you’re ready to move on to the next steps.
Step 5: Applying the First Layer of Epoxy
Once your epoxy mixture is ready, use a trowel or squeegee to apply it evenly across the bathroom floor. Be sure to spread it as thin as possible for maximum durability. But make sure it is thick enough to cover the surface completely.
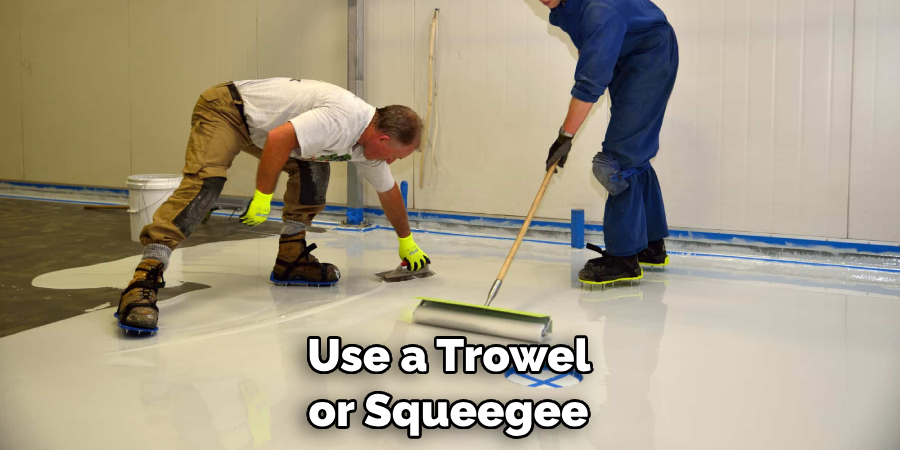
Start in one corner and work your way across the room, using long sweeping motions. This will help ensure that you have an even layer of epoxy across the entire floor. These long sweeps should overlap slightly, to create a seal.
Step 6: Letting It Dry
Allow this first layer of epoxy to dry completely before proceeding. Check the manufacturer’s instructions for more details on drying times. It could take anywhere from 12 to 24 hours for the epoxy to be completely dry and ready for the next layer.
But make sure it is completely dry before moving on. It’s important to note that the epoxy should feel completely dry to the touch before you move on.
Step 7: Applying a Second Layer of Epoxy
Once the first layer is dry, apply a second coat in the same manner as before. Again, make sure to spread it as thin and even as possible. It is important to note that the second layer should be thicker than the first in order to achieve optimal coverage.
But make sure it isn’t too thick. It should be about the thickness of a dime. It is important to make sure that you thoroughly cover the entire surface in order to create a long-lasting and durable epoxy floor.
Step 8: Adding Colorant (Optional)
If desired, you can add colorants or decorative chips to your epoxy flooring at this point. Follow the product instructions for the best results! It is important to note that colorants and decorative chips should be added after the second layer of epoxy has been applied. This will help ensure that the colorant or chips are securely embedded in the epoxy. But make sure not to add too much. It can cause the epoxy to peel or crack.
Step 9: Letting It Cure
Leave your epoxy bathroom floor to cure completely according to the manufacturer’s specifications. This will take anywhere from 24-72 hours depending on room temperature and humidity levels. This is a crucial step in the process and shouldn’t be rushed.
It is important to note that the epoxy must be completely cured before it can be walked on or exposed to water. This is to ensure that the floor will be strong and durable.
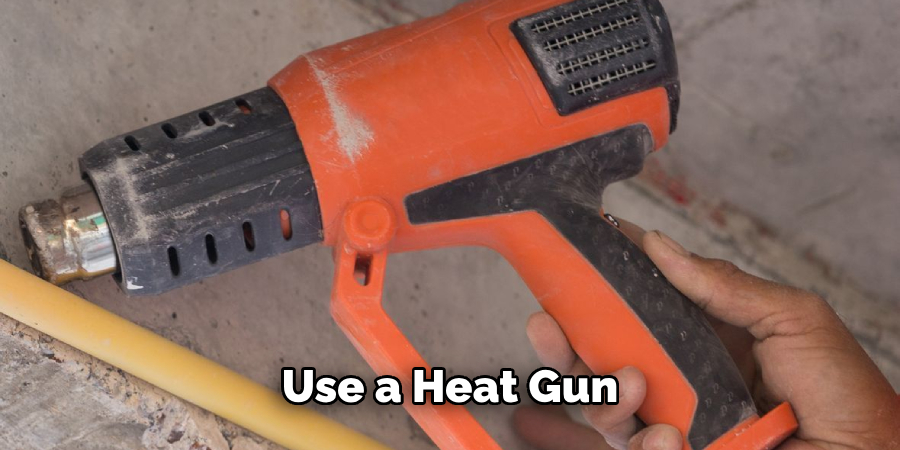
Step 10: Smoothing the Surface
Once your epoxy floor has cured, use a heat gun or hairdryer to melt any bumps or imperfections. This will help to create an even, professional-looking finish! This step is especially important if you added decorative chips to your epoxy bathroom floor.
But make sure that the heat gun or hair dryer does not get too hot, as this could cause damage to the epoxy. However, if you followed the manufacturer’s instructions correctly, this should not be an issue.
Step 11: Sealing the Epoxy Floor
Finally, seal your epoxy bathroom floor with a clear coat of polyurethane. This will protect it from water damage and keep it looking great for years to come! It is important to note that this should be done after the epoxy has completely cured. Make sure to follow the product instructions carefully when applying. Once it’s dry, your epoxy bathroom floor is ready for use!
With these 11 steps on how to epoxy a bathroom floor, you can easily create a beautiful and durable epoxy floor in your bathroom. Make sure to follow all the steps carefully and use the proper tools and materials for the best results! With just a bit of preparation and the right materials, you can easily tackle this project on your own—and enjoy the benefits of having an easy-to-clean and durable surface.
Frequently Asked Questions
Q: What is the Best Type of Epoxy to Use for a Bathroom Floor?
A: The best type of epoxy to use for a bathroom floor is waterproof, urethane-based epoxy. This type of epoxy provides superior protection against moisture and will resist discoloration caused by exposure to sunlight or other environmental elements.
Q: How Long Does It Take for Epoxy Flooring to Cure?
A: The drying time for epoxy flooring varies depending on the room temperature and humidity levels. Generally speaking, it should take between 24-72 hours for the epoxy to cure completely.
Q: Are There Any Special Safety Precautions When Working with Epoxy?
A: Yes! It’s important to take safety precautions when working with epoxy. Make sure to wear protective goggles, gloves, and clothing when handling resin or mixing compounds. Additionally, make sure to keep your working area well-ventilated and free from any open flames.

Q: How Do You Clean an Epoxy Floor?
A: To clean an epoxy floor, simply sweep or vacuum up any dirt and debris. For tougher messes, you can use mild detergent and warm water to mop the surface. Avoid using any abrasive cleaners or scrubbing brushes, as this can damage the flooring.
Conclusion
By taking the time to properly epoxy your bathroom floor, you can give it an extra layer of protection from water, stains, and wear and tear. With a few key steps such as preparing and cleaning the surface, using the correct materials, and properly applying the epoxy coatings, you can have beautifully sealed bathroom floors in no time.
Don’t forget that prepping and safety is paramount for any DIY project, so make sure you use protective equipment when working with epoxy. Now that you know how easy it is to epoxy a bathroom floor, why not give it a try? If you find yourself over your head during the task, consider reaching out to a professional for assistance. Thanks for reading this article on how to epoxy a bathroom floor.