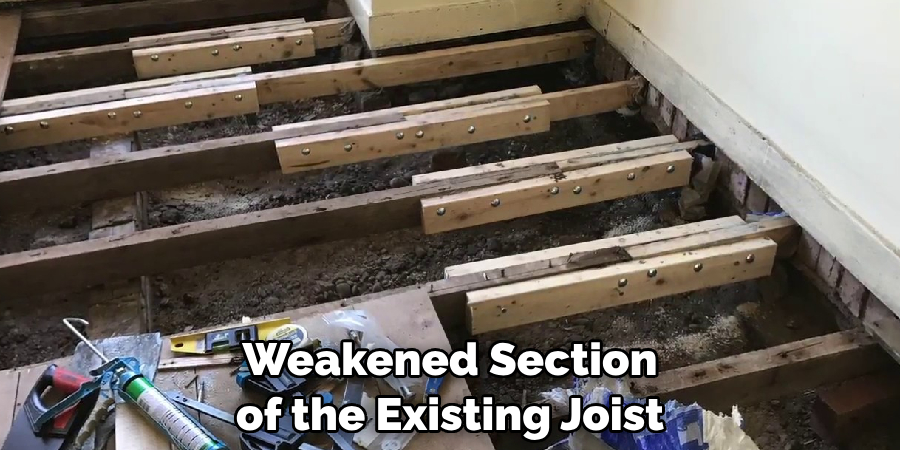
Sistering a floor joist is a fundamental repair technique used in construction and home renovation to reinforce compromised joists. It involves attaching a new joist, known as a “sister,” alongside the existing one. This process is critical for maintaining the structural integrity of a floor, ensuring it can support the designated weight without sagging or bending. Whether due to age, water damage, or termite infestation, sistering floor joists can be a practical solution to extend the life of a home’s flooring structure. This guide on how to sister a floor joist will walk you through the steps and considerations necessary to successfully sister a floor joist, aiming to provide you with the knowledge and confidence needed to tackle this project.
What is a Floor Joist?
A floor joist is a horizontal structural member that supports the weight of a floor, typically made of wood, engineered wood products (such as plywood or oriented strand board), or steel. They are commonly found in residential and commercial buildings to create an even surface for flooring materials to be installed on top. The size and spacing of joists vary depending on the design of a building, with larger and closer-spaced joists being able to support heavier loads.
When Should You Sister a Floor Joist?
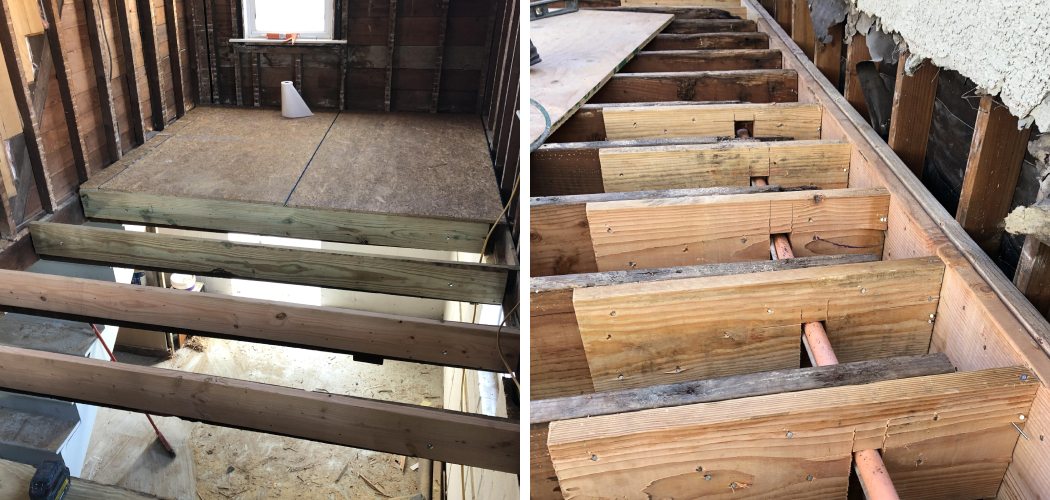
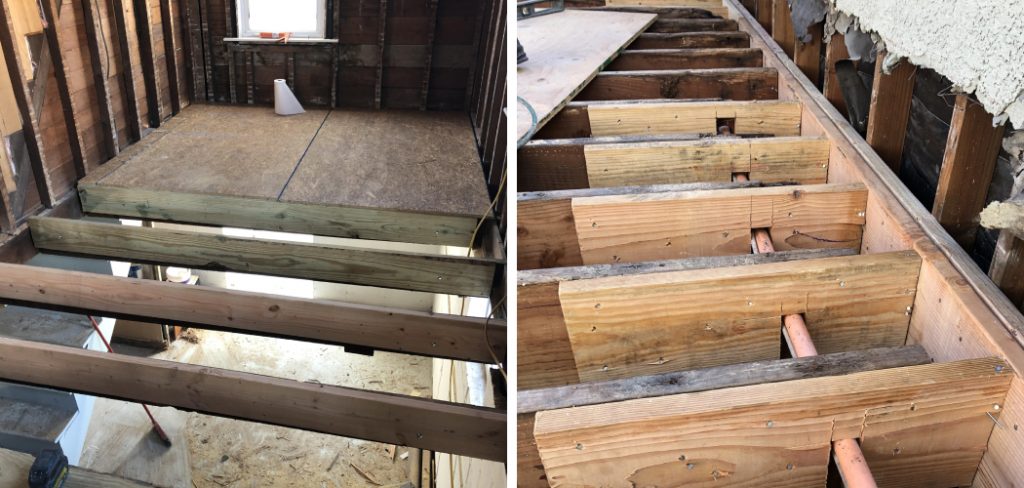
Sistering a floor joist is often necessary when an existing joist has become weakened or damaged. Signs that may indicate the need for sistering include sagging floors, squeaking noises when walking on the floor, or visible cracks or splits in the joist. These issues can be caused by a variety of factors, such as age, rot from water damage or insect infestation. It is important to address these problems promptly to prevent further damage and ensure the safety and stability of the flooring structure.
Materials Needed
Before beginning the process of sistering a floor joist, it is essential to gather all the necessary materials. These may include:
New, Full-length Joist
The sister joist should be the same length and size as the existing joist. This will ensure even support for the floor.
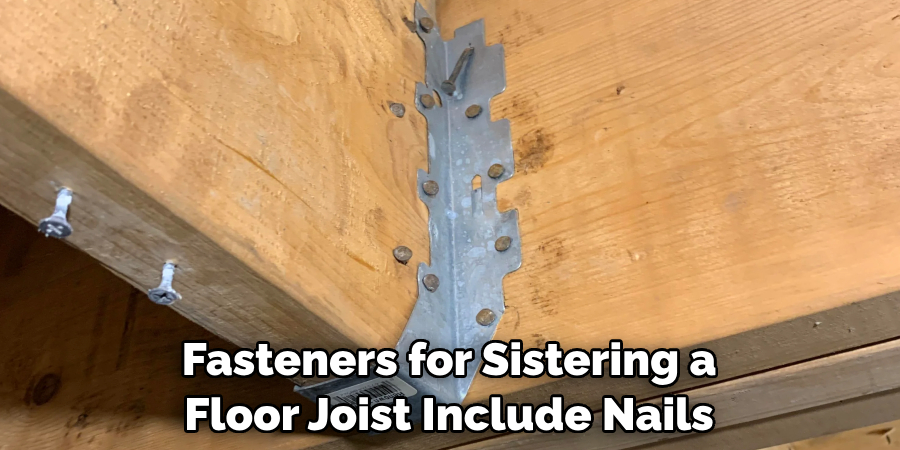
Fasteners
Commonly used fasteners for sistering a floor joist include nails, screws, or structural metal connectors such as joist hangers. The type of fastener chosen should be appropriate for the materials being used and be able to provide sufficient strength and support.
Tools
Depending on the materials and fasteners being used, the tools needed for sistering a floor joist may vary. However, some essential tools include a circular saw or hand saw, drill, hammer, and measuring tape. It is also recommended to have safety equipment such as goggles and gloves.
11 Step-by-step Guidelines on How to Sister a Floor Joist
Step 1: Prepare the Area
Ensure the area is clear of any furniture or obstructions, allowing for easy and safe access to the floor joists. It may also be helpful to cover the floor with a drop cloth or plastic sheeting to protect it from any debris or damage. You may also want to set up a work table nearby to hold your tools and materials. But make sure it doesn’t interfere with your work area. There should be enough space for you to move around comfortably. You can also wear knee pads to protect your knees.
Step 2: Locate the Weakened Joist
Identify the weakened or damaged joist that needs to be sistered. This will usually be the one visibly showing signs of damage, such as sagging or splitting. If you are unsure, this may require further inspection by a professional. But it’s always best to err on the side of caution and sister all the joists in a particular area if possible. Although it may require more materials and time, this can provide additional support and prevent future issues. The next steps will assume that you have identified the specific joist to sister.
Step 3: Measure the Existing Joist
Measure the length and width of the existing joist to ensure you get a sister joist of the same size. It is crucial that both joists are the same size to provide even support for the floor. You can also use a chalk line to mark the location of the joist on the floor, making it easier to place the new joist accurately.

You may also want to mark the center and ends of the existing joist to help with placement. It’s best to use a pencil for marking so it can be easily erased later. It is also important to note the direction of the floor joists as you will need to place your sister joist parallel to them.
Step 4: Prepare the Sister Joist
Cut the sister joist to the appropriate length, either using a circular saw or a hand saw. If using a circular saw, be sure to set the blade depth only slightly deeper than the thickness of the joist to avoid cutting into the subfloor or ceiling. Use a measuring tape and square to ensure accurate cuts. But remember to make a test cut on scrap wood first before cutting the actual joist.
You can also sand or plane the edges of the sister joist to ensure a snug fit. If the sister joist is longer than needed, you can trim it later. The key is to make sure you have a sister joist with the exact same specifications as the existing one.
Step 5: Apply Construction Adhesive
Apply construction adhesive to one side of the new joist, spreading it evenly over the surface using a putty knife. This will help bond the two joists together and provide additional support. For larger joists, you may want to apply adhesive on both sides. You can also use adhesive caulk if preferred. But make sure to use a strong and durable adhesive suitable for the materials you are using. Although not necessary, this step can further strengthen the sistered joist. You can also consider using adhesive tape for additional reinforcement.
Step 6: Place the Sister Joist
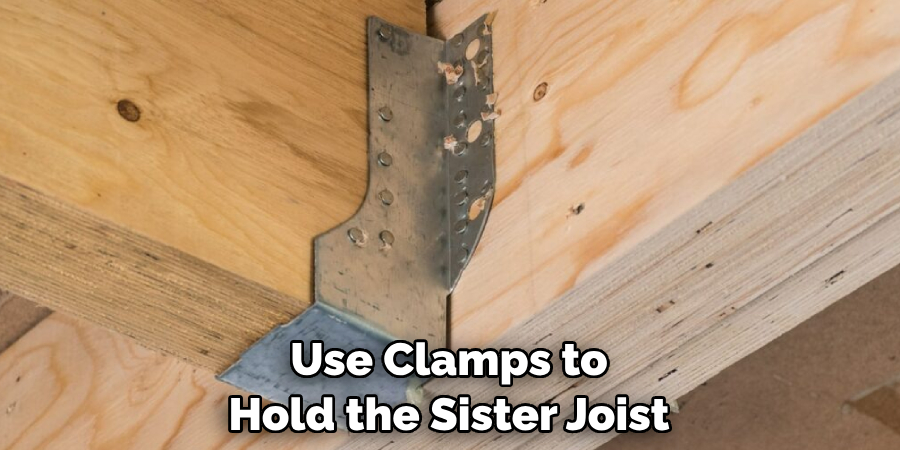
Carefully lift and place the sister joist next to the existing joist, lining up the ends and center with your marks. If using a circular saw earlier, make sure to avoid cutting through any nails or screws that may be present in the subfloor. You may want to use clamps to hold the sister joist in place while securing it.

It’s best to have someone assist you with this step, especially if working with longer joists. But if working alone, use temporary support such as a stack of wood blocks to prop up the sister joist while securing it. The sister joist should be flush with the existing joist.
Step 7: Secure the Sister Joist
Using appropriate fasteners, secure the sister joist to the existing joist. The type and spacing of the fasteners may vary depending on the materials being used and the size of the joists. Commonly used methods include using nails or screws through both joists or using structural metal connectors such as joist hangers.
It is crucial to follow the manufacturer’s instructions and use the correct size and type of fastener for optimal strength and support. It may also be helpful to have someone assist you with this step, especially when working with longer joists. The sister joist should now be securely attached to the existing joist.
Step 8: Secure the Ends
If sistering a floor joist that spans over multiple supports, it is necessary to secure the ends of the sister joist to each support. This will ensure an even distribution of weight and prevent sagging or bowing. You can use the same method as securing the joist to the existing joist, using appropriate fasteners such as nails, screws, or structural metal connectors.
You may also want to use clamps or temporary supports to hold the sister joist in place while securing the ends. But make sure to remove them once the fasteners are in place. You can also use construction adhesive for additional reinforcement. It is crucial to follow the manufacturer’s instructions and use the correct size and type of fastener for optimal strength and support.
Step 9: Trim the Sister Joist
If the sister joist is longer than needed, you can now trim it using a circular saw or hand saw. Make sure to cut the excess evenly on both ends for a clean finish. If necessary, you can also sand or plane the edges of the sister joist to ensure a smooth and level surface. But be careful not to remove too much material, as this can weaken the strength of the joist. It’s best to make small adjustments at a time and test the fit before making any final cuts.
The sister joist should now be securely in place, providing additional support to the weakened or damaged joist. You can now proceed with any necessary repairs to the subfloor or ceiling before removing the drop cloth and cleaning up your work area.
Step 10: Clean Up
Remove any debris or sawdust from the area and dispose of it properly. You may want to sweep or vacuum the floor to ensure it is clean before replacing any furniture or belongings. It’s also a good idea to inspect the surrounding joists for any signs of damage or weakness and make necessary repairs as needed.
The sister joist should now be fully installed and provide additional support to the floor. Congratulations, you have successfully sistered a floor joist and prevented future issues with your flooring. Remember to always prioritize safety and seek professional help if needed when dealing with structural repairs.
Step 11: Consider Additional Support
If you notice that multiple joists in the area are weakened or damaged, it may be a sign of larger structural issues. In this case, it’s best to consult a professional for a thorough inspection and possible solutions. They may recommend additional support methods such as adding steel beams or reinforcing existing joists with brackets. It’s always better to address any underlying issues before they become larger and more costly problems in the future. Regular maintenance and inspections of your home’s structure can help prevent major repairs down the road.

Following these steps on how to sister a floor joist and considering additional support options can help ensure your floors remain strong and sturdy for years to come. Don’t ignore signs of damaged or weakened joists, as they can lead to more significant issues with your flooring and potentially compromise the safety of your home. With proper maintenance and repairs, you can maintain a safe and comfortable living space for yourself and your family.
Tips for Ensuring a Successful Sistering Process
- Always Use High-quality Materials and Tools for the Best Results.
- Measure Twice Before Making Any Cuts or Adjustments to Ensure Accuracy.
- Use Appropriate Safety Gear, Such as Gloves and Goggles, When Handling Power Tools.
- Seek Professional Help if You Are Unsure About Any Steps in the Process or Encounter Unexpected Issues.
- Regularly Inspect Your Home’s Structure and Address Any Potential Issues as Soon as Possible.
- Don’t Ignore Signs of Damage or Weakness in Floor Joists, as They Can Lead to More Significant Problems if Not Addressed Promptly.
By following these tips and the steps outlined in this guide, you can successfully sister a floor joist and maintain the structural integrity of your home’s flooring.
Common Challenges and Troubleshooting Tips
- If the Sister Joist Does Not Fit Snugly Against the Existing Joist, Check for Any Warping or Unevenness in the Materials. You May Need to Sand or Plane Down Certain Areas to Achieve a Better Fit.
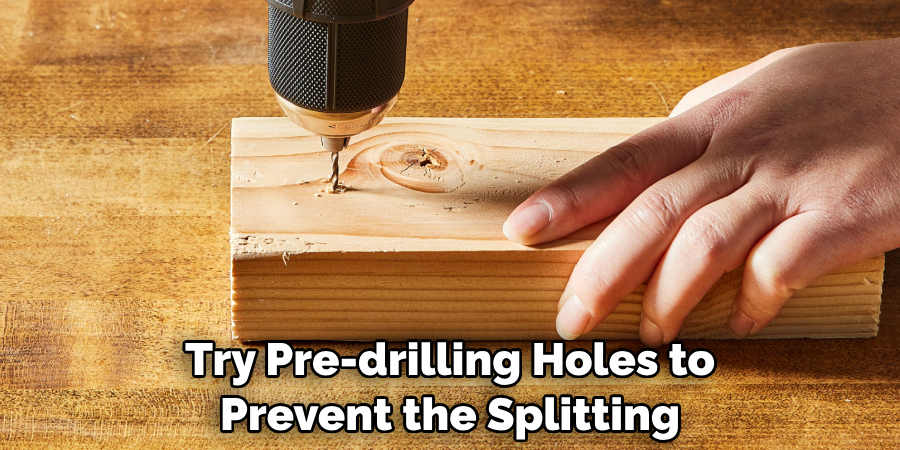
- If Fasteners Are Not Staying in Place, Make Sure You Are Using Appropriate and High-quality Fasteners. You Can Also Try Pre-drilling Holes to Prevent the Splitting of the Wood.
- If You Encounter Unexpected Issues or Difficulties, Do Not Hesitate to Seek Professional Help for Guidance and Assistance. It’s Better to Have an Expert Inspect and Address Any Potential Structural Problems Than Risk Causing Further Damage.
- Regular Maintenance and Inspections Can Help Detect Issues Early On and Prevent More Significant Repairs in the Future. Make It a Priority to Keep Your Home’s Structure Strong and Safe.
Keep these tips in mind while sistering floor joists, and always prioritize safety first.
Alternative Methods for Reinforcing Floor Joists
- If the Sister Joist Method Seems Too Complex or Time-consuming, You Can Also Consider Using Steel Brackets or Strapping to Reinforce Weakened or Damaged Joists. However, This Method May Not Be as Effective in Distributing Weight and Preventing Sagging Over Time.
- Another Alternative Is Installing Additional Support Beams Underneath the Affected Area of the Floor. This Can Be More Costly and Requires Professional Help, but May Be Necessary for Very Weak or Damaged Joints.
- For Older Homes, You May Want to Consider Upgrading Your Flooring System to a Modern Truss or I-Beam System. This Can Provide Better Support and Stability in the Long Run. However, It Is a Major Renovation Project That Requires Professional Help and Significant Cost.
Consider these alternative methods carefully and consult with a professional before making any decisions for your home’s structural repairs.
Frequently Asked Questions
Q: Can I Sister a Floor Joist on My Own?
A: Yes, you can sister a floor joist on your own as long as you have the necessary tools and knowledge. However, it is always recommended to seek professional help for larger or more complex projects.
Q: How Do I Know If My Floor Joist Needs to Be Sistered?
A: Signs of a weakened or damaged floor joist include sagging floors, visible cracks or splits in the wood, and squeaky noises. It’s also essential to inspect your floors regularly for any changes or issues.
Q: Can I Use Different Materials for the Sister Joist?
A: It’s best to use the same material as the existing joist for sistering. However, if that is not possible, you can use similar materials with a comparable load-bearing capacity. Consult a professional for specific recommendations on your project.
Q: How Long Will a Sister Joist Last?
A: The longevity of a sister joist depends on various factors such as the materials used, load capacity, and environmental conditions. With proper installation and maintenance, a sister joist can last for many years. Always inspect and address any issues with your flooring promptly to prevent further damage and prolong the life of the sistered joist.
Q: How Do I Determine the Length of the Sister Joist Needed?
A: Measure the length of the damaged or weakened section of the existing joist and add a few inches for overlapping, usually around 12-18 inches. It’s always better to err on the side of caution and have a longer sister joist than necessary.
Conclusion
Sistering floor joists is a highly effective method for restoring the strength and stability of your home’s flooring. By carefully following the process of selecting the right materials, preparing the existing joist, and attaching the sister joist securely, homeowners can tackle this project with assurance.
While it may seem daunting at first, understanding the fundamentals of sistering joists empowers homeowners to extend the lifespan of their home’s structure and address potential issues before they escalate. Always remember for complex or extensive damage, consulting with a professional is recommended to ensure the safety and integrity of your home’s construction. Thanks for reading this article on how to sister a floor joist.