
Winter can be both a beautiful and daunting season, filled with cozy fires and icy weather. Winter is here, and it’s time to get our sliding doors ready for the colder temperatures and icy weather. Whether you live in an area where winter means lots of snowfall or mild temperatures, you’ll need to take precautions to protect your home from the elements.

One important item on that checklist is winterizing sliding doors—these wide openings often become drafty as thermal windows are exposed to cooler air outdoors.
In this blog post, we’ll show you simple steps on how to winterize a sliding door to get your door ready for chilly weather while also making sure it remains secure. Read on for advice about how to tackle this task quickly—so you can sit back and enjoy all that winter has to offer! In this article, we’ll explore exactly how to accomplish this in an easy-to-follow format!
What is Winterizing?
Winterizing is the process of preparing your sliding doors for cold weather. This includes installing insulation, caulking, and weatherstripping seals to protect against drafts and other elements like moisture. The goal is to keep your interior warm during the coldest months of the year while also keeping any water or debris out at the same time.
Things to Keep in Mind When Winterizing a Sliding Door
1. Safety
When winterizing a sliding door, there are some things to keep in mind. First and foremost is safety. If you are not familiar with the proper installation of sliding glass doors, it is best to contact a professional for assistance. Additionally, be sure to use the correct tools and materials when handling any repairs or maintenance on your door.

2. Type of Door
Before winterizing, you’ll need to identify the type of sliding door you have. Is it an aluminum frame? A vinyl frame? Or a wood frame? Knowing this information will help you select the right materials for sealing and insulation.
3. Weatherstripping
One of the most important steps in winterizing your sliding door is weatherstripping. It’s a good idea to use a flexible foam or vinyl-type weatherstrip around the door frame. This will help keep outdoor drafts from entering your home. Additionally, you should also add insulation between the glass and frame of the door in order to maintain an even temperature inside the house.
Keeping your sliding door weatherized can be a relatively simple process that will help keep your home warm and save on heating costs. Follow these steps to ensure your sliding glass door is ready for winter!
Materials Needed
Before you begin, make sure you have all the necessary materials. You’ll need:
- Insulation
- Weatherstripping sealant
- Caulk
- Tape measure
- Utility knife or scissors
- Putty knife or scraper
- Masking tape
- Sponge and bucket of warm water
10 Steps on How to Winterize a Sliding Door
Step 1: Measurement
Measure the width and height of your sliding door. Also, measure the size of the gap between the door and frame. Take note of all these measurements and write them down for easy reference.

Step 2: Cleaning
Clean off any debris from around the sliding door frame. Remove any dirt, dust, or cobwebs that may be present. Use a wet sponge dipped into warm, soapy water and gently wipe down the frame.
Step 3: Insulating
Cut a piece of insulation to fit the size of your sliding door frame. Make sure it is slightly larger than the gap so that when placed in, there will be a snug fit. Securely attach the insulation in place with masking tape or strong adhesive strips.
Step 4: Caulking
Using a caulking gun, run a thin line of caulk along the edges of the sliding door frame. This will provide an additional layer of protection against moisture and drafts. Let the caulk set for 24 hours to ensure proper adhesion.
Step 5: Weatherstripping
Once the insulation and caulk are in place, you’ll need to apply weatherstripping sealant. Cut a strip of sealant to fit the size of your sliding door frame. Gently press the sealant into each side of the frame and ensure that it is firmly in place.
Step 6: Check & Adjust
Check all corners and edges to make sure everything is in place. If there are any gaps or uneven areas, apply more caulk and sealant as needed. Checking and adjusting can help to ensure that your sliding door is as secure as possible.
Step 7: Testing
Once you’ve finished, give the door a test run. Open and close it several times to make sure everything is working properly. Make any adjustments necessary before securing the door in place for winter.

Step 8: Secure
To ensure that your sliding door is secure, you’ll need to use a latch or lock system. This will help to keep the door closed even on windy days. Choose the best type of security for your home and install it according to the manufacturer’s instructions.
Step 9: Inspect
Periodically inspect your sliding door throughout the winter season. Make sure that all seals and locks are still in place and that no drafts or moisture is getting through. If you notice any issues, address them immediately to avoid costly repair costs down the line.
Step 10: Enjoy
You’ve taken the necessary steps to winterize your sliding door—now it’s time to enjoy the fruits of your labor. Sit back and relax, knowing that you’ve done all that you can to protect your home from the elements this winter!
Now that you know how to winterize a sliding door, what are some other projects you’re planning for winter? Let us know in the comments below! We’d love to hear from you.
8 Maintenance Tips
It is important to keep your sliding door in top condition all year round. Here are 8 tips you can use to winterize a sliding door:
- Clean and inspect the tracks. There may be debris or dirt that needs to be removed from the tracks for smooth operation. Perform regular inspections of the track and clean it when necessary.
- Lubricate moving parts. Use a lubricant such as 3-in-1 oil and apply it to the metal tracks and rollers of the sliding door. Lubrication helps prevent them from rusting and will keep them operating smoothly.
- Check weatherstripping. Make sure that the weatherstripping around the door is intact, unbroken, and sealed properly. If it is cracked, worn out, or missing, replace it with new weatherstripping to keep cold air from entering your home.
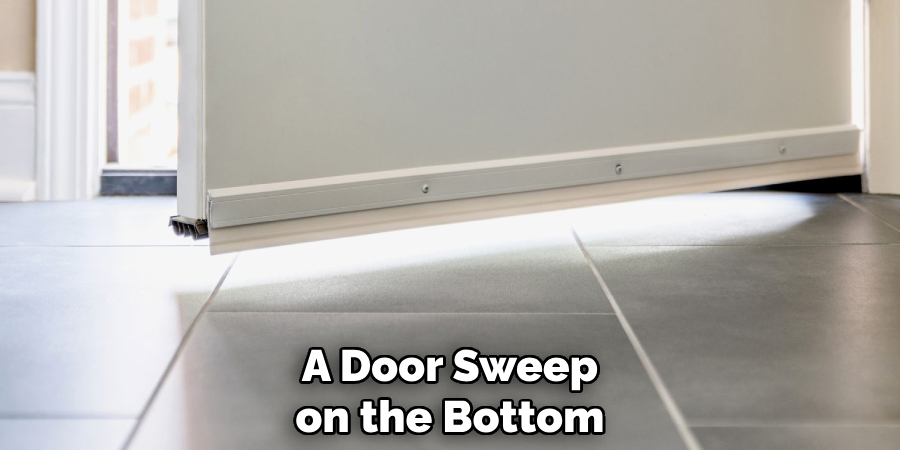
- Install a sweep. A door sweep on the bottom of the sliding door will help prevent drafts and provide an extra layer of insulation for your home. sweeping will help to keep out dust, dirt, and vermin as well.
- Apply caulk or sealant. Check around the edges of the sliding glass door for any gaps that could be letting in cold air. Apply a sealant or caulking to ensure there is no air infiltration.
- Install a threshold. A threshold or door bottom seal will help to keep cold air out and warm air in. This can be easily installed by following the instructions included with the product.
- Check the lockset and deadbolt. Make sure these are functioning properly and that they are secure when locked, replace them if necessary.
- Add a storm door. Installing a storm door over the sliding glass door will provide an extra layer of insulation and protection from drafts. It also adds an extra level of security to your home.
These tips will help you winterize your sliding door so that it is in top shape all year round. Following these simple steps will ensure that you have a warm and cozy home throughout the winter season.
Additionally, be sure to check the manufacturer’s instructions on how to winterize a sliding door for your particular door to ensure proper installation and maintenance. When in doubt, contact a professional to help you with any issues you may have. With these simple steps, you can be sure that your sliding door is ready for the cold weather ahead.
Conclusion
With these simple steps and tips on how to winterize a sliding door, you can now winterize your sliding door or patio with ease. By making these small yet effective changes, you’ll enjoy a secure, draft-free and energy efficient system that not only saves you money and helps to conserve energy but also offers comfort throughout the chillier months ahead. So why wait?
Get started today! If you do run into any issues along the way, don’t be afraid to seek professional help from an expert. They can provide direction and additional tips to get the most out of your new winterized sliding door or patio. Winterizing doesn’t have to be a daunting task if it’s done correctly, so take the time to really make sure all of the necessary steps are completed in order for your project to turn out successful.