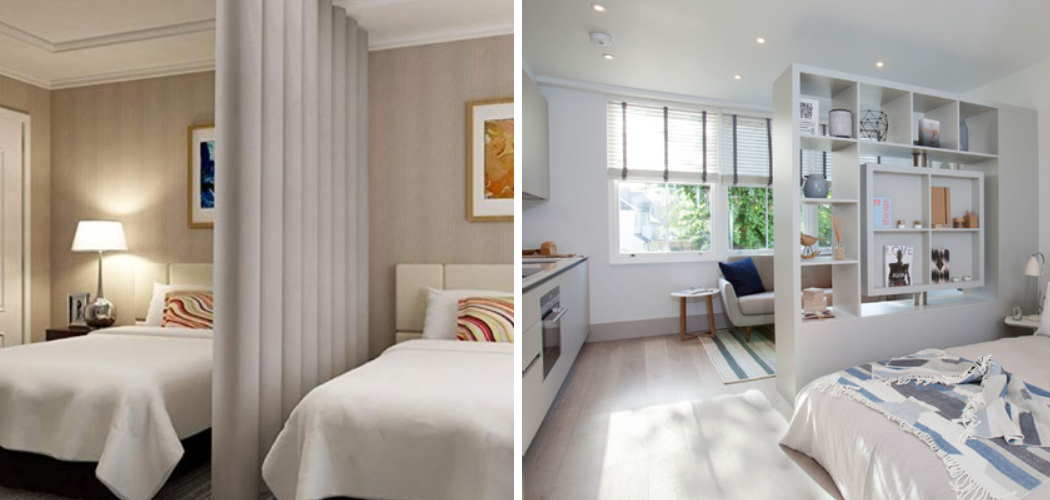
Do you have an extra bedroom in your home that is currently going unused? If so, did you know it can be transformed into a comfy, inviting extra living space? All it takes is some creativity and craft supplies to split the bedroom into one side as a cozy sitting room and the other as an office or guest room.

Splitting the room in half and creating two separate living areas could be the ideal solution. By decorating it cleverly, even a modest-sized space can become much more efficient and comfortable; thus, allowing you to make use of every inch of your bedroom easily!
In this blog post, we will provide some useful tips on how to split a bedroom into two. Keep reading for all our top tricks to making both spaces feel cozy and inviting – without breaking the bank.
What Will You Need?
To effectively split a bedroom into two, your supplies list should include the following:
- Tape measure
- Drywall screws and anchors
- Hammer
- Jigsaw or power saw
- Drill bits
- Wall stud finder
- Level
- Studs (2×4) and lumber
- Nails and a hammer
- Drywall sheetrock, joint compound, and mud
- Paint or wall covering of choice
Once you have gathered all the necessary supplies, it’s time to get started!
10 Easy Steps on How to Split a Bedroom Into Two
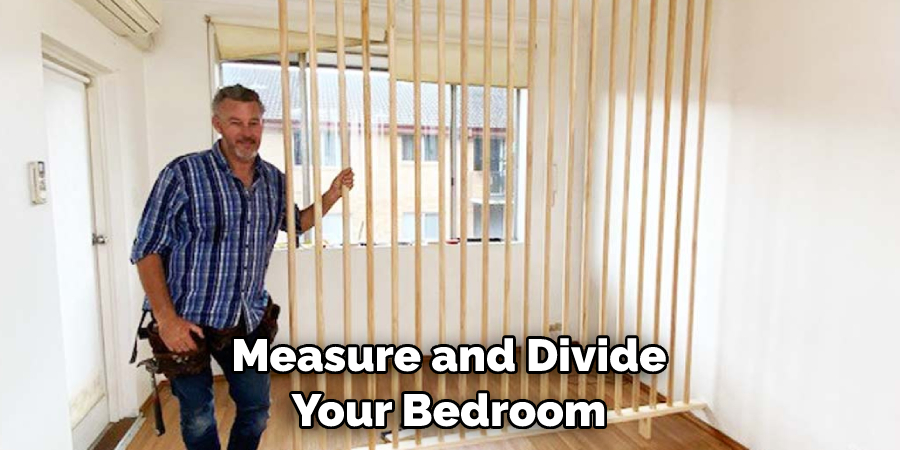
Step 1: Measure and Divide
The first step is to measure and divide your bedroom. Use a tape measure to determine your room’s exact width and length, then map out where you want to separate it with a line or piece of tape. If the two halves are not of equal size, make sure that you take into account this discrepancy when measuring.
Step 2: Prepare the Walls
Next, use a stud finder to locate any wall studs that may be present in the area you wish to partition off. Once located, mark them with a pencil for easy reference later on. Don’t forget also to mark the floor and ceiling.
Step 3: Install Drywall Anchors
Now it’s time to install drywall anchors into the walls of the room. To do so, drill holes at least 1 inch deep into each marked wall stud. Then insert drywall screws into these holes until they are secure.
Step 4: Install Wall Supports
Next, install wall supports using 2×4 lumber and nails. Place the lumber behind the drywall anchors at a 45-degree angle to create a strong support system for your partition walls. Secure each one in place using both nails and drywall screws.
Step 5: Cut Sheetrock
Once you have installed the wall supports, it’s time to cut your sheetrock to size. Using either a jigsaw or a power saw, carefully measure and cut your sheetrock in accordance with the dimensions of your room’s layout. Make sure to wear safety glasses while doing this step!

Step 6: Attach Sheetrock
Now that you have prepped the walls and cut your sheetrock, you are ready to attach it. Use a hammer or drill to secure the drywall into place against the wall supports. Ensure that each piece is securely fastened to create an even surface all around.
Step 7: Install Trim
Once your sheetrock is attached, use trim pieces or molding to give your partition walls a professional finish. Secure these pieces using nails and then caulk any gaps or seams between them once everything is in place. Be careful to use a level when installing the trim pieces for the best results.
Step 8: Tape and Mud
Now you are ready to tape and mud the seams of your partition walls. Apply joint compound along the edges of each seam with a putty knife, then apply drywall tape over the top. Allow the joint compound to dry completely before proceeding to the next step.
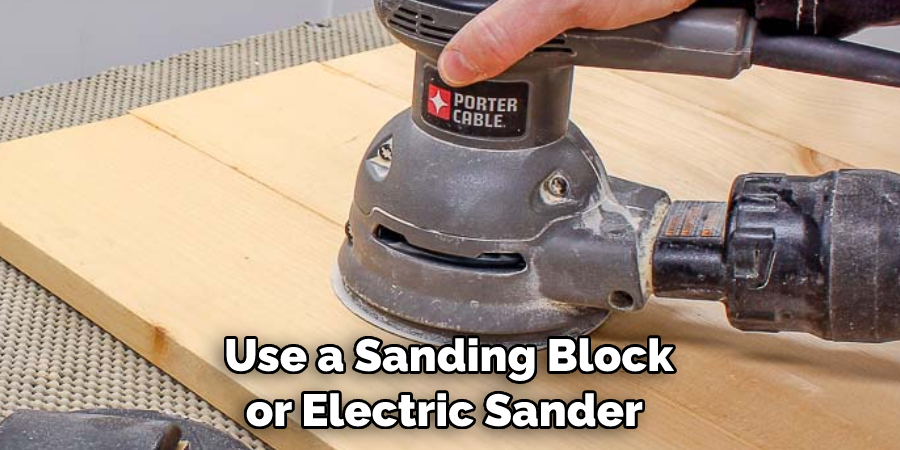
Step 9: Sand and Paint
Once your walls are securely taped and mudded, use a sanding block or electric sander to smooth them out as much as possible. When complete, apply a coat of paint or wall covering of your choice for an even finish. Try to find something that will complement your room’s existing walls and décor.
Step 10: Add Accessories and Finishing Touches
The final step in splitting your bedroom into two is to add the finishing touches – such as furniture, rugs, curtains, lighting fixtures, etc. Once everything is in place, you’ll be ready to enjoy your brand-new living space! Remember, don’t forget to include storage solutions such as shelves, dressers, and cupboards for optimal use of space!
Following these simple steps, you can easily transform your room into two separate, unique living areas. Whether you’re looking for extra space or just want to add some character to your home, this project is sure to make a big impact. So get started today and watch as your bedroom transforms before your eyes!
5 Additional Tips and Tricks
- Consider the size of the bedroom. If it’s too small, you may need to get creative in your design to maximize space.
- Choose a layout that makes sense for both sides of the room; try to avoid creating awkward corners or separate areas that don’t flow together easily.
- Make sure to use furniture and other decor items that can be shared between both sides. This will help to create a sense of unity and cohesion within the room.
- Utilize creative storage solutions to keep the clutter at bay when splitting a bedroom into two.
- Add small touches, like matching bedding or artwork, to give each side its unique personality while maintaining a cohesive theme throughout the room. Splitting a bedroom into two doesn’t have to mean sacrificing style for functionality!
By following these tips and tricks, you’ll easily be able to turn any bedroom into two separate spaces that are both stylish and space-efficient.
5 Things You Should Avoid
- Avoid using too many partitions or walls to create separate spaces. This can make the room feel cramped and divided.
- Don’t use furniture that makes one side of the room look significantly larger than the other; this will cause an imbalance in the design.
- Refrain from creating two completely different styles for each side of the room; it should still have a cohesive, unified theme throughout.
- Don’t forget about lighting! Ensure both sides are well-lit with natural light and artificial fixtures so they don’t feel too dark or gloomy.
- Steer clear of leaving large gaps between furniture pieces; this can lead to drafts and other uncomfortable situations when sleeping or relaxing in the bedroom.
By avoiding these design mistakes, you’ll create a beautiful and functional split bedroom that you and your family can enjoy. With the right planning and creativity, splitting a bedroom into two doesn’t have to be a daunting task!
What is the Cheapest Way to Divide a Room?
The cheapest way to divide a room is to use furniture pieces, curtains, or rugs to create distinct areas within the room. This can help create two separate spaces without building walls or installing doors. You can also try hanging fabric dividers from the ceiling for greater privacy and soundproofing.
Additionally, consider using large area rugs or carpets to define each individual space; this will make it easy to move furniture around and customize each side of the split bedroom. Lastly, look for affordable storage solutions like shelves and bins that can help visually divide the room.

By following these tips and tricks, you’ll be able to divide a room inexpensively while still maintaining your desired style and functionality.
How Can You Expand Small Room?
If you’re looking to expand a small room, there are a few things you can do. The first is to maximize the available space using furniture and storage solutions that can double as both seating and shelving. This will help keep clutter off of the floor and help create more usable space in the room.
You can also utilize vertical space by installing shelves or wall-mounted cabinets; this will free up some floor area while still providing ample storage for all your essentials. Additionally, consider rearranging the layout of the furniture pieces; this will give the illusion of a larger area even if it’s not actually increasing in size.
Finally, try adding mirrors or reflective surfaces throughout the room, as this will help make it feel brighter and airier. By following these tips, you’ll be able to make a small room feel bigger without breaking the bank!
Conclusion
Splitting a bedroom into two separate areas can help to transform any living space from cramped and confined to spacious and inviting. Though you’ll need to invest time, effort, and resources to make the division happen, it’s worth it when your bedroom is cleanly split into two distinct and enjoyable parts.
As you contemplate all of this material, consider adding a custom-crafted item to the room’s look as well – something original and unique that reflects your own personal style.
With the merging of two halves into one cohesive whole, you can create a pleasant atmosphere that will be relaxing and visually appealing for years to come.
With creative solutions like this at our disposal, there’s no reason why any room should stay small or cluttered forever! Hopefully, the article on how to split a bedroom into two has been helpful in beginning your own successful project. Best of luck!