
Rockwool insulation is a great choice for any home or commercial building. It provides excellent soundproofing and thermal insulation, so it can make a significant difference in reducing energy costs while creating a quiet, comfortable environment. Rockwool is also highly fire-resistant, making it ideal for installation in ceilings where potential fires may be a concern.
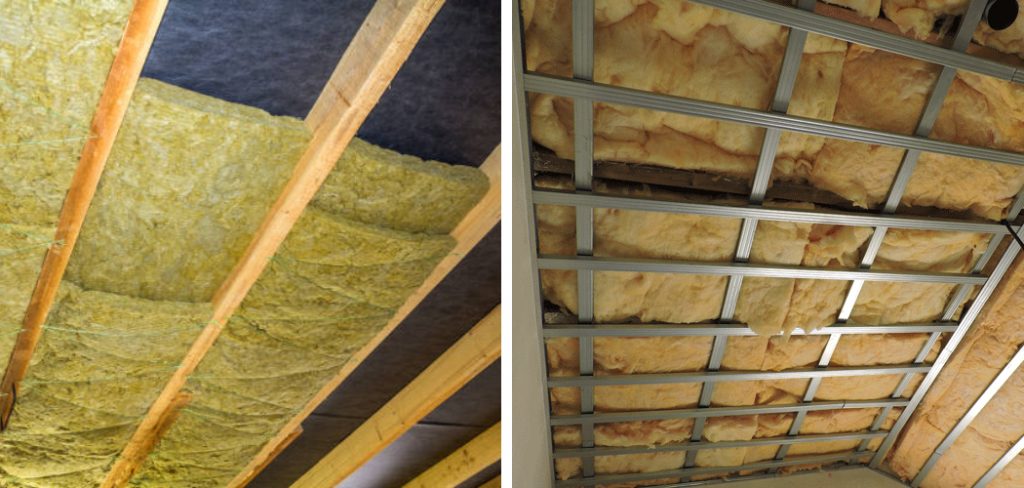
Rockwool insulation has many advantages for ceiling installation. It is particularly effective in reducing noise and improving soundproofing, as it absorbs sound within the fabric of the material. Rockwool insulation also offers excellent thermal performance, helping to keep your home warm in winter and cool in summer.
In addition, it is non-combustible and moisture-resistant, making it a fireproof and waterproof insulation solution. In this blog post, You will learn in detail how to install rockwool insulation in ceiling.
Tools You Will Need
- Safety goggles
- Work gloves
- Dust mask
- Tape measure
- Utility knife
- Level
- Caulking gun and sealant
- Electric drill and bits
- Pneumatic stapler or nail gun
- Chalk line
- Pry bar or crowbar
- Hammer.
Step by Step Processes for How to Install Rockwool Insulation in Ceiling
Step 1: Inspect the Area
Before you start installing Rockwool insulation in the ceiling, it is important to check for any existing damage or deterioration that could be present. This includes checking for cracks, holes, or other signs of structural decay that can compromise the insulation’s performance.
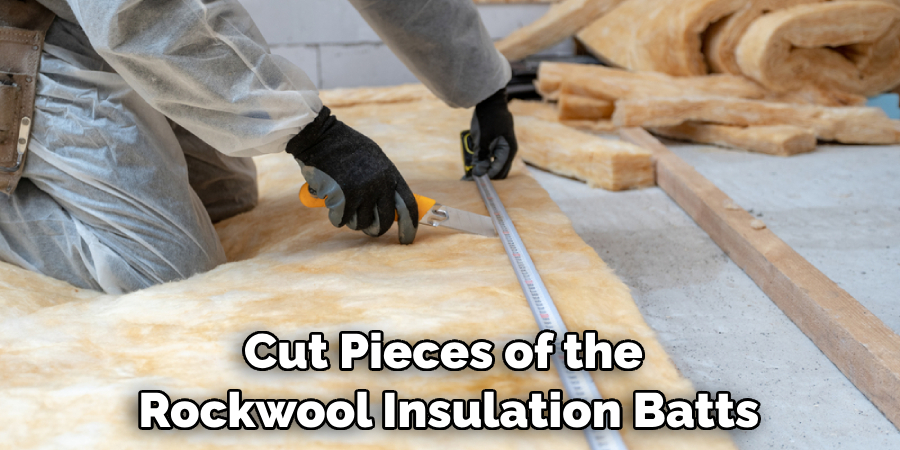
Step 2: Measure and Cut Insulation Batts
Cut pieces of the Rockwool insulation batts based on your measurements to fit the desired space. Make sure to leave an extra 1/2 inch of insulation for compression. Carefully place each insulation piece into the ceiling cavity, ensuring they are all flush and evenly spread out.
Step 3: Secure with Fasteners
Use screws or staples to secure the insulation batts in place. Ensure they are firmly secured so that there is no shifting or movement when the ceiling is loaded with weight. Place a vapor barrier over the insulation and secure it using tape or spray adhesive. This will help protect the insulation from moisture and minimize energy loss.
Step 4: Seal Around Any Openings
If there are any openings, such as wiring or ducts, it is important to seal them off with caulk or expanding foam insulation to reduce air leakage. Measure and cut the insulation batts into appropriate pieces that fit the desired space.
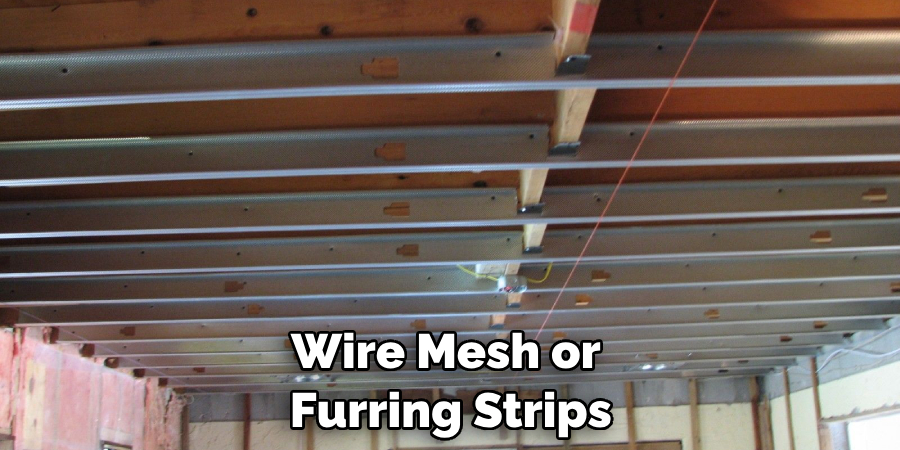
Step 5: Install Insulation Support System
Install an insulation support system such as wire mesh or furring strips to hold up the insulation if needed. Make sure it is securely fastened into place. Once all of the insulation is in place, cover it up with drywall to create a finished look.
Step 6: Check for Air Leaks
Finally, inspect all around the space to ensure there are no air leaks or openings that could compromise the insulation’s performance. Make any necessary repairs to ensure the insulation is airtight.
Using these steps, you can easily install Rockwool insulation in your ceiling and enjoy its benefits! This type of insulation provides superior thermal protection, soundproofing, and moisture control for a comfortable and energy-efficient home environment.
Safety Tips for How to Install Rockwool Insulation in Ceiling
- Wear the appropriate protective gear, such as safety glasses, dust masks, and gloves, when handling and installing Rockwool insulation.
- Rockwool is made of rock and can be sharp; wear long sleeves and pants to avoid any potential injury from its edges.
- Ensure that the area is free from moisture before installation. This will prevent the Rockwool from absorbing any moisture that can lead to mold growth.
- Accurately measure and cut the Rockwool to fit the installation area before laying it down on the surface.
- Make sure that all surfaces are clean and debris-free before installing Rockwool insulation so as not to trap any dirt between the insulation and surfaces.
- Avoid exposing Rockwool insulation to direct sunlight, as this may lead it to become brittle over time.
- Install Rockwool insulation correctly following instructions provided on its packaging or contact professional installers for assistance if needed.
By following these basic safety tips, you can ensure that the installation of Rockwool insulation in your ceiling is done right and without any issues. Doing so will guarantee a safe and sound insulated environment for years to come.
Are There Any Special Guidelines for Cleaning and Maintenance of Rockwool Insulation?
Yes. Keeping your Rockwool insulation clean and well-maintained is important to ensure it is functioning properly. Here are some tips for cleaning and maintaining the insulation:
- Vacuum or remove large debris from the surface of the insulation before cleaning.
- Remove dust, dirt, and other particulates with a damp cloth or vacuum cleaner.
- Avoid using chemical cleaners on Rockwool insulation as it may degrade the material.
- Inspect your insulation regularly and ensure there are no gaps or weak spots where air can escape.
- Replace any damaged pieces of insulation to ensure optimal performance and efficiency.
- Ensure your insulation is not blocking vents or air intakes, as this could lead to an inefficient system.

By taking the proper steps to clean and maintain your insulation, you can ensure that it will last for years to come and continue performing effectively. If you have any questions about cleaning and maintaining Rockwool insulation in your ceiling, contact a professional for more information.
What Should Be Done if the Insulation Becomes Damaged or Needs to Be Replaced?
If the insulation becomes damaged or needs to be replaced, it is important to take the necessary steps to ensure that your home is safe and protected. A qualified professional should always install Rockwool insulation to guarantee that it has been installed correctly and is properly sealed. If any of the material appears noticeably worn, cracked, or deteriorated, it must be replaced.
Replacing Rockwool insulation can be a difficult and dangerous task because of its flammability, so it is important to take the necessary precautions. First, turn off all electricity in the area before beginning any work.
Then, carefully remove the old insulation from the ceiling and dispose of it according to local regulations. Be sure to wear protective clothing, goggles, and a dust mask during removal to avoid breathing in any of the particles.

Can Rockwool Insulation Improve Soundproofing in a Room?
Yes, Rockwool insulation can help improve soundproofing in a room. It is made from a special type of stone wool that is designed to reduce noise transmission through walls and ceilings.
It also has a high thermal resistance and low-density construction, so it provides excellent insulation properties. To install Rockwool insulation in the ceiling, you will need the following materials: a ruler, a circular saw, a hammer and nails, insulation panels, and caulking.
First, measure the dimensions of the ceiling with the ruler to determine how much material you will need. Then, cut the insulation panels to size using the circular saw. Ensuring that all measurements are accurate and that the pieces fit together perfectly is important.
Next, use hammers and nails to secure the Rockwool insulation panels to the ceiling joists. Ensure all seams between panels are sealed with caulking for maximum soundproofing efficiency.
Are There Any Health Risks Associated With Installing Rockwool Insulation?
Rockwool insulation is considered to be a safe material for home use. It doesn’t contain any hazardous substances, and its fibers are not known to cause irritation or health concerns when handled correctly.
However, it is always recommended to wear safety equipment when installing Rockwool insulation, such as protective eyewear, gloves, and a respiratory mask. This is to prevent contact with the small fibers that may come loose during installation and to minimize exposure to dust particles in the air.
Once installed, Rockwool insulation does not pose any health risks and can be safely enjoyed by residents of any home or building it is used.
It is important to note that Rockwool insulation is not fire retardant and should never be used when it comes into contact with open flames or other ignition sources. However, Rockwool insulation can provide excellent soundproofing properties and contribute to a comfortable indoor environment.
Is Diy Installation of Rockwool Insulation Safe and Effective?
The answer to this depends on your own skill level and experience. If you are comfortable completing DIY tasks around the home, then there is no reason you can’t install Rockwool insulation yourself in the ceiling.
However, if you’re not confident in your abilities or don’t have much experience in home improvement projects, it is best to employ the services of a professional. Many safety precautions must be taken when installing Rockwool insulation in the ceiling. For example, you need to wear protective gear such as gloves and goggles and have proper ventilation throughout the area where you will be working.
Additionally, because of the dense nature of Rockwool insulation, you must be extra careful when handling it to avoid any potential health risks.
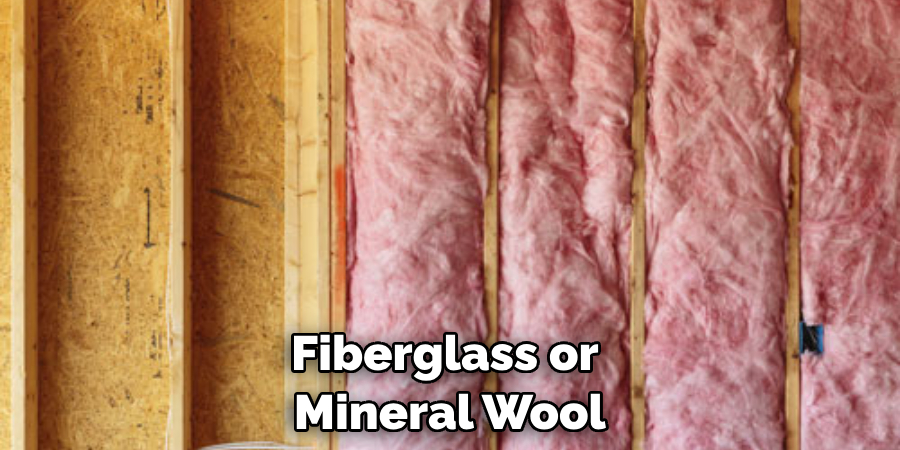
In terms of effectiveness, proper installation of Rockwool insulation will provide superior sound and heat insulation compared to cheaper materials such as fiberglass or mineral wool. It is also less prone to settling over time which can cause draughts and reduce the insulation effectiveness.
Importance of How to Install Rockwool Insulation in Ceiling
- Keeping Your Home Warm: Installing rock wool insulation in the ceiling helps to keep your home warm during cold months, as it traps air within its fibers and prevents it from leaking out of the room or house.
- Reducing Noise Levels: The dense material used to make Rockwool absorbs sound waves, helping to reduce the noise levels in a room or house.
- Insulating from Fire: Rockwool is fire-resistant, making it an excellent choice for areas of the home that may be at risk of catching fire. It can help protect against heat and flames, keeping you and your family safe.
- Saving on Energy Costs: Installing insulation in the ceiling helps to keep your home more energy efficient, reducing the amount of money spent on heating and cooling costs.
- Improving Indoor Air Quality: Rockwool is non-toxic and contains no hazardous materials, making it a safe choice for improving air quality in your home.
- Increasing Home Value: Installing rock wool insulation can improve energy efficiency and lower utility bills, making it a great choice for increasing the value of your home when it comes time to sell or rent.
Rockwool insulation is an excellent choice for many home improvement projects, and installing it in the ceiling is an effective way to keep your home warm, reduce noise levels, insulate against fire, save on energy costs, improve indoor air quality, and increase the value of your home.
Conclusion
In conclusion, installing rock wool insulation in your ceiling is a great way to ensure that you save energy and money while also maintaining the comfort level of your home. By following these simple steps, you can quickly install rock wool insulation and ensure your ceiling will be properly insulated for years to come.
This type of insulation is also fire-resistant, making it a safe and sound choice for your home. As long as you take the proper precautions when installing rock wool insulation in your ceiling, you can rest assured that your home will be comfortable and energy-efficient year-round.
I hope this article has been beneficial for learning how to install rockwool insulation in ceiling. Make Sure the precautionary measures are followed chronologically.