Enhancing the aesthetic appeal of your living spaces can often be achieved with simple yet impactful additions, such as a ceiling medallion.

This decorative element, traditionally used to add elegance and architectural interest, is a focal point above chandeliers or ceiling fans. By selecting a medallion that complements the style of your room, you can elevate the overall ambiance of your space.
Whether you’re aiming for classic, modern, or eclectic decor, the right ceiling medallion can seamlessly integrate with your existing interior design, providing an understated yet sophisticated touch.
The beauty and elegance of a ceiling medallion can only be fully appreciated when it is correctly installed. Knowing how to install a ceiling medallion is crucial, as improper installation can lead to uneven placement, potential damage to your ceiling, or even the medallion falling off, posing a risk to safety.
Proper installation techniques ensure that the medallion securely adheres to the ceiling and aligns perfectly with the lighting fixture it frames. Utilizing the right tools, adhesives, and fasteners while paying close attention to the specifics of your ceiling’s structure is key.
Not only will this ensure the stability and longevity of the medallion, but it will also enhance its decorative effect, ensuring it complements the room as intended. Whether you’re a seasoned DIY enthusiast or a novice in home improvement projects, understanding the right approach to installing a ceiling medallion is a step towards achieving a beautifully finished space.
Understanding Ceiling Medallions
A. Overview of Medallion Styles and Designs
Ceiling medallions are available in many styles and designs, catering to diverse aesthetic preferences and architectural periods. From intricate traditional patterns reminiscent of classical architecture to sleek and simple modern designs for contemporary spaces, a ceiling medallion complements every type of interior décor.
Historically crafted from plaster, modern medallions are more commonly made from lightweight materials such as polyurethane, making them easier to install and maintain.
Designs range from geometric patterns and neoclassical motifs to custom designs that reflect personal styles and themes. The size of the medallion can also significantly impact the room’s look, with larger medallions making a bold statement in spacious rooms.
In contrast, smaller ones offer a subtle nod to architectural detail in more compact spaces. The choice of style, size, and design of a ceiling medallion can dramatically affect the ambiance of a room, serving as a central unifying element or as an accent piece that complements the existing decor.
B. Benefits of Installing a Ceiling Medallion
The benefits of installing a ceiling medallion extend beyond merely enhancing a room’s aesthetic appeal.

Firstly, ceiling medallions add value to your home by creating a sense of luxury and historical depth, making spaces feel more refined and thoughtfully designed. They can also be used to cleverly disguise imperfections or unsightly stains on the ceiling, especially around light fixtures, thereby saving on repair costs.
In addition to their decorative appeal, ceiling medallions can help to improve the light distribution in a room by creating a visual link between light fixtures and the surrounding space, making the area appear brighter and more inviting.
Installing a medallion is a relatively simple and cost-effective DIY project that can significantly impact the look and feel of a room.
Furthermore, ceiling medallions provide an economical solution that can be easily changed or updated over time for those looking to update their space without committing to extensive renovations. In essence, ceiling medallions offer both functional and aesthetic benefits, making them a worthwhile addition to any home improvement project.
How to Install a Ceiling Medallion: Preparing for Installation
A. Gathering Necessary Tools and Supplies
Before commencing with installing a ceiling medallion, preparing with the right tools and supplies is crucial to ensure a smooth and efficient process.
1. Tools for Cutting and Measuring
The precision of cutting and measuring directly impacts the alignment and fit of your ceiling medallion. Essential tools include:
- Tape Measure: For accurate measurement of the ceiling space and medallion diameter.
- Marker or Pencil: To mark drill points on the ceiling and outline areas on the medallion that may need trimming.
- Saw: A fine-toothed saw is ideal for cutting through the medallion material without causing splits or damage. In many cases, a handsaw will suffice, though a power saw can make quicker work of larger or thicker medallions.
- Drill and Drill Bits: For creating holes for screws or anchors in the ceiling. Ensure you have various sizes to match your mounting hardware.
- Level: To ensure the medallion is perfectly horizontal upon installation. An uneven medallion can throw off the balance of the room’s aesthetic.
2. Adhesives and Mounting Hardware
Choosing the right adhesive and mounting hardware is pivotal for a secure installation that lasts years without needing attention.

- Construction Adhesive: Opt for a high-strength adhesive designed for ceiling use, ensuring it’s compatible with both the medallion material and your ceiling. This will hold the medallion in place.
- Screws and Anchors: In addition to adhesive, using screws or anchors provides extra security, especially for heavier medallions. The type required will depend on your ceiling material (drywall, plaster, etc.).
- Painter’s Tape: Useful for holding the medallion in place while the adhesive dries.
Ensuring you have these tools and materials ready before starting will help streamline the installation process, reducing the risk of delays or issues arising from a lack of preparation.
B. Assessing Ceiling Structure and Compatibility
Before installing a ceiling medallion, it’s essential to assess your ceiling’s structure and compatibility with the medallion you’ve chosen. This step is crucial in preventing potential damage to your ceiling and ensuring the longevity of the medallion’s installation. Consider the following aspects:
- Material and Weight: Evaluate the ceiling material (drywall, plaster, etc.) and its ability to support the weight of the medallion, especially if opting for a larger or denser material.
- Ceiling Condition: Inspect the ceiling for any damage, cracks, or imperfections that could affect installation. Repairing any flaws beforehand will provide a stable base for the medallion.
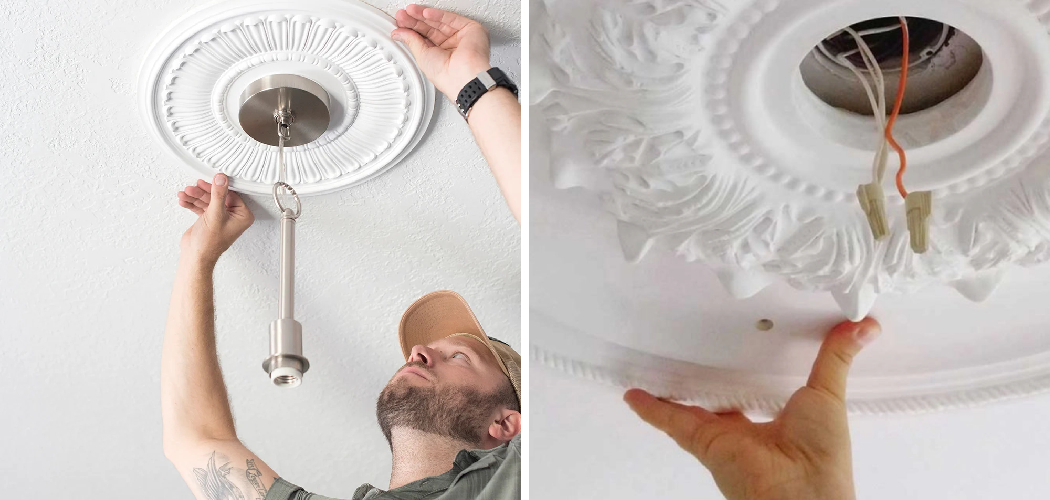
- Electrical Wiring and Fixtures: Identify the location of any wiring or fixtures that might interfere with the installation. Ensure the medallion’s center hole aligns with the electrical box for light fixtures or fans.
- Space and Size: Measure the ceiling space to ensure the medallion fits proportionally and doesn’t overwhelm the room or fixture intended to complement.
Assessing these factors will help achieve a successful installation, adding structural integrity and visual appeal to your space.
How to Install a Ceiling Medallion: Measuring and Marking

The next step, before you physically install the ceiling medallion, involves accurate measuring and marking to ensure precise placement. This critical phase lays the groundwork for a seamless installation, aligning the medallion perfectly with the ceiling fixture and ensuring it is the room’s visual centerpiece.
A. Locating the Center of the Ceiling
Locating the center point of your ceiling is essential for correctly placing the ceiling medallion. This can be especially crucial in rooms where the medallion needs to align with an existing light fixture or ceiling fan. To find the center:
- Measure the Width and Length: Begin by measuring the length and width of your ceiling. Use a tape measure and be precise since even minor discrepancies can lead to a visibly off-center medallion.
- Divide to Find the Center: Once you have the dimensions, divide each by two to find the central point on both the length and the width. Mark these midpoints on the ceiling using a pencil or non-permanent marker.
- Create Intersection Point: Using the markings, draw a light line from one side of the room to the other, intersecting at both the midpoint of the length and the width. The point where these two lines intersect is the ceiling’s center.
- Confirm with Diagonal Measurements: For additional accuracy, measure diagonally from each room corner. These measurements should intersect at the ceiling’s center point, confirming your earlier markings.
- Prepare the Ceiling Surface: Before proceeding, ensure that the identified center point is free of imperfections or obstructions. The area around the center will need to be clean, dry, and structurally sound to support the medallion.
B. Transferring Measurements for Medallion Placement
With the center of the ceiling clearly marked, the next step involves transferring the ceiling medallion’s measurements to the ceiling to mark its exact placement.
- Determine Medallion Position: Hold the medallion against the ceiling, centering it around the marked center point. Use a level to ensure it is flat against the ceiling without tilting.
- Trace the Medallion Outline: Carefully trace the outline of the medallion onto the ceiling with a pencil. This outline will guide you during installation, helping ensure the medallion is symmetrically aligned.
- Mark Mounting Points: If your medallion requires screw holes for additional support, mark these points on the ceiling now, within the traced outline. Ensure these marks align with any pre-drilled holes in the medallion for seamless installation.
- Double-Check Measurements: Measure the distance from the outline to various points in the room (e.g., walls, the fixture it encircles) to confirm that the medallion will be positioned symmetrically. If necessary, adjust by erasing and re-marking the outline.
- Mark for Electrical Fixtures: If the medallion will encircle a light fixture or fan, ensure that the hole in its center aligns precisely with the electrical box in the ceiling. Adjust the medallion’s position if needed to accommodate wiring or other obstructions.

By carefully measuring and marking, you lay the foundation for a centered and beautifully installed ceiling medallion that enhances your room’s aesthetic and architectural detail.
Cutting Openings for Light Fixtures
A. Tracing and Cutting Light Fixture Openings
Creating a precise opening for light fixtures or ceiling fans is crucial for a seamless finish when installing a ceiling medallion. This step should be approached with care to ensure the medallion enhances the room’s aesthetic and fits perfectly around the fixture. Here’s how to trace and cut the opening:
- Position the Fixture’s Template: If your light fixture comes with a paper template, use it to mark the opening on the medallion. If not, place the base of the fixture against the medallion’s center and trace around it.
- Mark the Cutting Line: Use a pencil to draw the cutting line on the medallion. For fixtures that require a larger opening, ensure the line is clearly marked, providing a guide for your cutting tool.
- Drill a Starter Hole: Drill a starter hole within the traced outline before cutting. This hole should be large enough to fit the blade of your cutting tool, such as a jigsaw or keyhole saw.
- Cut the Opening: Carefully insert the blade into the starter hole and cut along the traced line. Keep the cutting tool steady and follow the outline closely to ensure a clean cut. Cutting just inside the line is advisable, as you can always widen the opening if needed.
- Smooth the Edges: Once the cut is complete, use a file or sandpaper to smooth any rough edges around the opening. This step is essential for preventing damage to the wiring or the light fixture during installation.
B. Adjusting for Different Light Fixture Sizes
Different light fixtures require openings of various sizes in the ceiling medallion. To accommodate these variations, you must be ready to adjust your approach based on the fixture’s design and size. Here are steps to ensure proper fitting regardless of the fixture size:

- Measure the Fixture Base: Start by measuring the diameter and height of the fixture’s base. This measurement will guide the size of the opening needed in the medallion.
- Compare with Standard Opening Sizes: Ceiling medallions may come with pre-cut or marked centers suitable for standard light fixtures. Compare your fixture’s size with these standards to determine if adjustments are necessary.
- Marking for Larger Fixtures: If your fixture requires a larger opening, draw a new outline around the existing one, ensuring it aligns evenly and provides sufficient space for the fixture’s base. Use a compass or drawing tool for circular fixtures to maintain an even circumference.
- Cutting and Enlarging the Opening: Carefully cut the new, larger opening using the same method as described earlier. If you’re enlarging a pre-existing hole, work slowly, removing small sections at a time to avoid cutting beyond the required size.
- Test Fit and Adjust: After cutting, test the fit of the light fixture within the new opening. If it’s too tight, gradually enlarge the opening, checking the fit regularly. Ensure there’s enough overlap between the fixture base and the medallion to cover the cut edges.
- Accommodating Unique Shapes: For non-circular fixtures, create a template of the base to accurately trace its outline onto the medallion. Matching complex shapes may require additional tools and precision.
By accurately tracing, cutting, and adjusting the medallion, you can ensure a perfect fit for light fixtures of any size. This enhances the overall look of the room while maintaining the functional integrity of both the medallion and the fixture.
Applying Adhesive and Mounting the Medallion
A. Choosing the Right Adhesive for Your Ceiling
Selecting the appropriate adhesive is paramount when mounting a ceiling medallion, ensuring a secure and lasting installation. Not all adhesives are suited for every type of ceiling material, so careful consideration is necessary. For plaster ceilings, a heavy-duty construction adhesive that’s specifically formulated for plaster and other masonry work is ideal.
These adhesives provide a strong bond and can support the weight of the medallion over time. For drywall ceilings, choose an adhesive compatible with the paint and the drywall to avoid any damage or weakening of the bond.
Additionally, in environments with high moisture, such as kitchens or bathrooms, an adhesive with mold and mildew resistance properties is recommended to prevent bond degradation over time.
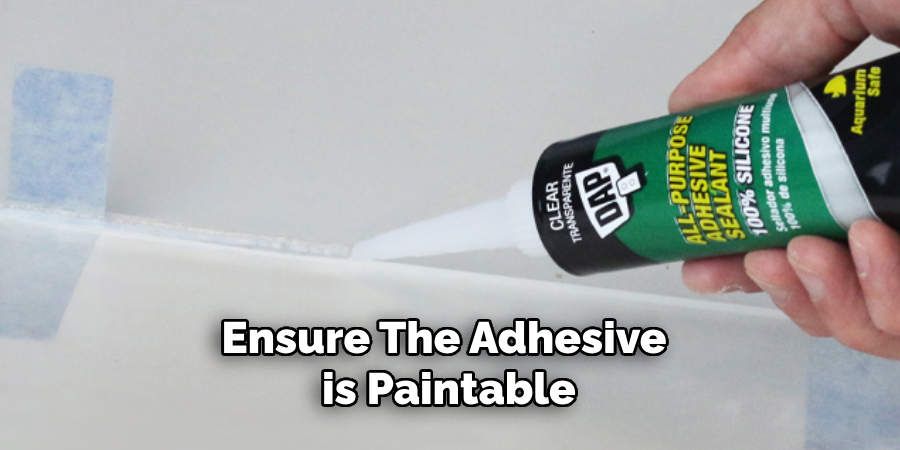
It’s also crucial to ensure the adhesive is paintable, especially if you plan on painting the medallion or the ceiling after installation.
Prior to applying any adhesive, the ceiling surface and the back of the medallion should be clean and dry. Test the adhesive on a small, inconspicuous area first to ensure it does not damage the ceiling or the medallion. Always follow the manufacturer’s instructions for application and curing times to ensure the best results.
B. Attaching the Medallion to the Ceiling
Once the right adhesive has been chosen, attaching the medallion to the ceiling requires patience and precision. Begin by applying a generous amount of adhesive on the back of the medallion, focusing on the edges and any detailed areas to ensure all parts adhere well to the ceiling.
Leave a small gap near the edge to prevent the adhesive from seeping out when pressed against the ceiling. Carefully lift the medallion to the ceiling, aligning it with your previously marked center and mounting points. Press firmly against the medallion, moving from the center outwards to remove any air bubbles and ensure a good bond.
Holding the medallion in place for a few minutes may be necessary, depending on the adhesive’s initial grab strength. For extra-heavy medallions, temporary support such as finishing nails or screws can be used to hold the medallion in place while the adhesive sets, but ensure these are placed where they will be hidden or can be easily filled and painted over.
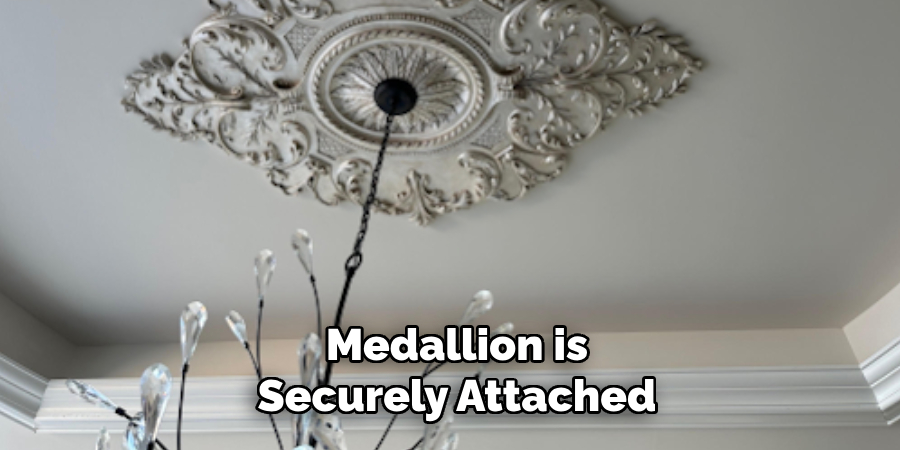
To ensure the medallion is securely attached, leave the adhesive to cure for the amount of time recommended by the manufacturer, which may range from a few hours to overnight. Avoid any activity that could disturb the medallion during this time. Once the adhesive has fully cured, remove any temporary supports and fill in holes with caulk or spackle.
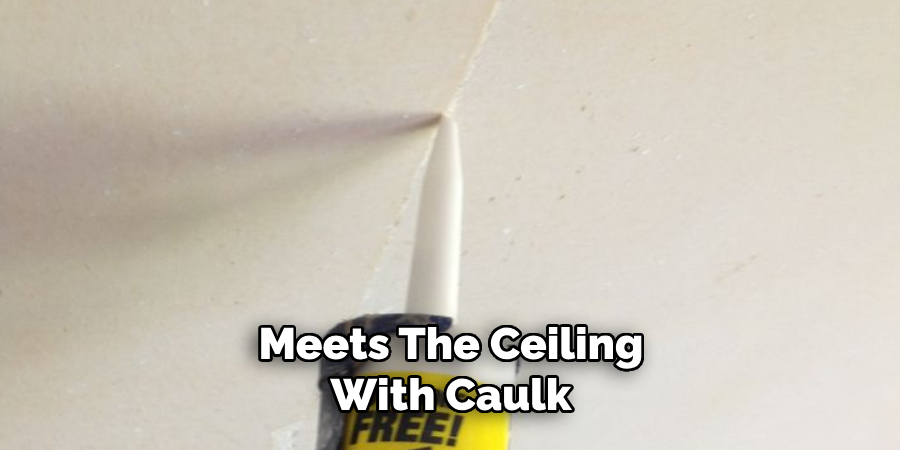
Smooth out the edges where the medallion meets the ceiling with caulk to create a seamless appearance, ready for any final painting. This careful process of selecting adhesives, applying them correctly, and adhering the medallion to the ceiling ensures the medallion remains securely in place and enhances the aesthetic appeal of the room with a professional-looking finish.
Securing and Finishing
A. Reinforcing with Screws or Nails
While the adhesive plays a crucial role in attaching the ceiling medallion, reinforcing the bond with screws or nails can provide additional security, especially for heavier medallions. This step is vital in ensuring that the medallion remains firmly in place over time, regardless of environmental factors that might weaken the adhesive bond.

Begin by selecting screws or nails that are long enough to penetrate through the medallion and into the ceiling material but short enough to avoid damage to any underlying structures. It’s advisable to use screws or nails with heads that are easily concealed or can be covered with paint or filler for a seamless finish.
Position the screws or nails evenly around the medallion’s perimeter, focusing on areas where the medallion and the ceiling material firmly meet. Pre-drill small pilot holes to avoid splitting the medallion, especially if it’s made of plaster or another fragile material. This also ensures that the screws or nails go in smoothly and straight.
Insert the screws or nails carefully, tightening them until they’re flush with the medallion’s surface or slightly below it. Be cautious not to overtighten; this could crack the medallion or damage the ceiling material. Once in place, these additional fasteners will significantly enhance the overall stability of the medallion.
B. Filling Gaps and Sealing Edges
After the medallion is securely attached and reinforced, the next step is to address any gaps or seams between the medallion and the ceiling. Filling these gaps not only improves the medallion’s appearance, making it seem as if it’s part of the original ceiling design but also prevents dust and other particles from accumulating in the cracks.
Use a flexible caulk or spackle designed for interior use, preferably one that’s paintable to match the ceiling and medallion if a painting is desired. Apply the filler using a caulking gun or putty knife, pressing it firmly into the gaps to ensure a tight seal. Smooth out the surface with a damp cloth or sponge for a clean finish.
Allow the filler to dry according to the manufacturer’s instructions, which typically range from a few hours to overnight. Once dry, sand any excess or uneven areas gently to create a smooth, uniform surface. This step is critical in achieving a professional-quality finish, as it seamlessly blends the medallion with the surrounding ceiling.
Finally, touch up the medallion and the ceiling paint as necessary, ensuring any screws, nails, or filled areas are well-concealed. This enhances the aesthetic appeal and protects the materials by sealing them from moisture and environmental wear.
Painting and Touching Up
A. Preparing the Medallion Surface for Paint
Proper surface preparation is crucial to achieving a flawless finish before painting a ceiling medallion. Start by thoroughly cleaning the medallion to remove any dust, grease, or old paint that could prevent the new paint from adhering properly.

A gentle, soapy water solution can be used for cleaning, followed by a rinse with clean water to remove any soap residue. Allow the medallion to dry completely before proceeding.
Next, inspect the medallion for any imperfections such as chips, cracks, or nail holes from the installation process. Use fine-grit sandpaper to smooth out rough areas and fill any imperfections with a high-quality, paintable filler. Once the filler is dry, sand the area again until smooth and flush with the surrounding surface.
Applying a primer is essential if the medallion is made from a porous material like plaster. Primer not only helps cover any stains or discolorations but also creates a smooth, uniform surface that enhances the paint’s adhesion, ensuring the final coat is even and durable.
Choose a primer suitable for the medallion’s material and the paint you will use. Apply the primer with a small brush or roller, ensuring full coverage of the medallion without pooling in the decorative crevices. Allow the primer to dry thoroughly as per the manufacturer’s recommendations before moving on to painting.
B. Painting Techniques for a Seamless Finish
Achieving a seamless finish on a ceiling medallion requires combining the right tools, paints, and techniques. Begin by choosing a high-quality paint that complements the room’s décor and is suitable for the medallion’s material.
Acrylic or latex paints are generally preferred for their easy application and cleanup. If the medallion features intricate designs, consider using a satin or semi-gloss finish, as these can highlight details beautifully without creating an overpowering shine.
For painting, use a high-quality angled brush for the edges and detailed areas and a small roller for the flat sections to ensure an even coat. Start with the most intricate parts of the medallion, moving the brush in the direction of the design to ensure the paint gets into all the nooks and crannies. Avoid overloading the brush to prevent drips and buildup in the details.
Once the detailed areas are painted, proceed with the roller for the broader sections. Apply the paint in thin layers, allowing each layer to dry completely before applying the next. This method reduces the risk of drips and provides a more uniform coverage. Depending on the color and type of paint, you may need several coats to achieve full coverage and the desired finish.

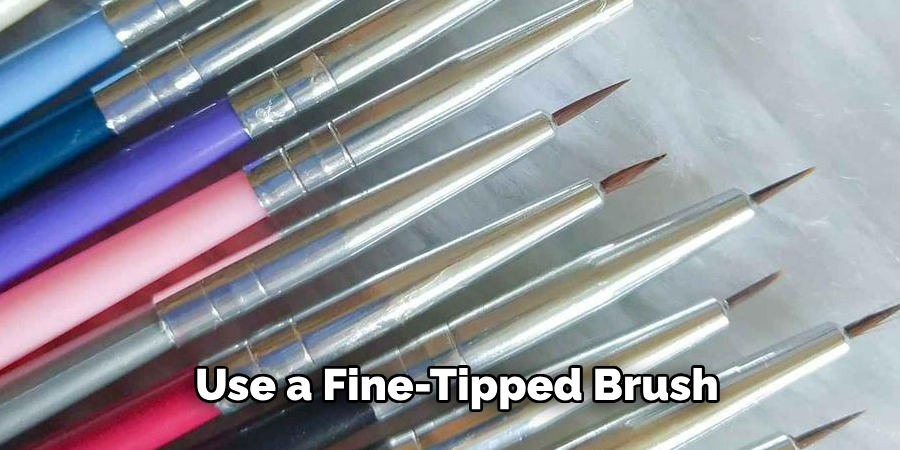
After the final coat of paint has dried, inspect the medallion for any missed spots or areas needing a touch-up. Use a fine-tipped brush for precision work to correct imperfections, ensuring a consistent and seamless finish.
Lastly, if desired, you can apply a clear sealer over the painted surface to enhance the medallion’s durability and sheen. This step is especially recommended for high-humidity areas or if the medallion is made from a material prone to damage. Use a sealer compatible with the paint type and apply it following the manufacturer’s instructions for the best protection and visual effect.
Conclusion
In summary, learning how to install a ceiling medallion involves a series of carefully executed steps to enhance your home’s aesthetic appeal. Starting with selecting the medallion that complements the room’s dimensions and décor, you then prepare the ceiling by marking the center point and ensuring the area is clean.
The next steps involve measuring and cutting the hole for the light fixture or fan, followed by the application of adhesive and securing the medallion with screws or nails for additional support.
Filling gaps and painting the medallion is critical for achieving a seamless and professional-looking installation. Each of these steps, from preparation to finishing touches, contributes to the successful installation of a ceiling medallion, significantly improving your interior design.
Tackling DIY home improvement projects, such as learning how to install a ceiling medallion, can be a highly rewarding endeavor. Not only does it empower homeowners with new skills, but it also fosters creativity and can significantly enhance the aesthetic appeal of your living space.
DIY projects offer the opportunity to personalize your home, giving it a unique touch that reflects your personal style and preferences. Remember, the key to success lies in thorough preparation, patience, and attention to detail.
Whether you’re a novice or have some experience, many resources are available to guide you through the process. Start with something achievable like installing a ceiling medallion, and gradually tackle more complex projects. Your home is your canvas; don’t hesitate to experiment, learn, and grow.
Your efforts will increase your property’s value and bring you immense satisfaction and pride in your achievements.