
Do you need to install hardwood floors in your room but are unsure of how to do it correctly? Well, look no further! If you’re looking for a simple and effective way to install hardwood flooring, consider the process of gluing down the planks.
Glue-down hardwood floors are an excellent option for those who want minimal disruption during installation and are looking for a permanent flooring solution. The stability of glued-down hardwood floors is also beneficial if you live in an area with extreme temperatures or high humidity levels.
In this blog post, we’ll give you all the tips and tricks you need to successfully glue down your new hardwood floors like a pro! We will discuss the step-by-step process of how to glue down hardwood floors along with all the equipment and supplies needed for success. Read on to find out more about how you can easily accomplish this DIY project yourself and get the perfect wood flooring finish that will last for years!
Is It a Good Idea to Glue Down Hardwood Floors?
Glue down hardwood floors are an excellent option for those who want a permanent flooring solution. This type of installation is also more stable and less prone to warping or buckling, which makes it the perfect choice in areas with extreme temperatures or high humidity levels. Additionally, glue down hardwood flooring is a great DIY project for those who don’t want to deal with the noise and disruption from a hammering installation.
Things to Remember While Gluing Down Hardwood Floors
1. Read Instructions
When gluing down hardwood floors, there are a few things to remember to ensure the job is done properly. First, always read the manufacturer’s instructions carefully before starting your project. Make sure you use the right type of wood glue for your flooring and apply it generously but not excessively. You should also take extra precautions when dealing with moisture sensitive wood or glue.
2. Allow Enough Time for Installation
Plan to spend around two days for a standard size room when gluing down hardwood floors. Allow enough time between each stage of the process so that everything can dry properly before proceeding. Also, make sure you keep the area well-ventilated and free from dust during the installation process.
3. Start From the Center
When installing glue down hardwood floors, it’s important to start from the center of the room and work your way outwards. This will help ensure that all planks are lined up properly and create a seamless look. You should also use a chalk line for precise alignment, and be sure to double-check measurements before gluing each plank in place.
4. Protect and Seal Your Floors
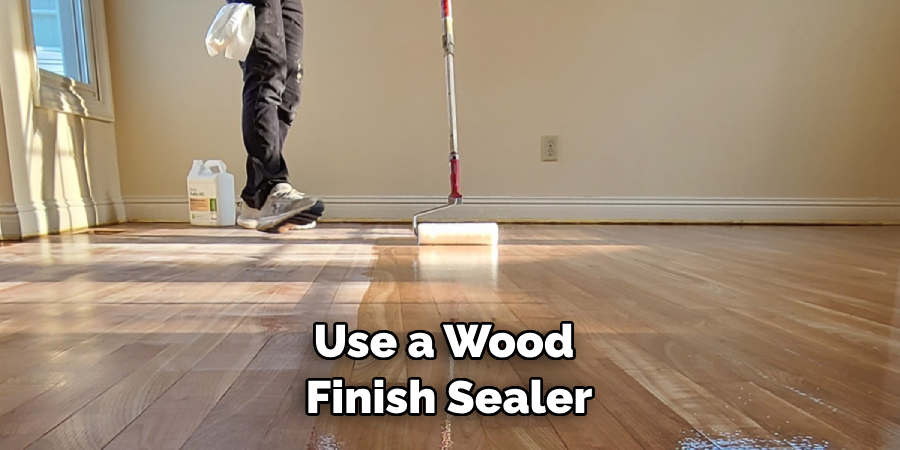
After you have installed your new hardwood floors, it’s important to properly protect and seal them. Use a wood finish sealer that is suitable for your type of flooring to ensure the longevity of your investment. You should also consider adding a moisture barrier under the planks if you live in an area with high humidity levels.
Following these tips and tricks, you can easily install glue down hardwood floors like a pro! With the right supplies and some patience, this DIY project is achievable for any homeowner.
What Supplies Do I Need to Glue Down Hardwood Floors?
Before you start gluing down your hardwood floors, it’s important that you have all the necessary supplies on hand. You’ll need the following:
- Wood glue suitable for hardwood flooring (check manufacturer instructions for type and amount)
- A putty knife
- Hammer
- Tape measure
- Chalk line
- Wood flooring nails (if applicable)
- Protective eyewear
10 Ways How to Glue Down Hardwood Floors
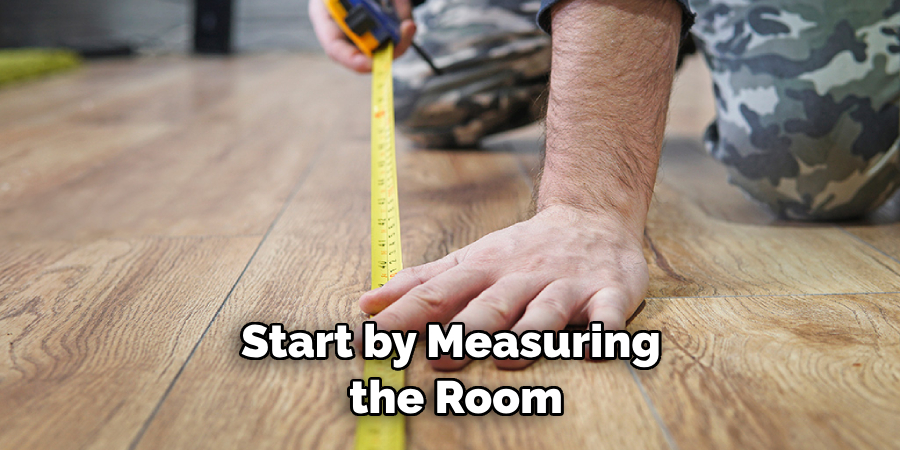
1. Measurement
Start by measuring the room and calculating the total square footage of flooring you’ll need. Measuring the floor twice is always a good idea to double check your calculations. Also, measure any doorways or other obstacles you might have to work around.
2. Underlayment
Once you’ve determined the area of coverage, lay down an underlayment if applicable. This will act as a moisture barrier and provide additional insulation for your hardwood flooring. It is an important step in the process, so make sure you use the right type and follow manufacturer instructions.
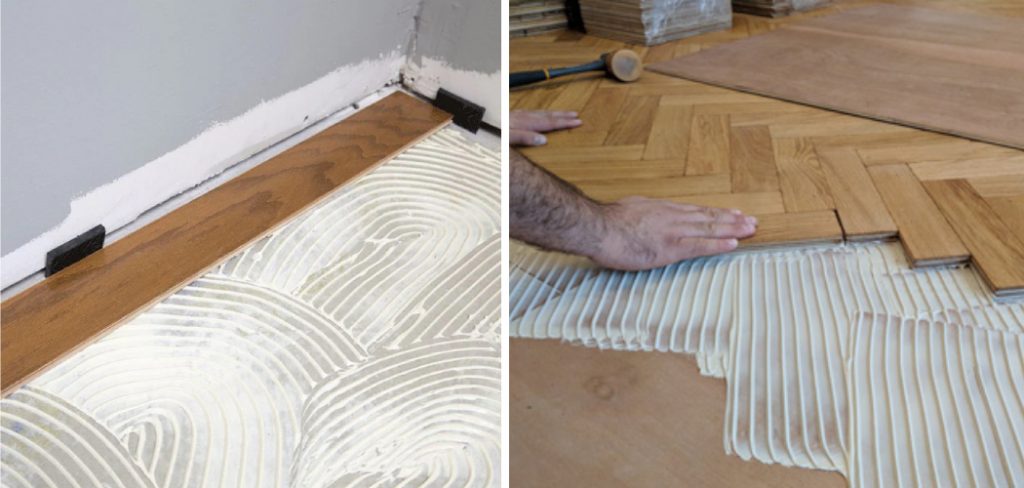
3. Gluing
Now it’s time to glue down your hardwood flooring! Start by spreading an even layer of wood glue onto the subfloor with a putty knife. Then, place each plank into position and press firmly into place before repeating this process with the remaining planks.
4. Alignment
Use a chalk line to ensure that all planks are perfectly aligned and void of any gaps or inconsistencies. This will help prevent buckling or warping over time, so take your time and double-check each plank before moving on to the next step.
5. Hammering (if applicable)
If your hardwood flooring requires nails for added stability, lightly hammer them into place while keeping the planks straight and aligned. Take care not to drive the nails in too deep, as this can cause damage to the wood.
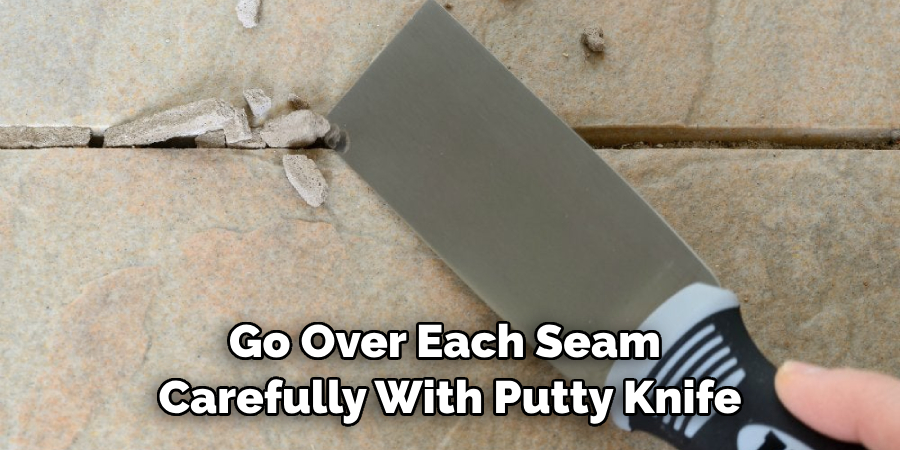
6. Seams
Go over each seam carefully with a putty knife to ensure all pieces of wood are completely sealed together. This will help prevent water damage and make sure the floor is solid and secure.
7. Finishing Touches
Once all planks are in place, use a damp cloth to clean up any excess glue or dirt. You may also want to add some wood filler to any seams or gaps for a neat finish. Remember to read the manufacturer’s instructions, as some type of wood flooring may require additional steps.
8. Curing Time
Let the glue cure for 24 hours before you walk on the floor or move anything back into the room. Depending on your flooring, it may take up to 72 hours for the curing process to be completed.
9. Protective Layer
Apply a sealant or protective layer to your flooring and ensure that you use the right type for your particular wood. This will help keep the floor looking great and prevent water damage, scratches, and other wear and tear.
10. Enjoy!
Now that you’ve learned how to glue down hardwood floors like a pro, it’s time to enjoy your newly installed flooring! Make sure to use area rugs in high-traffic areas and keep it well-maintained over time for the best results.
Following these ten steps and using the right supplies, you’ll be able to glue down hardwood floors in no time! Be sure to take your time and double-check measurements for a seamless look.
8 Safety Measures to Take Before Gluing Down Hardwood Floors
Before beginning to glue down your hardwood floor, there are certain safety measures you should take. Keep these eight tips in mind:
1. Make sure the area is well-ventilated. Since glues and adhesives can emit toxic fumes when used, proper ventilation is essential for completing this job safely. A congested working area can result in breathing problems or even a fire hazard.
2. Wear the right protective gear. Make sure you have gloves, safety glasses, and a face mask to protect yourself from any glue particles that may become airborne. It is also important to wear old clothes since glues can ruin clothing if they come into contact with the fabric.

3. Check labels for warnings. All glues and adhesives come with labels, so read them carefully before using the product to make sure you are aware of any potential hazards.
4. Work in a clean platform. Make sure the floor surface is clean and free from debris before beginning the job to prevent any accidents or mishaps due to slippery surfaces or foreign objects that could get caught in the adhesive.
5. Measure twice, and cut once. Before cutting any pieces of hardwood flooring, be sure to double-check your measurements in order to ensure accuracy and avoid having to buy more materials than necessary.
6. Apply glue with caution. Make sure you are using the right amount of adhesive for the job and carefully follow instructions on how to apply it.
7. Regularly check for spills or leaks. Keep an eye on the area to make sure no glue is leaking from any of the seams or edges of the hardwood flooring, as this could result in a dangerous mess.
8. Give yourself time to clean up after finishing the job. Take care to remove any excess adhesive and clean surfaces to ensure the area is safe.
By following these safety measures on how to glue down hardwood floors, you can be sure to have a successful and secure gluing down of hardwood floors. Make sure to take your time and do things right for the best results possible. With the proper preparation and precautions in place, you’ll be on your way to enjoying beautiful hardwood floors in no time.
Frequently Asked Questions
How Long Will It Take to Finish the Project?
It depends on the size of the room and the type of hardwood flooring you’re using. Generally, it will take one to two days for an average-sized room with standard planks. If you are installing a more intricate design, it may take longer.
What Type of Adhesive Should I Use?
The adhesive used to glue down hardwood floors should be flooring adhesive that is specifically designed for the type of hardwood being installed. Be sure to read the product label instructions for how much coverage and drying time is required.
What Kind of Glue Do You Need to Use?
The type of glue used will depend on the type of hardwood flooring you’re installing. Solid hardwood floors typically require a high-solids urethane adhesive, while engineered wood floors may need a lower-solids product. Ask your flooring supplier for recommendations.

Do I Need to Allow the Glue to Dry Before Walking on the Floor?
Yes, it’s important to allow the glue to dry completely before walking on the floor. Even if it appears dry, you should check with your manufacturer or installer for a recommended time frame before allowing foot traffic.
Conclusion
Installing hardwood floors can take a bit of effort, but the end result is a beautiful addition to any space. With the right tools and materials, your hardwood floor installation should be complete in no time. Be sure to use a glue-down process for the best results. By using flooring adhesive and taking your time on this project, you can ensure that your flooring will look amazing and last for years to come.
If you find yourself struggling in this process or have questions along the way, don’t hesitate to reach out to an expert. They can provide helpful advice on how to glue down hardwood floors.
In order to have a successful outcome with your hardwood install, make sure that you measure twice and cut once so that you can guarantee accurate placement of your materials and avoid any costly mistakes. Before long, you’ll have a gorgeous new floor installed with minimal hassle!