Many of us have been caught in a surprise downpour that’s left us soaked to the skin. But what about when it rains inside our home? During humid days or months, moisture can build up and lead to unhealthy air quality conditions in your living space, which is why knowing how to clean a Rainmate comes in handy. Maintaining these devices properly is important by routinely clearing them of dust, dirt, debris, and mold.

A well-maintained Rainmate will help ensure optimal performance and reduce any health risks associated with dirty appliances! In this blog post, we’ll provide you with an easy step-by-step guide on cleaning a Rainmate and keeping your living area free from pollutants. So read on for all the details you need!
What Will You Need
Before we dive into the cleaning process, let’s gather all the necessary materials first. You’ll need:
- A clean cloth or towel
- Mild soap or dishwashing liquid
- Warm water
- White vinegar (optional)
- Q-tips or small brush (optional)
Once you have all these items, we can clean your Rainmate!
10 Easy Steps on How to Clean a Rainmate
Step 1. Unplug the Device:
Safety should always be your top priority. Before you start the cleaning process, unplug your Rainmate from the power source to prevent any risk of electrical shock. If your device has been running, allow it to cool down for at least 30 minutes before proceeding.
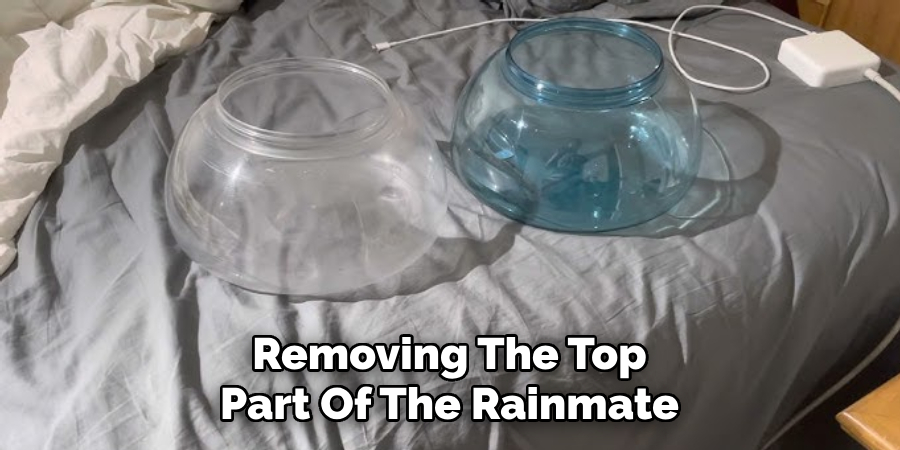
Step 2. Disassemble the Device:
Begin by removing the top part of the Rainmate, also known as the motor housing. To do this, gently lift it off the base. Set it aside on a dry, flat surface. Next, empty any remaining water from the base of the device. Remember, not submerging the motor housing in water is essential as it can damage the electrical components.
Step 3. Clean the Base:
Next, add a few drops of mild soap or dishwashing liquid to warm water. Use a clean cloth or towel to wipe the base’s interior thoroughly. You may use a Q-tip or a small brush to scrub these areas for stubborn dirt or mold. Undiluted white vinegar can disinfect the base and remove any lingering odors if desired. Afterward, rinse the base with warm water and let it air dry completely.
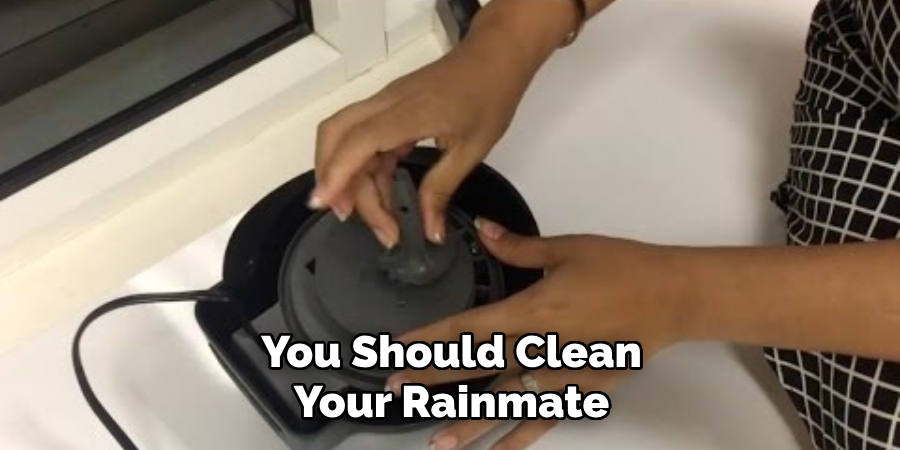
Step 4. Clean the Motor Housing:
Cleaning the motor housing requires extra care to avoid damage. Take a damp cloth and carefully wipe the outside of the housing. For the inside, use Q-tips or a small brush to clean the vents and other hard-to-reach areas gently.
NEVER submerge the motor housing in water or any other liquid, as this could lead to irreversible damage. Once you’re done, set the motor housing aside to air dry completely.
Step 5. Reassemble and Operate:
Once the base and motor housing are, you can reassemble your Rainmate. Place the motor housing back onto the base, carefully aligning it properly. Plug the device back in, fill it with clean water, and resume operation. Congratulations, you’ve successfully cleaned your Rainmate! Regularly repeat this process to keep your device in top condition and your living space fresh and clean.
Step 6. Maintenance Tips:
To prolong the lifespan and efficiency of your Rainmate, it’s crucial to maintain it regularly. Aim to clean your device at least once a month or more often if you use it frequently.

Avoid using harsh chemicals that could damage the device. Always allow the components to dry completely before reassembling to prevent mold or mildew growth. Lastly, keep your Rainmate in a dust-free area to minimize the need for frequent cleaning.
Step 7. Regularly Change the Water:
To keep your Rainmate working efficiently, change the water regularly. If you’re using the Rainmate continuously, replacing the water every 24 to 48 hours is recommended. Using fresh water ensures that the device can optimally clean and humidify the air in your space. Remember to unplug the device before removing the used water and refilling the base. Reassemble your Rainmate and enjoy the fresh and clean air!
Step 8. Consider Airing Out the Device:
While not mandatory, it’s often beneficial to let your Rainmate air out after cleaning and before you add fresh water. This can help remove any residual moisture within the device that might encourage mold or mildew growth. Simply leave the disassembled parts in a well-ventilated area for a few hours, ensuring they are scorched before you reassemble and refill the device.
Step 9. Store Properly When Not in Use:
When you’re not using your Rainmate, it’s crucial to store it properly to prevent damage and prolong its lifespan. Empty any remaining water and clean it following the steps above. Once it’s dry, store it in a clean, dry place away from direct sunlight.
Cover it with a cloth or store it in its original box to protect it from dust. Proper storage ensures your Rainmate will be ready to use and perform optimally the next time you need it.
Step 10. Troubleshooting Common Issues:
Occasionally, you might encounter some issues with your Rainmate. If the device isn’t operating as efficiently as before, it could be due to a buildup of dirt or debris within the device. Make sure to clean it thoroughly, following the steps above.
If the device makes an unusual noise, check to see if the motor housing is properly aligned and secured. Remember, if you’re facing persistent issues, it’s always a good idea to consult with a professional or contact customer support.
By following these simple steps, you’ll be able to keep your Rainmate clean and functioning effectively for years to come. Proper device maintenance can also help improve the air quality in your space, making it a healthier and more comfortable environment to live in. So take care of your Rainmate, and enjoy all its benefits!
5 Additional Tips and Tricks
- Regular Cleaning: Regular cleaning is crucial for maintaining the longevity of your RainMate. Ideally, you should clean your RainMate at least once every week if it’s used frequently.
- Use Distilled Water: Distilled water is recommended for RainMate to prevent any hard water buildup. Tap water often contains minerals that can harm the unit over time.
- Avoid Harsh Chemicals: When cleaning your RainMate, avoid using harsh chemicals as they can damage the unit. Instead, use a mild soap and warm water solution.
- Dry Before Storing: Always ensure your RainMate is completely dry before storing. This prevents any mold or mildew development, which could negatively impact the unit’s performance.
- Regular Parts Check: Regularly check and replace any worn out parts. This helps in maintaining the optimal performance of your RainMate.
With these additional tips and tricks, you can ensure that your RainMate stays in top condition for years.
5 Things You Should Avoid
- Overfilling the Basin: Avoid overfilling the water basin. There’s a maximum fill line for a reason. Overfilling could lead to water spilling over and damaging the RainMate.
- Direct Sunlight Exposure: Don’t place your RainMate in direct sunlight. Prolonged exposure can lead to the unit’s material degrading or discoloring over time.
- Using Non-Rainbow Fragrances: Using non-Rainbow approved fragrances or oils can damage the unit. Always use products specifically designed for RainMate.
- Ignoring Weird Noises: Any unusual noises from the unit should not be ignored. They could be a sign of a malfunction or a part that needs replacement.
- Delayed Cleaning: Don’t delay cleaning your RainMate. Regular cleaning ensures its longevity and proper functioning. Postponing cleaning could lead to buildup and potential damage.
By avoiding these potential pitfalls, you ensure that your RainMate operates at its best and lasts for a long time.
Can You Use Essential Oils in Rainmate?
Yes, you can use essential oils in your RainMate if they are specifically designed for use with the unit. Rainbow offers a variety of fragrances and oils that are safe for use with RainMate. Using non-approved products may damage the unit and void its warranty. It’s always best to stick to recommended products to ensure the proper functioning of your RainMate.
Additionally, essential oils can add a pleasant scent to the air and enhance your overall experience with the unit. Just remember to follow the instructions for use carefully to avoid any potential damage. So go ahead and enjoy your RainMate with some added aromatic goodness!
Is a Rainmate Like a Humidifier
While a RainMate may seem similar to a humidifier, it’s important to note that they serve different purposes. A humidifier adds moisture to the air, while a RainMate is an air purifier and freshener. Although both can improve the air quality in your home, they function differently.
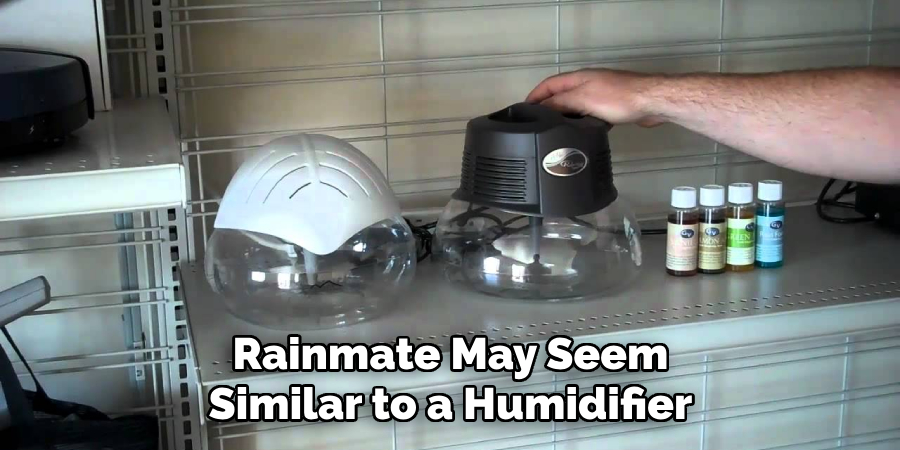
Humidifiers are used primarily for health reasons, while RainMates are used for health and aromatherapy purposes. Using a RainMate alongside a humidifier, especially during dry seasons, is always recommended for optimal air quality.
Remember, a RainMate is not a substitute for a humidifier but works well in combination with one. So go ahead and enjoy the benefits of both in your home!
Conclusion
In conclusion, cleaning a rainmat is a simple process. By following basic steps and preparing ahead, the task becomes easy, leaving you more time to relax under the cool, refreshing air of your rainmate!
To protect your investment and keep it running smoothly for many years, schedule regular cleaning services with an experienced technician. This will help ensure that your rainmate will last through all weather conditions.
When it comes time for a new unit, shop around using a reputable dealer who can advise about proper use and maintenance to get the most out of your purchase.
Hopefully, the article on how to clean a rainmate provided you with valuable insight into cleaning and maintaining your RainMate. With these tips, you can enjoy a clean, fresh-smelling home all year round with your trusty RainMate. Happy cleaning!