
Are you looking to give your hardwood floor a new look and bring life back into the room? Changing your floor color can be an easy and cost-effective way of completely transforming the space. However, there’s more to changing hardwood floor color than meets the eye – if you don’t know what you’re doing, it could end in disaster!
Whether you’re looking to restore aged flooring or just want a refresh, here are some tips and tricks on changing hardwood floor color in no time.
In this blog post, we’ll show you how to change hardwood floor color without damaging them or costing an arm and a leg. Keep reading for useful tips on selecting colors, prepping your floors for staining, applying stains correctly, and protecting them afterward.
What Will You Need?
Before you get started, make sure to gather the following materials:
- Sandpaper/sander
- Stain
- Finish
- Paintbrush/ applicator or cloth for staining
- Polyurethane sealant (optional)
- Vacuum for cleanup.
Once you have all of your supplies, you’re ready to begin!
10 Easy Steps on How to Change Hardwood Floor Color
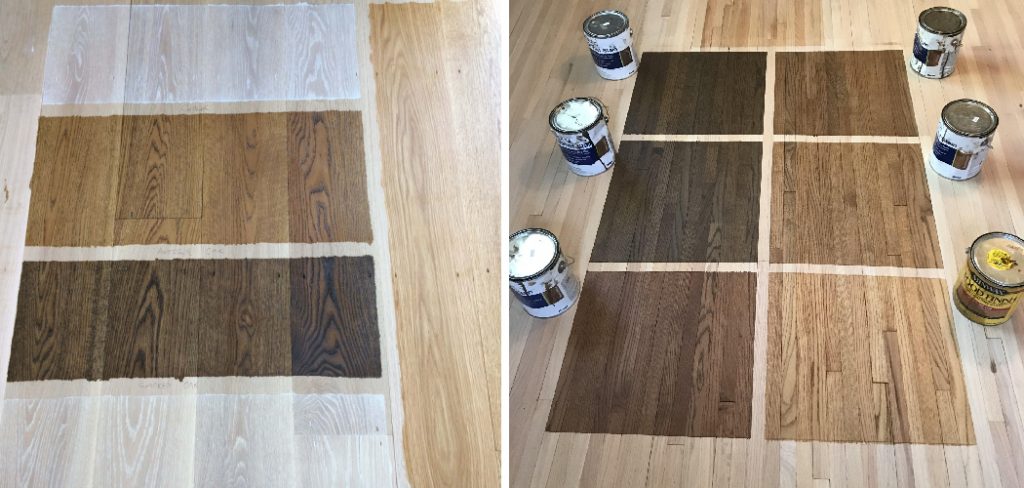
Step 1. Selecting Your Stain Color
Stain colors vary from light and natural to dark and deep. Consider the current color of your wood flooring and which direction you want to take it. If you’re unsure, test a small area of your floor to help you decide.
Step 2. Preparing Your Floors for Staining
Before staining, use a vacuum cleaner to remove any dust or dirt particles from the surface of the wood floors. Then, sand down the existing finish with a sander/sandpaper to create an even surface that will accept the new stain color more easily. You can also use chemical stripping if desired.
Step 3. Applying Stain
Once you’ve prepped your hardwood floors, apply the stain of your choice using either a brush or cloth and work in sections until all your floor is covered in an even coat. Allow each section to dry before moving on to another. If you need to, add additional coats for darker-looking flooring.
Step 4. Finishing Up
Once you’re happy with the stain color, use a polyurethane sealant (optional) to provide an extra layer of protection and durability to your floors. Make sure to follow the manufacturer’s instructions for application. Another option is to use a finish like oil or varnish to protect the wood from wear and tear.
Step 5. Cleaning Up
Clean up any spills or smudges on the floor using a damp cloth before letting them dry completely. Once they have dried, vacuum away any dust particles from the surface before applying another coat of finish (if desired). You Can Finish It!
Step 6. Try It Out
After applying the stain and sealant, walk around barefoot on the floor to get a feel for the new color. Ensure you are happy with it before sealing it in with another coat of finish (if desired). Be careful not to slip or slide, as the floors will still be slick.
Step 7. Protect Your Floors
Use rugs or mats in high-traffic areas to protect your newly stained floors from wear and tear. This will help them last longer and keep their vibrant colors for years. Use felt protectors on their nails to prevent scratches if you have pets.
Step 8. Let Dry Completely
Allow your floors to dry completely before walking on them or placing the furniture back into the room. Depending on how many coats of finish you applied, this could take anywhere from a few hours to overnight. Dry times vary based on the type of finish used.
Step 9. Enjoy Your New Floors
Once your floors have dried completely, you can step back and admire your work! Your newly stained hardwood floors will give any room an updated look and refresh the entire space. Remember that regular cleaning and maintenance will keep them looking their best.
Step 10. Reapply As Needed
Don’t forget to reapply sealant or finish every few months to keep your floor looking its best. This will help protect you from dirt, spills, and wear and tear for years. Remember always to follow the manufacturer’s instructions when applying products.
With these ten easy steps, you’ll know to change your hardwood floor color quickly! Remember that patience is key – it’s important not to rush the process and to take time with each step. Before you know it, you’ll have a beautiful, revitalized hardwood floor that looks new!
5 Additional Tips and Tricks
1. Sand the surface of your hardwood floors and then apply a stain to change the color. This is a great solution for those looking for an easy way to alter the color of their hardwood floors.
2. Invest in a wood dye to further enhance the color of your flooring. This is an excellent solution for those looking to add a bit more vibrancy to their floors.
3. Make sure you use protective coating after staining or dying your floor, which will help ensure its longevity and keep it from fading over time.
4. Consider using paint on your hardwood floors if you’re looking for a bolder change in color that won’t fade with time. Just make sure to apply several coats and use a sealant once it’s finished drying to preserve the paint job for years.
5. If you want a simple way to give your hardwood floors a quick makeover, consider using wood-look vinyl flooring. This will provide an instant transformation without stripping the original finish or using any chemicals. The nice thing about vinyl is that it can be easily removed when ready for another change.
No matter which method you choose, take your time and research all the options available to find the perfect solution for changing the hardwood floor color in your home. With these tips and tricks, you’ll have beautiful new floors quickly!
5 Things You Should Avoid
1. Avoid using oil-based products on your hardwood floors, as these can cause discoloration and damage to the wood.
2. Don’t use a sander to remove the existing finish on your floor; this can leave behind scratches that will be difficult to repair.
3. Avoid using generic stains or dyes, as these are likely to fade quickly over time. Opt for higher quality products specifically made for hardwood floors when possible.
4. Do not leave any rags soaked in stain or dye sitting on the flooring for too long, as this could lead to permanent staining if not immediately wiped away.
5. Never apply any kind of sealant until you have let the stain or dye completely dry; otherwise, the sealant won’t be effective.
Following these tips and tricks will help you successfully change the color of your hardwood floors without any issues! Just remember to take your time and use the right products for the best results.
Can You Change Dark Wood Floors to Light?
Yes, you can definitely change dark wood floors to light. Sanding the existing finish is a great way to start, as this will help create a smooth surface for applying new stains or dyes.
You can then use lighter colors of stain or dye to bring out the natural beauty of your hardwood flooring and brighten it up. To ensure that your newly stained floors are protected from wear and tear over time, be sure to apply several coats of sealant after they have dried completely.
Additionally, you can invest in wood-look vinyl flooring to quickly transform the color and look of your hardwood floors. Vinyl is an inexpensive option, and it can be easily removed when you are ready for another change. With these tips, you’ll be able to switch from dark to light without any difficulties!
Remember that proper preparation is key, no matter which approach you take to changing the color of your hardwood floors. Take your time with each step and follow all the instructions carefully to achieve beautiful results that will last for years to come!
Conclusion
Changing the color of your hardwood floors can completely refresh the look and feel of any room. With a relatively small expense and effort, you can have the dark, trendy look many homeowners long for without breaking the bank.
Before choosing your desired color, make sure to check with a flooring professional for any tips they might have on sanding and staining hardwood floors. Doing so can help ensure you achieve a professional-looking finish without paying for costly services.
And always remember to use a well-ventilated area when working with staining solutions, as they contain volatile organic compounds that can be hazardous. These steps will ensure you achieve beautiful new hardwood floors at an affordable price.
Hopefully, the article on how to change hardwood floor color has helped you gain a better understanding of the process involved in changing the color of your hardwood floors. Whether you decide to use stain, dye, paint, or wood-look vinyl flooring, careful preparation and attention to detail are key to achieving great results. Good luck!