Enhancing your home’s curb appeal and providing protection from the elements are essential aspects of maintaining a comfortable and aesthetically pleasing living space. Building a roof overhang over an exterior door is a practical and visually appealing solution that serves both purposes.
Whether you’re seeking shelter from rain and sun or aiming to add architectural interest to your entryway, constructing a roof overhang requires careful planning and execution. From choosing the right materials and design to ensuring proper drainage and structural integrity, this project demands a blend of functional considerations and design finesse.

In this comprehensive guide, we will walk you through the step-by-step process of how to build a roof overhang over an exterior door, equipping you with the knowledge and confidence to undertake this project and transform your entrance into a stylish and functional focal point.
Importance of a Roof Overhang for Protection and Aesthetics
When considering the best way to improve the exterior of a home, adding a roof overhang over an exterior door is an excellent choice. Roof overhangs provide both protection and aesthetic value for the home, making them well worth any effort or expense required.
The primary purpose of a roof overhang is to protect against the elements – such as sun, rain, and snow – by providing a layer of insulation for the home. As an added benefit, roof overhangs can also enhance the aesthetics of a home’s exterior by creating an attractive architectural feature.
In addition to protecting against weather elements, having a roof overhang over an exterior door also provides additional security from burglars or other intruders. This is due to the fact that a roof overhang can make it difficult to reach and access a door, thus providing an extra layer of protection for the home.
Finally, by using materials such as wood or vinyl, homeowners are able to customize their roof overhangs to match the style of their home. With so many options available, it’s easy to find something that will work well with the overall design of the home.
Overall, adding a roof overhang to an exterior door offers numerous advantages for both protection and aesthetics. By taking the time to install a quality overhang, homeowners are able to enhance their home’s curb appeal while also ensuring that their family is safe and secure from outside elements.
Benefits of DIY Construction for Customization and Cost Savings
Many homeowners prefer the look of a roof overhang above an exterior door. Building your own can be a cost-effective way to get the exact look you want, while also enjoying its many benefits. DIY construction for a roof overhang allows for much better customization than pre-built options, which often come in standard sizes and colors.
You can choose exactly how large or small you want the overhang to be, as well as what type of materials to use. This will give you more control over the overall look and feel of your outdoor space.
In terms of cost savings, constructing a roof overhang yourself can be much cheaper than purchasing one that’s already made. By buying your own supplies and planning ahead, you can save a considerable amount of money. Additionally, when building your own roof overhang, you’ll be able to take on the project at your own pace and budget.
Installing a roof overhang also provides an extra layer of protection from the elements for your entryway. Rain and snow will be less likely to accumulate as they will be diverted away from your doorway by the overhang. This is especially useful in climates that receive a lot of rain or snow throughout the year.
10 Methods on How to Build a Roof Overhang over an Exterior Door
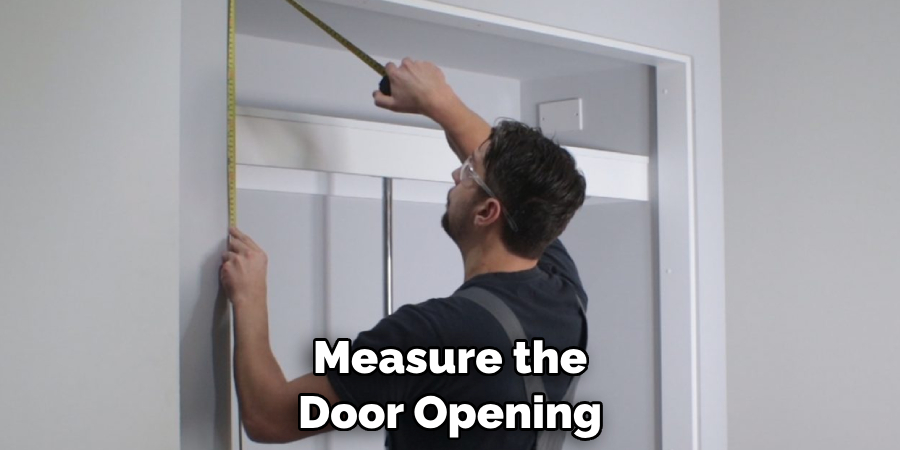
1. Measure the Door Opening:
The first step in building a roof overhang is to measure the door opening. This will help you determine the size of the overhang that you will need to build. You should also measure the height of the door and the distance from the ground to get an idea of how much space you have to work with. When measuring, make sure to account for any trim or other materials that may be on the door.
Next, you will need to decide how much of an overhang you would like. Generally, a few inches is enough for protection from rain and sun. However, if you live in an area with more extreme weather conditions, then you should consider building a larger overhang.

2. Select Building Materials:
Once you have determined the size of your roof overhang, you can start selecting materials for its construction. You will need lumber, plywood, nails, screws, and other hardware such as flashing and trim pieces. Make sure that all of your materials are rated for outdoor use and are suitable for your climate.
3. Create a Plan:
Before beginning construction, it is important to create a plan for your roof overhang project. This plan should include detailed diagrams of how each component will be constructed and where it will be located on your home’s exterior wall. It is also important to consider any local building codes or restrictions that may apply to your project before starting construction.
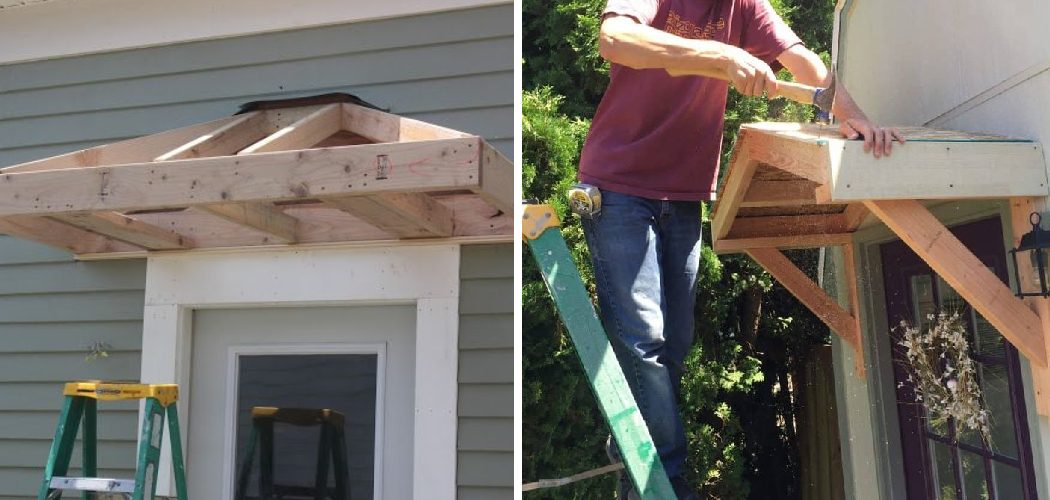
4. Construct Support Beams:
The next step in building a roof overhang is to construct support beams from pressure-treated lumber. These beams should be placed at least 16 inches apart on either side of your door opening and secured in place with nails or screws driven into studs in your home’s exterior wall. Make sure that the beams are level before you attach them to the wall, so that your roof won’t be crooked.
Next, cut and install a plywood or OSB sheet across the top of the support beams. This is what will provide additional support for your overhang when it’s finished. Secure the sheet in place with nails or screws driven into the studs.
5. Attach Plywood Sheathing:
Once the support beams are in place, attach plywood sheathing to them using galvanized nails or screws driven through pre-drilled holes in the sheathing material and into the support beams below it. Make sure that all edges are sealed with caulk or other waterproofing material to prevent water from entering your home through gaps between pieces of sheathing material.

6. Install Flashing:
Flashing should be installed along both sides of your roof overhang where it meets up with the exterior walls of your home. This flashing helps protect against water damage by keeping moisture out while allowing airflow underneath the overhang area so that condensation does not form on its underside during humid weather conditions. Installing flashing is an important step in ensuring the longevity of your roof overhang.
You will need to purchase a metal flashing material that is appropriate for your type of roof. Aluminum or galvanized steel are both good options. Measure the area along each side where you plan to install the flashing and cut it accordingly, using tin snips or a metal cutting saw.
7. Attach Trim Pieces:
After installing flashing around both sides of your roof overhang, attach trim pieces around its perimeter using galvanized nails or screws driven into pre-drilled holes in each piece of trim material and into studs behind them on either side or beneath them if applicable, depending on their location relative to door opening below them. This will give your roof overhang its finished look and help keep moisture from getting beneath it.
Make sure you caulk around the edges of both sides of the trim material to seal them in place. Finally, attach a strip of weather stripping along the bottom edge of your roof structure before installing siding or other finishes to prevent water infiltration through the bottom gap between the door frame and overhang. Your exterior door and roof overhang are now ready to keep the elements out of your home.
8. Install Shingles:
Finally, install shingles onto both sides of your roof overhang using galvanized nails or screws driven through pre-drilled holes in each shingle piece and into studs behind them on either side or beneath them if applicable, depending on their location relative to the door opening below them.
Be sure to overlap each shingle course slightly, and be sure to use roofing tar in the seams between each shingle piece. Make sure not to overdrive the nails or screws; they should just barely penetrate through the thickness of each shingle piece. Finally, use a waterproof sealant along any corners that were cut for the overhang installation.
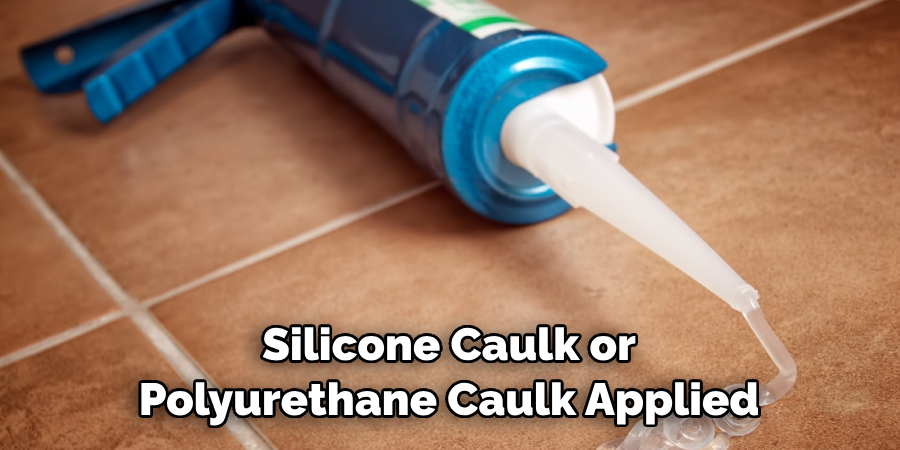
9. Caulk Gaps Between Shingles:
After installing shingles onto both sides of your roof overhang, caulk any gaps between adjacent shingle pieces using caulking material designed for outdoor use such as silicone caulk or polyurethane caulk applied along seams between shingle pieces with a caulking gun. This will help ensure that no water gets into the seams between your shingles, which could cause damage to your roof overhang.
Be sure to clean off any excess caulk before it dries with a damp cloth. Additionally, apply more caulk along the edges of the roof overhang and where it meets up with the exterior door frame. Doing this will provide an additional seal to your roof overhang and help protect the exterior door from water damage.
10. Paint Roof Overhang:
Once all components have been installed onto both sides of your roof overhang, paint it using paint designed specifically for outdoor use, such as exterior acrylic paint applied evenly across the entire surface area with a paint roller. This will protect the material from moisture and extreme weather elements, helping it last for years to come.
Make sure to read all instructions on the paint can for optimal results and apply two coats of paint for extra protection. Allow each coat to dry completely before applying the other so that your roof overhang looks professional and uniform in color when completed.

Conclusion
Building a roof overhang over an exterior door is a great way to add curb appeal to any home. Not only does it add style and beauty to the outside of your home, but it also provides practical benefits such as shelter from the elements, protection from UV rays, and increased security.
Furthermore, it is relatively easy to build with materials you can find at most hardware stores. From designing the frame to securing it in place, this tutorial has provided step-by-step instructions on how to build a durable and stylish roof overhang that can enhance the outside of your home for years to come.
And if you find that you need more guidance on how to build a roof overhang over an exterior door, please don’t hesitate to reach out! We’d be glad to help answer questions and provide whatever additional assistance we can. Let us know if there’s anything we can do so you can enjoy the durable and beautiful result of your hard work!