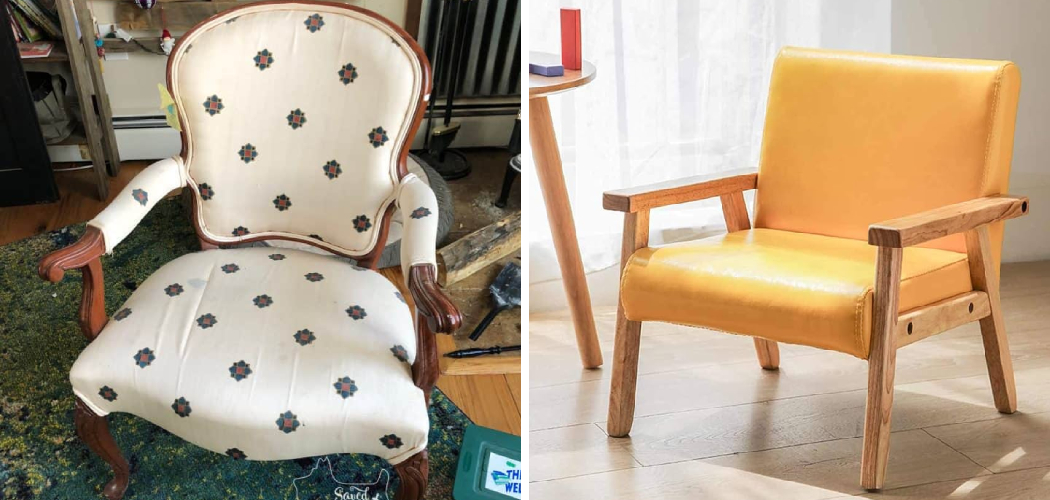
Reupholstering a chair that doesn’t come apart can be both a challenging and rewarding endeavor. The process requires a careful approach and precise techniques, as the usual disassembly methods aren’t applicable. However, successfully reupholstering such a chair offers numerous benefits.

It restores the seat’s comfort, updates its aesthetic appeal, and preserves sentimental value, especially if the chair is a family heirloom or holds personal significance. Careful planning and meticulous attention to detail are crucial for a successful reupholstery project. Whether you’re a seasoned DIY enthusiast or a novice tackling your first reupholstery task, understanding the intricacies of how to reupholster a chair that doesn’t come apart ensures that the finished product looks professional and meets your expectations.
Assessing the Chair and Materials
Evaluating the condition of the chair is the first crucial step in reupholstering a chair that doesn’t come apart. Begin by checking for structural stability. Examine the chair for any loose joints or signs of damage to the frame, such as cracks or weaknesses. A stable foundation is essential to ensure the longevity and comfort of the reupholstered chair. Next, assess the existing upholstery. Look for wear and tear on the fabric, such as fraying, fading, or stains. This will help you determine the extent of the reupholstery needed and whether any additional repairs are required.
Once you’ve evaluated the chair, gather the necessary materials for reupholstering. You will need fabric for the upholstery, ensuring there is enough to cover the entire chair, including any additional allowances for seams and tucking. If the existing padding is worn out, consider acquiring upholstery foam or batting to replace it. Essential upholstery tools include sharp scissors for cutting fabric, a staple gun with plenty of staples, fabric glue for securing loose ends, and basic hand tools like a hammer and pliers for removing old staples or tacks. Preparing all the required materials and tools beforehand will streamline the reupholstery process and help achieve professional results.
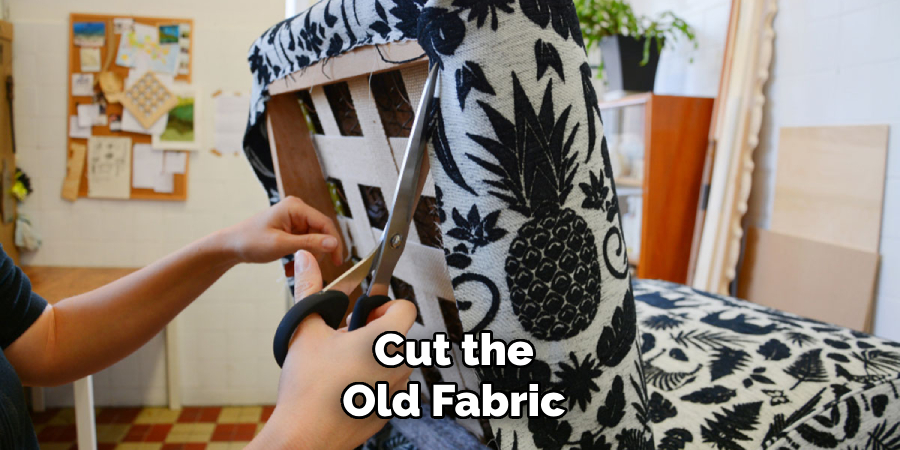
Removing the Old Upholstery
- Cutting away the old fabric:
- Use sharp scissors to carefully cut along the seams and edges of the existing upholstery.
- Removing staples or tacks:
- Using pliers to pull out staples or tacks, the fabric is secured to the frame.
- Peeling away layers:
- Remove any foam or batting layers underneath the fabric.
- Cleaning the chair frame:
- Wiping down the frame to remove dust, dirt, and residue from the old upholstery.
Cutting and Preparing New Fabric
Measuring and Cutting Fabric:
- Measuring Each Section of the Chair: Begin by measuring each part of the chair that requires new upholstery. This includes the seat, backrest, arms, and any other areas with fabric covering. Use a flexible tape measure to get accurate measurements of each section’s width, length, and any curves or angles that may affect how the fabric is cut.
- Adding Extra Fabric for Seam Allowance and Tucking: It’s crucial to add extra fabric to your measurements for seam allowances and tucking. Typically, an additional 2 to 3 inches around the edges is sufficient. This extra fabric will allow you to staple the material securely to the chair frame and make adjustments as needed without running short.
- Cutting the Fabric According to Measurements: Lay out your chosen fabric on a flat surface. Use fabric chalk or a fabric marker to outline the measurements for each section, including the added allowance. Carefully cut the fabric along the outlines with sharp scissors to ensure clean edges. Label each piece to keep track of which section it corresponds to, which will help during the upholstery process.
Preparing the Fabric:
- Ironing Out Any Wrinkles or Creases in the Fabric: Before you start attaching the new fabric, it’s important to iron out any wrinkles or creases. These imperfections can affect the final appearance of the upholstery, leading to an uneven or unattractive finish. Set your iron to the appropriate temperature for the fabric type and gently press out any wrinkles, working systematically across each piece.
- Adding Additional Layers of Batting or Foam if Extra Padding is Desired: If the existing padding is insufficient or you want to add extra comfort, consider adding layers of batting or upholstery foam. Cut the batting or foam to the same dimensions as the fabric pieces minus the extra allowance. Secure these padding layers to the chair sections using fabric glue or adhesive spray, ensuring they are evenly distributed and firmly attached. Once the padding is in place, the new fabric pieces are ready to be attached to the chair.
How to Reupholster a Chair that Doesn’t Come Apart: Upholstering the Chair
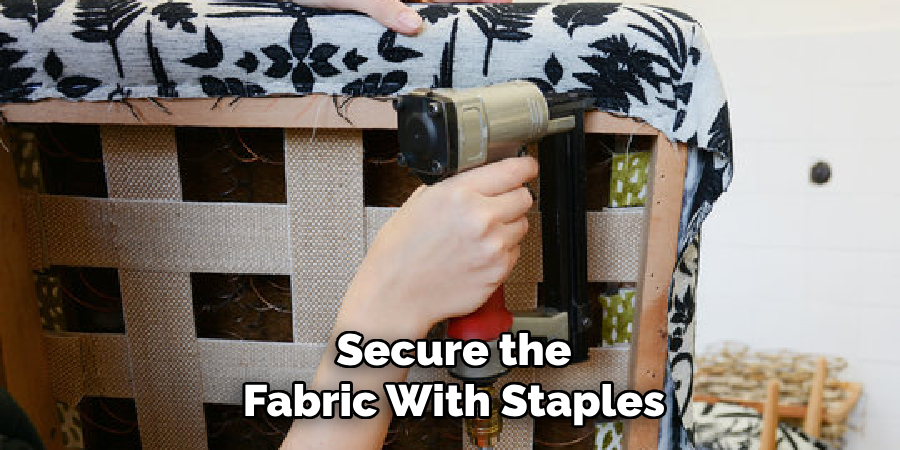
1.Attaching the New Fabric:
- Starting With the Seat: Position the fabric over the chair’s seat. Make sure it is centered and aligned with the chair’s contours. Gently pull the fabric taut over the seat, ensuring there are no wrinkles or folds. An even and snug fit is crucial for a professional appearance.
- Securing the Fabric With Staples Along the Edges: Once the fabric is in the correct position, start securing it with a staple gun. Begin at the center of one edge of the seat and staple the fabric to the frame. Move to the opposite side and secure the center of that edge. Alternate between sides, working from the center outwards. This helps to distribute tension evenly and avoid any bunching or sagging of the fabric. Continue this process along all the edges until the fabric is fixed in place.
- Folding and Pleating the Fabric Neatly Around Corners and Curves: When you reach the corners and curves of the seat, fold and pleat the fabric neatly. This will ensure a smooth and professional-looking finish. Make small, even pleats, and secure them with staples as you go along. Take your time to adjust and align the fabric for a seamless appearance.
2.Upholstering the backrest and arms:
- Following the Same Process as for the Seat: Repeat the same steps for the backrest and arms of the chair. Position the fabric, pull it taut, and staple it in place, working from the center outwards. Pay special attention to any curves or corners, and make neat folds and pleats as needed to ensure a smooth and tight fit.
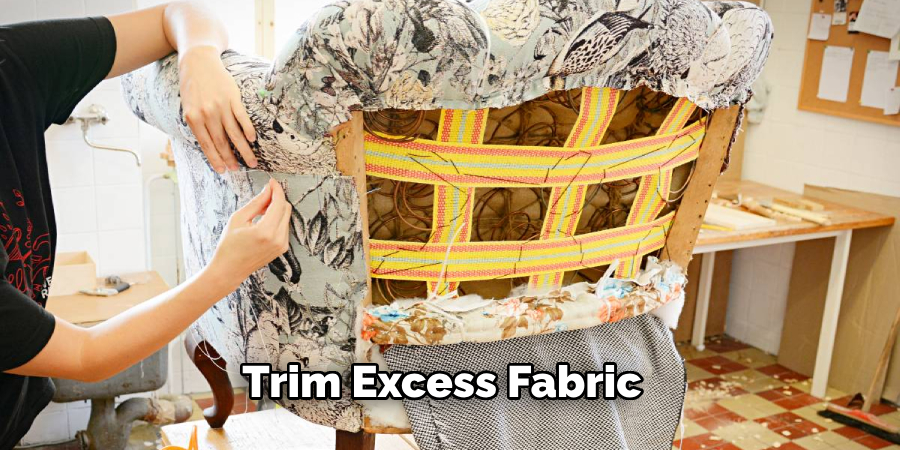
3.Trimming excess fabric:
- Cutting Away Any Excess Fabric: After all chair sections are upholstered, use sharp scissors to carefully trim away any excess fabric. Make sure to leave enough fabric to remain securely stapled while removing any excess that could cause bunching or an unkempt appearance. Take this step slowly to avoid accidentally cutting too close to the staples, which could compromise the stability of the upholstery.
Careful execution of these steps will result in a newly reupholstered chair that is both comfortable and visually appealing, with a professional and well-crafted finish.
Finishing Touches
Adding Decorative Details:
- Concealing Staple Lines With Upholstery Trim or Piping: Once the new fabric is securely in place, you may need to hide any visible staple lines for a clean and polished look. Upholstery trim or piping can be used to cover these lines effectively. Choose a trim or piping that complements your fabric and chair design. Use a hot glue gun or fabric glue to attach the trim along the stapled edges, ensuring that it is evenly placed and securely bonded.
- Adding Decorative Buttons or Tufting for a Tailored Look: To enhance the overall aesthetic and create a tailored appearance, consider adding decorative buttons or tufting. Mark the desired locations for buttons or tufting on the fabric, ensuring symmetry and alignment. Use a strong upholstery needle and thread to attach buttons, pulling the thread tight to create tufted indentations. Secure the thread knots firmly on the underside of the fabric.
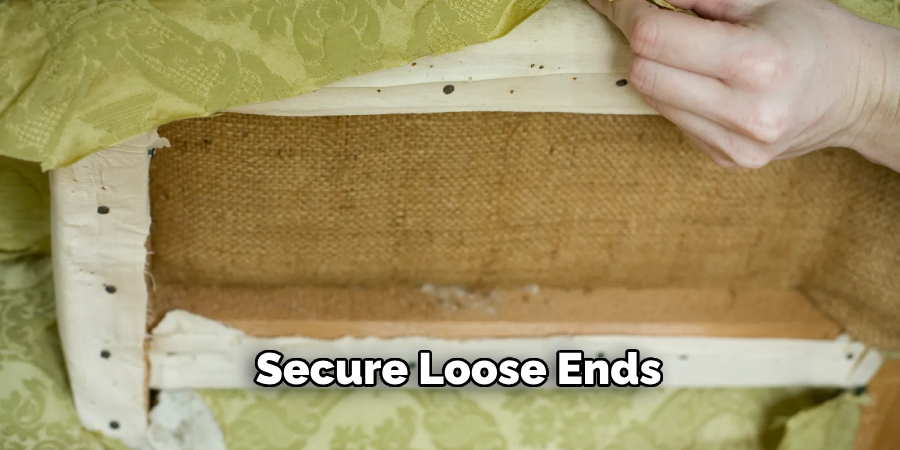
Securing Loose Ends:
- Using Fabric Glue or Hand-sewing to Secure Any Loose Edges or Seams: Inspect the chair for any loose edges or seams that may need additional attention. Apply fabric glue to secure loose edges or use a needle and thread to hand-sew these areas for a more durable finish. This will ensure the upholstery remains intact and maintains a neat appearance over time.
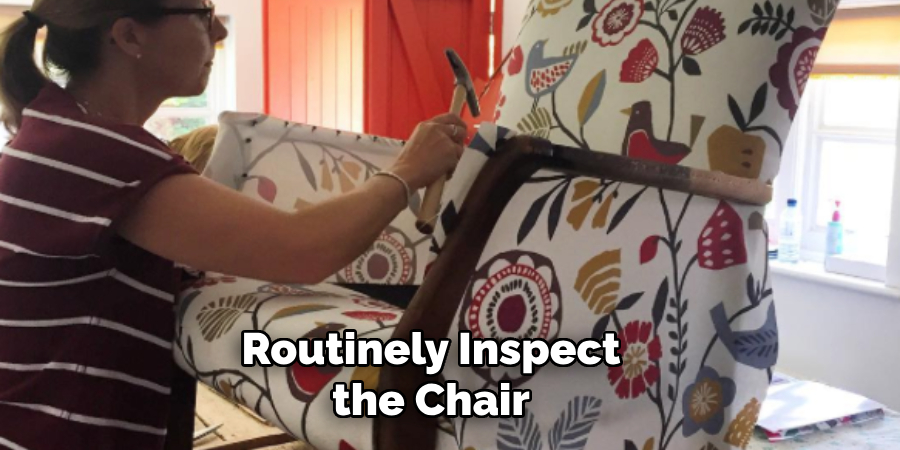
Inspecting the chair:
- Checking for Any Loose Staples or Uneven Areas That May Need Adjustment: Conduct a thorough inspection of the newly upholstered chair. Look for any loose staples, uneven fabric tension, or other imperfections requiring adjustments. Make any necessary corrections to ensure the chair is perfectly upholstered and ready for use.
Cleaning and Maintenance
Cleaning the newly upholstered chair:
- Vacuuming to Remove Any Dust or Debris: Regularly vacuum the chair to keep it free from dust, dirt, and debris. Use a soft brush attachment to gently clean the fabric without causing any wear or damage.
- Spot Cleaning With Mild Detergent and Water as Needed: For small spills or stains, use a mild detergent mixed with water to spot-clean the affected area. Apply the solution with a clean cloth, gently blotting the stain. Avoid rubbing, as this can spread the stain and damage the fabric. Always test the cleaning solution on an inconspicuous area first to ensure it does not discolor or damage the material.
Regular maintenance:
- Checking for Signs of Wear or Damage and Addressing Promptly: Routinely inspect the chair for any signs of wear, such as frayed edges or loose seams. Address these issues promptly to prevent further damage and to maintain the chair’s appearance and structural integrity.
- Avoid Placing Heavy or Sharp Objects on the Chair to Prevent Damage to the Upholstery: Take care to avoid placing heavy or sharp objects on the chair, as these can cause tears, punctures, or other forms of damage to the fabric. Encourage proper usage to extend the life of the upholstery and keep the chair looking its best.
Conclusion
Reupholstering a chair without disassembly involves several precise and methodical steps to ensure a professional finish. First, assess the chair to identify any structural issues and determine its suitability for reupholstery. Removing the old upholstery follows, which involves carefully stripping away the existing fabric. Next, cut and prepare the new fabric, paying close attention to measurements for a snug fit.
The core steps of upholstering involve positioning, pulling, and securing the fabric with staples, focusing on neat folds and pleats around curves and corners. Adding final touches, such as decorative trims or buttons, and securing any loose edges ensure a polished look. Regular cleaning and maintenance, including vacuuming and spot cleaning, will help preserve the newly updated chair. Learning how to reupholster a chair that doesn’t come apart can be a rewarding and satisfying experience, offering both aesthetic improvement and a sense of personal accomplishment. Approach each project with patience, attention to detail, and a flair for creativity to create a beautifully restored piece of furniture.
You can also check it out to Wash Off Chalk Marker