
Relocating a ceiling light fixture offers homeowners the unique opportunity to enhance the functionality and aesthetics of their living spaces.

This flexibility allows for lighting adjustment to better suit room layouts, improve ambiance, or highlight architectural features. Understanding how to relocate ceiling light fixtures can transform a room, making it appear more spacious, welcoming, or focused on certain areas.
Although it might seem daunting, moving a light fixture with the right knowledge and preparation can be straightforward.
This guide aims to empower homeowners with the ability to customize their lighting, making any room more suited to their needs and preferences.
Safety must be the top priority when undertaking any electrical work project, such as learning how to relocate ceiling light fixtures. Proper planning not only ensures a smooth execution but also minimizes risks of injury or damage. Before starting, it’s essential to understand the project’s scope, from the initial assessment of the new location to the final touches on the installation.
This involves considering the electrical wiring requirements, the structural support needed for the fixture, and the necessary tools and safety gear.
A well-thought-out plan, paired with a respect for electricity and a thorough understanding of household wiring, is crucial. By placing an emphasis on safety and meticulous planning, homeowners can confidently proceed with relocating their ceiling light fixture, ensuring a successful and safe enhancement to their home’s lighting.
Assessing the New Location
A. Determining the Ideal Placement for Your Fixture
The initial step in effectively relocating a ceiling light fixture is identifying the ideal placement for your new fixture. This critical phase involves evaluating the functional and aesthetic requirements of the space.
Consider the activities that occur in the room; for example, a reading area may benefit from direct lighting, while a general living space might be better served by ambient lighting.
The size and shape of the room play a significant role in this decision as well. In spaces where tasks are performed, such as kitchens or home offices, positioning the light directly above work areas can reduce shadows and improve visibility.

Conversely, central placement can create a welcoming atmosphere and enhance the room’s overall aesthetic in gathering areas like dining rooms or living rooms. It’s also wise to consider the fixture type and the light direction it emits. Some fixtures are designed to cast light broadly, while others focus light in a specific direction.
Utilizing these characteristics can help achieve the desired effect in a room. Lastly, assess natural light sources and how they change throughout the day to ensure that the relocated fixture complements natural light, avoiding over-illumination or stark contrasts.
B. Considering Electrical Wiring and Access
After determining the best location for your light fixture, the next step is considering the practical aspects of electrical wiring and access.
This involves thoroughly evaluating the current electrical system’s capacity to support the new fixture location. Firstly, identify the nearest power source and evaluate if existing wiring can be extended or if new wiring is necessary.
It’s crucial to understand the path that the wiring will take from the source to the new fixture location. Obstacles such as beams, joists, and existing electrical or plumbing infrastructure can impact the feasibility of your chosen spot.
Another crucial factor is the new location’s accessibility. Relocating a fixture to a hard-to-reach area may increase the project’s complexity and cost. Consider also the future accessibility for maintenance, repairs, or further alterations.
Additionally, compliance with local building codes and regulations must be considered. These may dictate specific requirements for electrical installations, including the types of wires, junction boxes, and supports that can be used, as well as how to safely secure them.
It may be beneficial to consult with a professional electrician to ensure that the planned relocation is feasible and compliant with all safety standards. This careful consideration of electrical wiring and access helps ensure a smooth installation process and guarantees the safety and reliability of your lighting for years to come.
How to Relocate Ceiling Light Fixture: Preparing for Relocation
A. Gathering Necessary Tools and Supplies
Collecting the necessary tools and supplies is essential before beginning the process of relocating a ceiling light fixture. This preparatory step ensures that you have everything needed for a smooth and efficient relocation, minimizing disruptions.

1. Electrical Tools for Wiring
The right electrical tools can make all the difference in successfully executing the project. Key items include:
- Wire Strippers: Essential for removing the insulation from electrical wires without damaging the metal.
- Circuit Tester or Multimeter: A crucial safety tool to ensure that there is no live electrical current in the wires you’ll be working with.
- Screwdrivers: A set of both flat-head and Phillips screwdrivers, as both may be required for different components of the light fixture and electrical boxes.
- Pliers: Needle-nose pliers are particularly useful for bending wire, while side-cutting pliers can trim wires to the necessary length.
- Wire Nuts: These are used to securely connect two or more wires together.
- Electrical Tape: This insulates wire connections, ensuring they are safely enclosed.
- Fish Tape: If running new wiring is part of the relocation, fish tape is used to pull wire through walls, ceilings, and conduit.
2. Ladder or Scaffold for Access
Given the nature of the task, having stable and appropriate-height access is vital. Depending on the ceiling height and workspace area, a ladder or a scaffold ensures that you can safely reach the light fixture and perform the necessary work comfortably.
B. Turning Off Power and Ensuring Safety
Safety is paramount when dealing with electrical installations, and relocating a ceiling light fixture is no exception. The following steps outline how to ensure a safe working environment:
- Turning Off Power: Begin by switching off the circuit breaker that supplies power to the light fixture. It’s advisable to turn off the main power supply to the house to avoid any risk of accidental electrocution.
- Verifying No Power: Use a circuit tester or multimeter to confirm that no current is flowing to the wires you will be working with. This step should not be overlooked, as assuming wires are dead without testing can lead to dangerous outcomes.
- Clear Workspace: Ensure that the area around your work site is free of furniture, rugs, or other objects that could trip you up or hinder your access to the fixture.
- Wearing Safety Gear: Personal protective equipment, such as gloves to protect your hands and safety glasses to shield your eyes from any debris, should be worn at all times during the project.
Taking the time to thoroughly prepare for the relocation of a ceiling light fixture, from gathering the essential tools to ensuring a safe working environment, lays the foundation for a successful DIY project.
How to Relocate Ceiling Light Fixture: Removing the Existing Fixture
A. Disconnecting Power and Testing Circuits
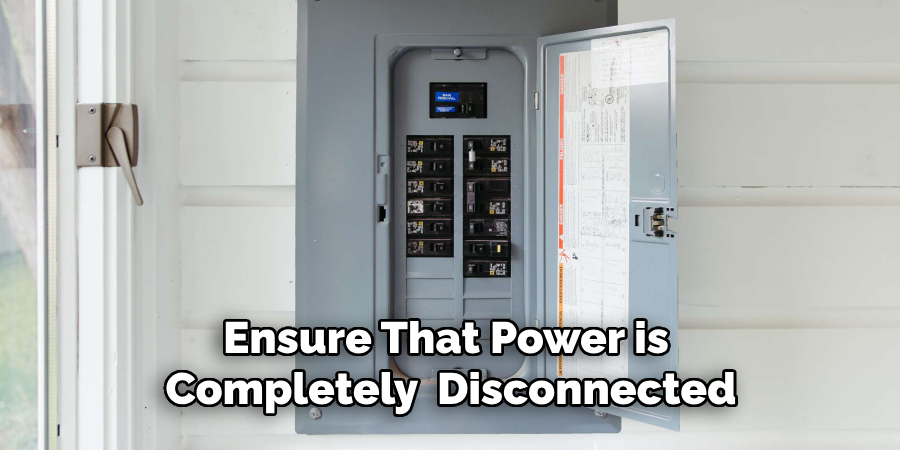
The first critical step in removing an existing ceiling light fixture is to ensure that power is completely disconnected. This is crucial for preventing electrical shocks and accidents. Start by turning off the circuit breaker that supplies power to the light fixture. For added safety, it may be wise to shut off the main power supply to the entire residence.
Once the power is off, verifying that the circuit is dead using a circuit tester or multimeter is essential. Place the tester’s probes on the fixture’s wires or terminals. If the tester does not light up or beep, the circuit is safe to work on.
Even with the power turned off, exercise caution and treat the wires as if they were life during removal. This mindset ensures you maintain the highest safety standards throughout the project. Confirming no electrical current ensures a safe working environment, allowing you to focus on the physical removal of the fixture without the risk of electrical injury.
B. Detaching the Fixture from the Ceiling
After confirming the absence of electrical current, the next step is detaching the fixture from the ceiling.
This process varies depending on the fixture type but typically involves unscrewing the mounting screws or nuts that hold the fixture to the ceiling box. Sometimes, fixtures are secured with a decorative canopy that conceals the mounting hardware. If so, gently lower the canopy to reveal the connections.
Carefully support the weight of the fixture as you loosen the screws to prevent it from suddenly dropping, which could cause injury or damage to the fixture.
Once the fixture is free from the ceiling, carefully disconnect the wire nuts or connectors that attach the fixture wires to the house wiring. Labeling each wire with masking tape and a marker is advisable to ease the installation of the new or relocated fixture.
Inspect the ceiling box to ensure it is securely fastened to a support. If the box appears loose or damaged, it may need to be replaced or reinforced before installing a new fixture. This is also an opportune moment to assess if the existing electrical box meets the requirements for the new fixture, especially if the new unit is heavier than the old one.
Removing the existing fixture requires patience and precision. Ensuring the area is well-lit with natural or alternative lighting sources helps safely complete this task. Following these detailed steps not only guarantees a smooth removal but also sets a solid foundation for installing a new or relocated ceiling light fixture.
Installing New Electrical Wiring
A. Planning and Routing New Wiring Pathways

Before laying new electrical wiring for the relocated ceiling light fixture, careful planning of the wiring route is essential. This preparation ensures that the wiring is both efficient and complies with electrical codes. Begin by identifying the location of the new fixture and the nearest power source you intend to connect to.
Consider the most direct path that does not interfere with existing wiring, plumbing, or structural components within the walls or ceiling. Use a stud finder to avoid drilling into studs, joists, or other obstacles.
Once the pathway is determined, measure the distance to calculate the amount of new wiring needed, adding extra length for ease of installation and future adjustments. If the route goes through walls or ceilings, you might need to drill holes through studs or joists to pass the wire.
The holes should be centered and at least 1¼ inches from the edge to prevent damage from nails or screws. When routing wiring across a ceiling, the National Electrical Code (NEC) requires support by ceiling joists or running boards to protect the wires from being damaged.
To avoid electrical hazards, all wiring must conform to local building codes, which may require the use of conduit or specific types of wire. Consult the latest version of the NEC or a professional electrician to ensure compliance and safety.
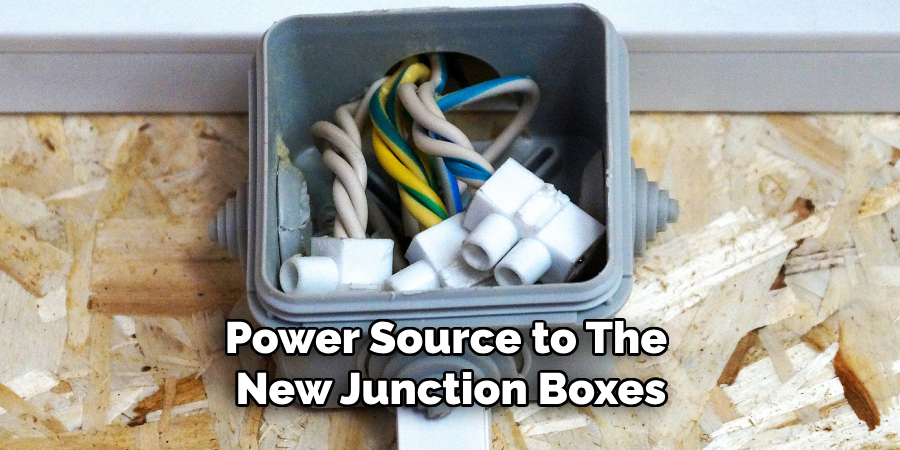
B. Installing Junction Boxes and Wiring Connections
The next step involves installing new junction boxes at the relocated fixture’s location and any other points where connections or splits in the wiring will occur. Junction boxes should be mounted securely to structural elements like studs or joists.
They serve as accessible points for making wire connections and protect these connections from damage. When installing, ensure there’s enough room around the box for the cover to fit and for future accessibility.
For the wiring connections, start by feeding the new wire through the drilled holes from the power source to the new junction boxes and eventually to the location of the relocated light fixture. At each junction box, strip the insulation from the wires to expose the copper ends.
Use wire nuts to connect wires of the same color – white to white (neutral), black to black (hot), and green or bare copper to green or bare copper (ground). Ensure each connection is tight and secure before gently folding the wires into the box and attaching the box cover.
Adhering to the correct wiring configurations is crucial when making connections to prevent electrical faults. If the wiring includes a switch, the hot wire should route through the switch before reaching the fixture to control power on and off.
After all connections are made, attach a cable clamp to each junction box, securing the wiring in place and providing strain relief.
Before proceeding to the project’s next phase, it’s advisable to have the wiring inspected by a certified electrician or a building inspector to ensure all installations are up to code and safe. While often overlooked in DIY projects, this step prevents potential electrical hazards or issues.
Mounting the New Electrical Box
A. Choosing the Right Box for Your Fixture
When selecting an electrical box for your new or relocated ceiling fixture, it’s imperative to consider the weight and type of the fixture and the box’s compatibility with your ceiling structure. Electrical boxes come in various materials such as plastic, steel, or fiberglass; each type has specific use cases and weight limits. For lightweight fixtures, a plastic box may suffice.
However, for heavier fixtures or ceiling fans, a metal box engineered to support heavier loads is essential. Additionally, the electrical box’s size is crucial for accommodating all the wires safely without overcrowding.
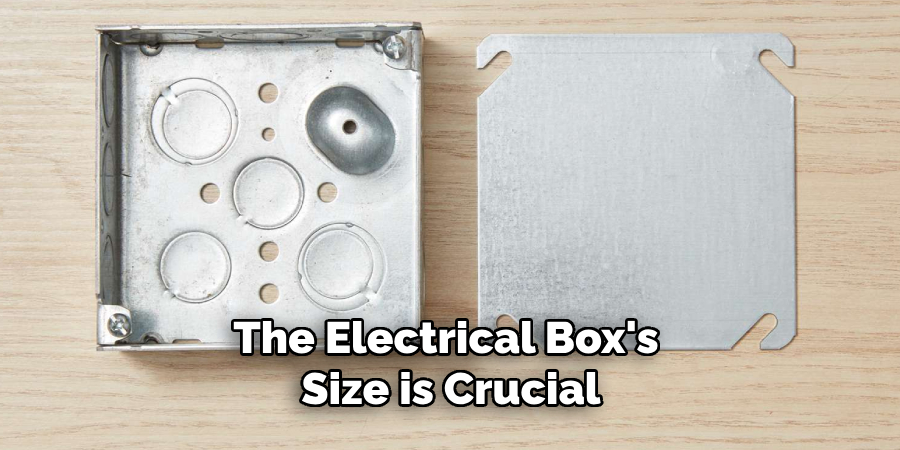
It’s advisable to opt for a box rated for ceiling fan support if it is possible to install a fan in the future. The National Electrical Code (NEC) provides guidelines on the appropriate box types and installation methods, ensuring safety and compliance.
Checking these guidelines or consulting with a professional electrician can help you choose the right box for your project.
B. Securing the Box to the Ceiling Structure
Securing the electrical box to the ceiling structure is a critical step that ensures the safety and stability of your ceiling fixture. To mount the box, you must identify a part of the ceiling’s structural framework, such as a joist or a cross brace.
If the location of your new fixture does not align with a structural element, you may need to install a wooden brace between joists to provide adequate support.
First, measure and cut the brace to fit snugly between the joists, positioning it so that the center of the box aligns with your desired fixture location. Use wood screws to secure the brace to the joists, ensuring it is strong enough to hold the weight of the fixture. Next, attach the electrical box to the brace or joist.
If you’re using a metal box, pre-drill holes and use machine screws to fasten it securely. For plastic boxes, nails or screws that come with the box can be used for attachment.
In cases where the ceiling structure is concrete or where access above the ceiling is not possible, special anchors or concrete expansion anchors may be required to mount the box securely.
It’s crucial to ensure the box is firmly attached to the supporting structure to prevent any movement or sagging, which could compromise the safety and functionality of the ceiling fixture. After mounting, gently pull on the box to test its stability before proceeding.
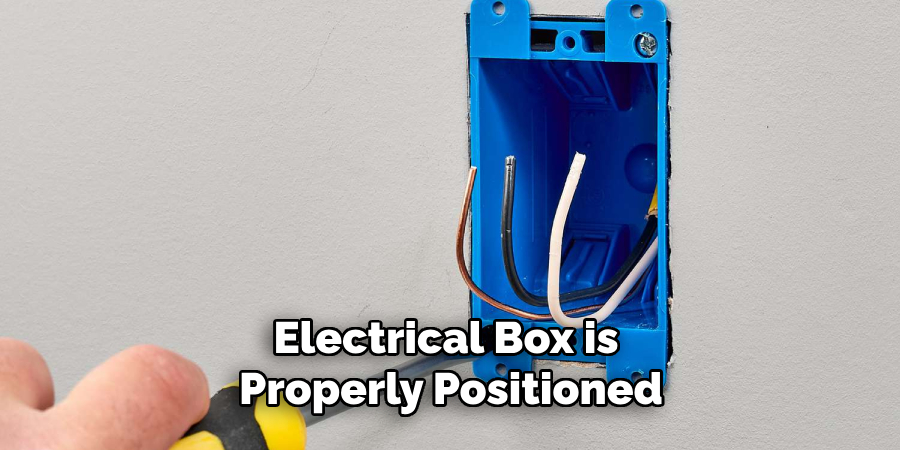
Completing this step with diligence ensures that the electrical box is properly positioned and securely attached, setting a solid foundation for successfully installing your new or relocated ceiling fixture.
Connecting the Light Fixture
A. Wiring the Fixture to the Electrical Box
After ensuring the newly installed electrical box is securely fastened and that all wiring complies with local electrical codes, the next critical step is connecting the light fixture. Begin by carefully reading the manufacturer’s installation instructions for your specific fixture. Generally, this involves threading the fixture’s wires through the designated opening in the electrical box.
Once the wires are fed through, match and connect the fixture’s wires to the corresponding wires in the box— typically, black to black (hot), white to white (neutral), and green or bare copper to green or bare copper (ground). Secure each connection with a wire nut, then wrap each with electrical tape for added safety.
Neatly fold the connected wires into the box, ensuring there is no undue stress on any connection. Finally, attach the fixture to the box using the provided mounting screws or bracket, being careful not to pinch any wires.
B. Testing the Fixture Functionality
Before proclaiming the project a complete success, it is imperative to test the functionality of the newly installed light fixture to ensure it operates safely and correctly.

Begin by making sure that all connections are secure and that the circuit breaker to the installation area is turned off. With the connections double-checked, restore power at the circuit breaker. Then, operate the light switch associated with the fixture.
If the fixture does not light up, turn off the power at the breaker again before re-examining your connections for any issues or missed steps in the installation process. Consider using a voltage tester to verify the presence of electrical power at the fixture’s connections if troubleshooting is necessary.
Once the fixture is confirmed to be working correctly, examine it for any flickering or unusual operation, which could indicate a loose connection.
After successfully testing the fixture’s functionality under various conditions (e.g., with different light dimming levels if applicable), you can finalize the installation by adding decorative elements or covers to the fixture. It’s also prudent to schedule a final inspection if required by local regulations, ensuring your project adheres to all safety standards and codes.

Patching and Repairing Ceiling Surfaces
A. Filling Holes and Gaps from Previous Fixture
After successfully installing your new or relocated light fixture, the next important step is to address any holes or gaps left in the ceiling from the previous fixture. This enhances the aesthetic appeal of your ceiling and prevents potential issues like moisture ingress. Start by removing any loose debris around the holes and ensure the surface is clean and dry.

A simple application of spackling paste with a putty knife is sufficient for small holes. Apply the paste, fill the hole completely, and then smooth it to level with the surrounding surface. You might need to use a piece of drywall or a plaster repair patch for larger gaps or holes.
Cut the patch to size, apply joint compound around the edges, and then place it over the hole, pressing firmly. Apply more compound over the patch, feathering the edges to blend seamlessly with the existing ceiling. Allow it to dry thoroughly, following the manufacturer’s recommended drying times before proceeding to the next step.
B. Sanding and Painting for a Seamless Finish
Once the filled areas have dried completely, sanding is necessary to achieve a smooth, consistent surface that matches the rest of the ceiling. Using fine-grit sandpaper, lightly sand over the patched areas, ensuring not to apply too much pressure to avoid creating further indents or damage.

The goal is to make the patch indistinguishable from the rest of the ceiling. After achieving a smooth finish, clean the area to remove all dust and debris, preparing it for painting.
Choosing the right paint and tools is essential for a seamless finish. Ideally, use the same type and shade of paint that exists on the rest of the ceiling. If this is unavailable, a primer may be applied before painting to ensure even coverage and to help match the existing ceiling color. Using a high-quality angled brush, cut in around the patch’s perimeter.
Then, using a roller with a nap that matches the rest of the ceiling’s texture, apply the paint over the patch and surrounding area, blending outward to prevent noticeable lines. Multiple light coats, with adequate drying time between each, may be necessary to achieve an even and discreet finish.
After the final coat has dried, inspect your work from various angles and lighting conditions to ensure the patch is seamlessly integrated with the rest of the ceiling. This careful attention to detail reflects a high level of craftsmanship and restores your space’s aesthetic integrity.
Conclusion
In conclusion, relocating a ceiling light fixture is a comprehensive process that starts with planning the relocation, ensuring adherence to safety protocols, and obtaining all necessary permits.
The initial steps include turning off the power, removing the existing fixture, and then installing a new electrical box at the desired location. Wiring the fixture correctly according to color-coded wires—black to black, white to white, and green or copper to green or copper—is crucial for safety and functionality.
Testing the fixture before finalizing the setup is fundamental to ensure it operates correctly. Lastly, patching and repairing the ceiling surfaces ensures a clean, professional look, effectively concealing the evidence of relocation. Adequate sanding and painting guarantee a seamless finish, completing the relocation process.
Engaging in a DIY project, such as learning how to relocate ceiling light fixture can be a rewarding endeavor. Not only does it enhance your living space, but it also imparts valuable skills and a sense of accomplishment.
With the right tools, careful planning, and adherence to safety standards, electrical DIY projects are within reach for many homeowners. It’s essential, however, to respect electricity’s power by always turning off the circuit and double-checking connections for safety.
Starting with smaller projects can build confidence for those new to such tasks. Remember, the internet is a goldmine for tutorials and guidance, making even more complex tasks like relocating a light fixture manageable.
Consider this an opportunity to step out of your comfort zone, learn something new, and personalize your home according to your vision. With patience and careful attention to detail, you’ll find that even intricate electrical projects can be successfully completed, paving the way for more ambitious DIY undertakings in the future.