Painting over high gloss laminate furniture presents both challenges and rewards, transforming outdated or mismatched pieces into stylish, updated decor. The slick surface of laminate can make it difficult for paint to adhere properly, but a stunning, durable finish can be achieved with the right preparation and technique. Many choose to paint laminate furniture to revive old pieces, match the new decor, or simply update a room’s style without the expense of purchasing new furniture.

The key to successfully learning how to paint over high gloss laminate furniture lies in thorough preparation: cleaning, sanding, and priming the surface to ensure the paint bonds effectively. With patience and attention to detail, even the most challenging high gloss laminate surfaces can be transformed into custom pieces that elevate the aesthetic of any space.
Gathering Materials and Tools
List of Required Materials:
- Sandpaper (120 and 220 grit)
- Primer designed for glossy surfaces (bonding primer)
- High-quality paint (latex, acrylic, or chalk paint)
- Paintbrushes and foam rollers
- Tack cloth or damp cloth
- Painter’s tape
- Drop cloths or old sheets
- Screwdriver (for removing hardware)
Gathering the proper materials and tools is a crucial first step in achieving a successful paint job on high-gloss laminate furniture. Specifically, choosing the right primer and paint is of utmost importance for ensuring adhesion and durability. A bonding primer designed for glossy surfaces will help the paint adhere effectively to the laminate. High-quality paint, whether latex, acrylic, or chalk, will provide a lasting and smooth finish. Additionally, using the correct sandpaper grits and quality brushes or rollers will facilitate a more professional result, making the project easier and more efficient.
Preparing the Workspace
Creating an optimal workspace is essential for a successful painting project, particularly when dealing with high-gloss laminate furniture. Start by setting up a well-ventilated area, preferably outdoors or in a garage, to ensure adequate airflow and minimize inhalation of fumes. Protect your surroundings by laying down drop cloths or old sheets to catch any paint drips or spills, safeguarding floors and nearby objects.
Before beginning, remove any hardware from the furniture using a screwdriver and store these items safely to avoid losing them. Ensuring a clean, organized workspace will streamline the painting process, allowing for easy access to all necessary materials and tools. A clutter-free environment minimizes the risk of accidental damage and helps you focus on achieving a smooth, professional finish on your high-gloss laminate furniture.
Cleaning and Sanding the Furniture
Cleaning the Surface:
- Use a mild detergent or degreaser to remove dirt, grease, and oils.
- Rinsing thoroughly and allowing the furniture to dry completely.
Before any sanding or painting can begin, starting with a clean surface is important. Use a mild detergent or a degreaser to effectively remove any dirt, grease, and oils that may be lingering on the high-gloss laminate furniture. Don’t rush through this step; thoroughly cleaning the surface will enhance the bonding of the primer and paint. After cleaning, rinse the furniture well to eliminate any soap residue and let it dry completely before moving on to the next step.
Sanding the Laminate:
- 120-grit sandpaper is used to lightly scuff the surface.
- Sanding in a circular motion creates a rough texture for the primer to adhere to.
- Wiping away dust with a tack cloth or damp cloth.
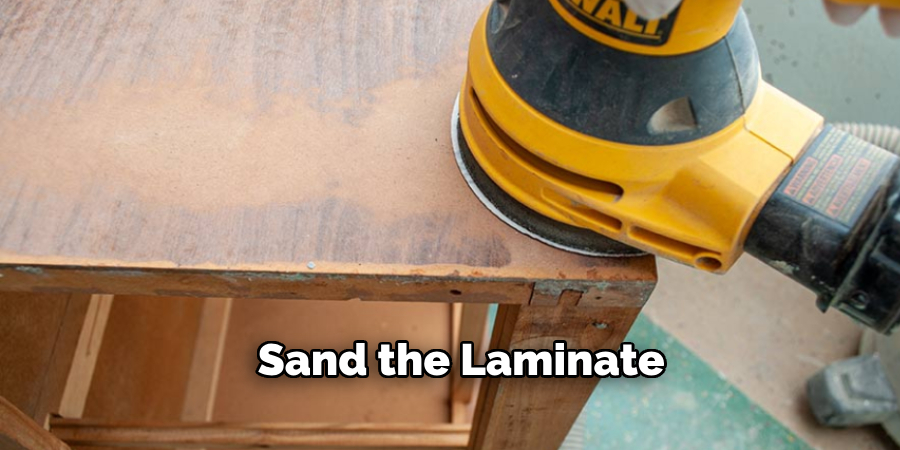
Sanding is critical when preparing high-gloss laminate furniture for painting. Using 120-grit sandpaper, lightly scuff the surface in a circular motion. This process is essential – the aim is to create a rough texture on the glossy laminate, which will help the primer stick more effectively. Be sure not to sand too aggressively to avoid damaging the laminate. Once the entire piece has been sanded, use a tack cloth or a damp cloth to wipe away all the dust. Any leftover dust particles can interfere with the adhesion of the primer and paint, so take your time to ensure the surface is perfectly clean and smooth.
Importance of Thorough Sanding to Ensure Primer and Paint Adhesion:
The importance of thorough sanding cannot be overstated when learning how to paint over high gloss laminate furniture. Proper sanding removes the shiny, slick surface that can prevent primer and paint from sticking. By creating a rough texture, you provide a better “tooth” for the primer to grab onto, resulting in a durable and long-lasting finish. Skipping or rushing this step can lead to peeling or chipping paint down the line, ultimately undermining all your hard work.
How to Paint Over High Gloss Laminate Furniture: Applying Primer
1.Choosing the right primer:
Selecting the appropriate primer is crucial for ensuring the success of your painting project on high-gloss laminate furniture. Opt for a bonding primer specifically designed for glossy surfaces. These primers have adhesive properties that enable them to stick effectively to shiny laminate, providing a strong foundation for your paint. Some well-recommended options include Zinsser BONDZ Maximum Adhesion Primer or KILZ Adhesion High-Bonding Primer.
2.Applying the primer:
Proper primer application sets the stage for a flawless finish. Begin by stirring the primer thoroughly to ensure a consistent mixture. Skipping this step can result in uneven coverage and compromised adhesion.
3.Cutting in Edges and Corners:
Use a high-quality paintbrush to cut along the edges and corners of the furniture. Brushes offer precision and control, which is ideal for these detailed areas.
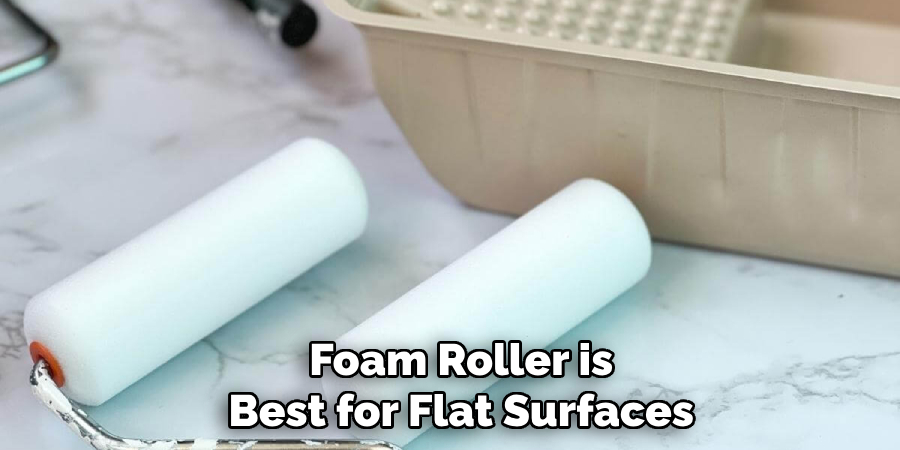
4.Covering Larger Surfaces:
A foam roller is the best tool for larger, flat surfaces. They provide a smooth application without brush marks, helping you achieve an even coat.
When applying the primer, focus on laying down a thin, even layer. Avoid overloading your brush or roller, leading to drips and uneven application. Follow the manufacturer’s drying time recommendations to allow the primer to adhere and cure properly.
5.Sanding after priming:
Once the primer is dry, lightly sand the surface using 220-grit sandpaper. This step addresses any minor imperfections and smooths the primed surface. Use gentle pressure to avoid sanding through the primer.
6.Removing dust:
After sanding, use a tack cloth or a damp cloth to remove all dust. Residual dust can compromise the adhesion of the paint, so ensure the surface is immaculate before proceeding.
Tips for ensuring even coverage and avoiding drips:
- Apply primer in long, even strokes rather than short, random ones.
- Keep an eye on corners and edges where drips are more likely to occur.
- Work in small sections to maintain a wet edge, which helps avoid lap marks.
- Avoid heavy application; multiple thin coats are preferable to a single thick one for better adherence and a smoother finish.
How to Paint Over High Gloss Laminate Furniture: Painting the Furniture
Choosing the Right Paint:
Selecting high-quality paint is crucial for achieving a durable and aesthetically pleasing finish on your high-gloss laminate furniture. Opt for latex, acrylic, or chalk paint, each offering unique benefits. Latex paint is known for its durability and easy cleanup, while acrylic paint offers a versatile finish and excellent adhesion. Chalk paint provides a matte and vintage look, making it a popular choice for those seeking a distressed finish. When choosing the paint, also consider the color and finish you desire—options range from matte, satin, and semi-gloss to full gloss. A higher sheen finish like semi-gloss or gloss will be easier to clean and more resistant to scratches.
Applying the Paint:
Proper paint application is essential for a smooth and professional-looking finish. Begin by stirring the paint thoroughly to ensure a consistent mixture, avoiding separation and splotchy coverage.
Edges and Corners:
Use a high-quality paintbrush to paint along the edges and corners of the furniture. Brushes offer precision and control, making them ideal for detailed areas.

Larger Surfaces:
For larger, flat surfaces, a foam roller is your best tool. Foam rollers deliver smooth application without brush marks, helping you achieve an even coat.
When applying the paint, focus on laying down thin, even layers. Overloading your brush or roller can lead to drips and uneven application. Allow each coat to dry fully according to the manufacturer’s instructions before applying the next coat. This usually takes a few hours but can vary based on the type of paint and environmental conditions.
Sanding Between Coats:
For the best results, lightly sand the surface with 220-grit sandpaper between each coat of paint. This step smoothens the surface and removes any minor imperfections, ensuring a flawless finish. Use gentle pressure to avoid sanding through the paint.
Removing Dust:
After sanding, use a tack cloth or damp cloth to remove all dust. Residual dust can compromise the adhesion and appearance of the subsequent coat, so ensure the surface is impeccably clean before proceeding.
Tips for Achieving Professional-Looking Results and Avoiding Common Pitfalls:
- Apply paint in long, even strokes rather than short, random ones.
- Keep an eye on corners and edges, as drips are more likely to occur there.
- Work in small sections to maintain a wet edge, which helps avoid lap marks.
- Avoid thick coats; multiple thin coats are preferable for better adherence and a smoother finish.
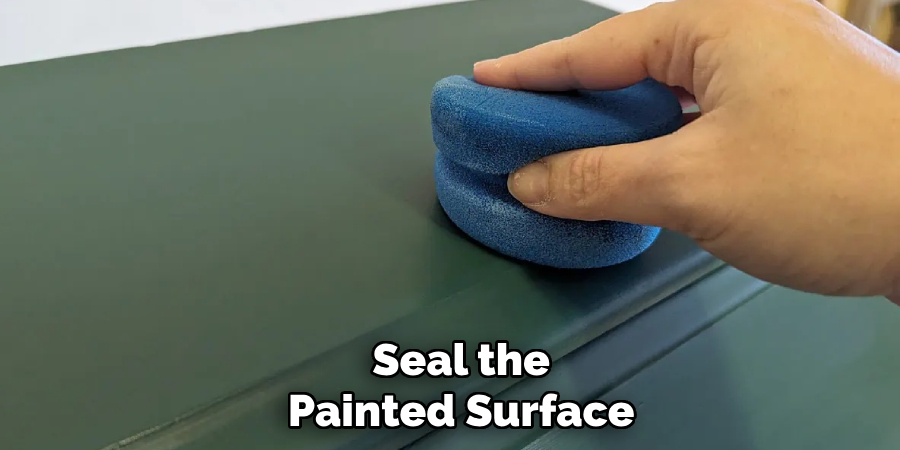
Sealing the Painted Surface
Choosing a sealer:
Selecting the appropriate sealer is critical for protecting your newly painted furniture and ensuring its longevity. Several options include clear polyurethane, polyacrylic, and furniture wax. Polyurethane offers excellent durability and comes in oil-based and water-based formulations. Polycrylic is a water-based alternative that provides a clear finish and is easy to clean up. On the other hand, furniture wax provides a soft sheen and is ideal for a vintage look, although it requires regular maintenance.
Applying the Sealer:
Proper application of the sealer is key to a smooth, long-lasting finish. Start by stirring the sealer thoroughly. Use a high-quality brush or foam roller to apply a thin, even coat. Focus on maintaining long, steady strokes to avoid bubbles and streaks.
Allow the sealer to dry completely per the manufacturer’s instructions before using the furniture. Drying times can vary but typically take several hours. For added protection, consider applying additional coats. Lightly sand the surface with 220 grit sandpaper between coats to ensure smoothness. Remove all dust with a tack cloth or damp cloth before applying the next coat.
Importance of Sealing the Paint:
Sealing the painted surface enhances durability and protects against wear and tear. It shields the paint from moisture, stains, and scratches, ensuring your furniture maintains its beautiful finish for years to come. A well-sealed surface is also easier to clean, making everyday maintenance a breeze.

Conclusion
Painting over high gloss laminate furniture can be rewarding and transformative when approached with the right techniques and materials. To recap the key steps, begin with thorough preparation, which includes cleaning and sanding the surface to ensure proper adhesion. Next, apply a suitable primer to create a solid base for your paint. When painting, use thin, even coats and allow adequate drying time between applications. Sealing the painted surface with a quality sealer protects against wear and tear, ensuring durability.
Finally, reattach the hardware and make any necessary touch-ups to complete the process. By following these steps, you can achieve a professional-looking finish that breathes new life into old furniture. Learning how to paint over high gloss laminate furniture offers a cost-effective way to update and personalize your space, making it a project worth undertaking for any DIY enthusiast.