
Have you ever wanted to give your Ikea Hemnes dresser a new look but weren’t sure where to start? You’re in luck! Painting furniture can be enjoyable and budget-friendly to transform outdated pieces into stylish, statement items.

Whether it’s a nightstand, wardrobe, or even an old dresser, painting your Ikea Hemnes is a breeze! Just follow these simple steps, and you’ll have your furniture looking like new in no time.
In this blog post, we’ll show you how to paint ikea hemnes dresser and get the high-end look you desire for less. We cover all the basics, from picking out the right paint color and type of primer to applying multiple coats for maximum protection against scratches — and best of all, no fancy tools are needed! Let’s dive in!
What Will You Need?
- Paints: Latex or oil-based paints are best for painting dressers. Choose a high-quality paint that’s specifically designed for furniture.
- Primer: Pick a primer that’s compatible with your chosen paint — either latex or oil-based, depending on your chosen paint.
- Sandpaper: Get fine-grit sandpaper, like 180 or 220 grit.
- Paintbrush & Roller: Choose whichever paint applicator you prefer — both work great for painting furniture!
- Drop Cloths (optional): If painting inside, use drop cloths to protect your floors.
Once you have all the necessary supplies, it’s time to start!
10 Easy Steps on How to Paint Ikea Hemnes Dresser
Step 1. Preparation
Before painting your Ikea Hemnes dresser, ensure it is clean and dust-free. Use a damp cloth or a vacuum cleaner to remove any dirt or debris from the surface. Then, sand down any rough spots on the dresser with the sandpaper. Once the surface is smooth, you can move on to the next step!
Step 2. Applying Primer
Apply a coat of primer to your Ikea Hemnes dresser with either a paintbrush or roller — whichever applicator you prefer. Allow the primer to dry before moving on to the next step. If necessary, apply a second coat of primer and let it dry completely.
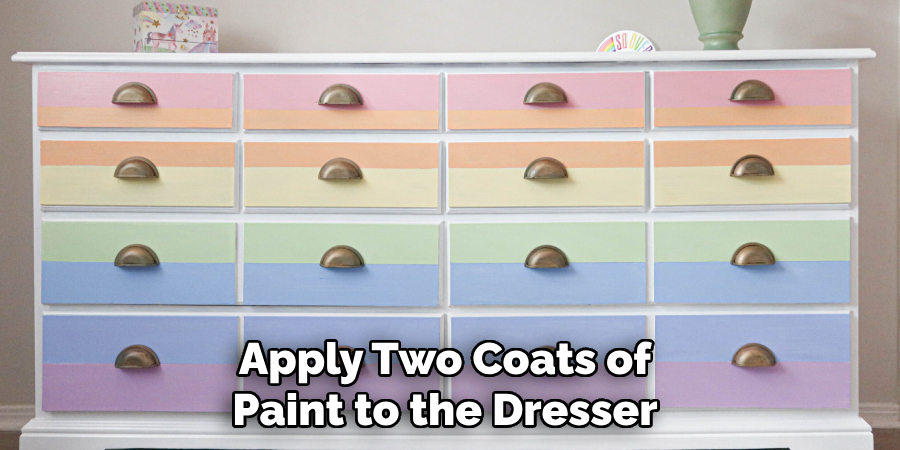
Step 3. Painting
Once the primer is dry, you can begin painting your Ikea Hemnes dresser with the color of your choice. Apply two coats of paint to the dresser, allowing each coat to dry before adding the next one. This will help ensure an even, smooth finish.
Step 4. Sealing
Once the paint is dry, it’s time to seal it! Use a water-resistant sealant or furniture wax to protect your painted dresser from scratches and wear and tear. This step will also help the paint last longer and keep its original color.
Step 5. Finishing Touches
Now you’re ready to add the finishing touches. If desired, you can add a stencil to your dresser or distress the edges with sandpaper for a vintage look. You can also choose to add hardware, such as handles or knobs, for an extra personal touch.
Step 6. Reassembling
After thoroughly drying the paint and sealant, it’s time to reassemble your Ikea Hemnes dresser. Carefully reattach the drawers and knobs or handles. Remember, this is your chance to add new hardware if you want to change the original look even further. Before you start, ensure the room is well-ventilated to avoid any fumes from the freshly painted dresser.
Step 7. Positioning and Care
Once the dresser is reassembled, it’s time to decide on its final position. Choose a spot that complements the room’s layout and your personal aesthetics. Avoid areas with intense sunlight exposure, as this could fade the paint over time. Lastly, for maintenance, use a slightly damp cloth for routine cleaning. Avoid using harsh chemical cleaners as they might damage the paint job.

Step 8. Enjoying Your New Piece
Now comes the best part – enjoying your newly painted Ikea Hemnes dresser! Whether you’ve chosen a bold, striking color or a muted, elegant shade, your dresser is sure to stand out and add a pop of personality to your room. Remember, the beauty of this DIY project is that it can be repeated with a different color or technique anytime you need a change.
Step 9. Sharing Your Transformation
After admiring your handiwork and enjoying your newly transformed Ikea Hemnes dresser, consider sharing your experience. This could be posting a picture of your new furniture piece on social media or writing a blog post detailing your journey. Your experience could inspire others to give furniture painting a try, and you may even gather some great tips and tricks for your next project from the DIY community.
Step 10. Sit Back and Relax
Last but not least, sit back, relax, and enjoy your newly painted Ikea Hemnes dresser! Whether you’ve opted for a subtle update or a bold transformation, you now have the satisfaction of knowing that you’ve transformed an outdated item into something beautiful. Always remember that with a bit of creativity and effort, you can turn any old or outdated piece into something unique and stylish.
By following these straightforward steps, you’ve not only learned how to paint an Ikea Hemnes dresser but also acquired a valuable skill that can be applied to countless other furniture upcycling projects. Embrace the process, let your imagination run wild, and discover the immense fulfillment of creating something beautiful with your hands.
5 Additional Tips and Tricks
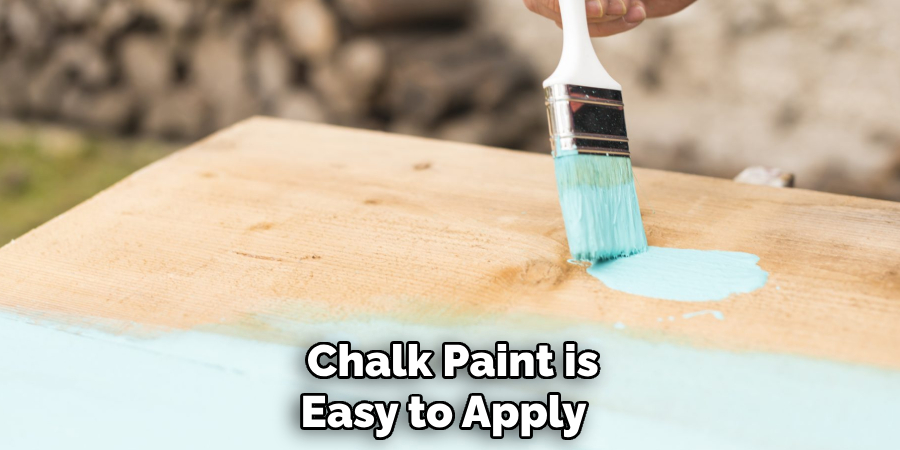
- If you’re looking for a more creative and unique way to paint your IKEA Hemnes dresser, consider using chalk paint! Chalk paint is easy to apply and gives your furniture an aged look without the need for primer or sanding.
- Make sure that the surface of your dresser is clean before you begin painting. Wipe it down with a damp cloth and let it dry for at least an hour.
- Use painter’s tape to cover any parts of the dresser that you do not want to paint, such as handles or trim.
- To ensure a smooth finish, use two light coats of paint rather than one heavy coat.
- Once your dresser is painted, let it dry for at least 24 hours before putting it back into use. This will help the paint to stick better and last longer.
Following these tips can help you get a perfect finish when painting your IKEA Hemnes dresser, no matter what type of paint you choose! With a little patience and some careful preparation, you can transform your dresser into a beautiful piece of furniture.
5 Things You Should Avoid
- Avoid using a paintbrush for painting the dresser, as this will likely leave brushstrokes and an uneven finish.
- Don’t start painting until you’ve fully prepared the surface of the dresser. Make sure it is clean and dust-free before starting.
- Avoid leaving excess paint on your dresser, as it will result in an uneven finish and an unattractive look.
- Do not paint in direct sunlight or heat, as this can cause the paint to dry too quickly and create a streaky appearance.
- Don’t forget to let the dresser sit for at least 24 hours after painting before putting it back into use! This will help the paint stick better and last longer.
By following these tips, you can ensure that your IKEA Hemnes dresser is painted to perfection! With a little preparation and patience, you can transform an ordinary piece of furniture into something truly special. Good luck with your painting project!
What is the Best Paint to Paint Ikea Furniture?
When it comes to painting Ikea furniture, there are many different types of paint available. The best type of paint will depend on the look you’re trying to achieve and the material of the furniture. For a professional-looking finish, oil-based paints are your best bet as they provide a durable and glossy finish that is resistant to scratches and wear and tear.

For a more casual, rustic look, chalk paint is also an option. Chalk paint gives your furniture a unique distressed style without the need for sanding or priming.
For outdoor furniture, it’s best to opt for a waterproof latex paint as this will provide protection from rain and snow. No matter what type of paint you choose, make sure to apply two or more coats for a smooth and even finish.
Conclusion
How to paint ikea hemnes dresser is a great way to add an individual touch to inexpensive furniture. It can become the cornerstone of your decor, expressing who you are and giving your home or apartment more character. With any luck, this guide has helped equip you with what you need to give your Ikea Hemnes dresser a beautiful makeover.
Whether it’s a bold statement or a subtle accent, painting your Ikea Hemnes dresser is affordable, fun, and rewarding. Don’t forget that the best results come from taking your time – plan out each step and allow the appropriate dry time between each phase in order to bring out the full potential of such an investment.
All in all, there is no right or wrong answer when it comes to spicing up your Ikea dresser – so go ahead and get started!