
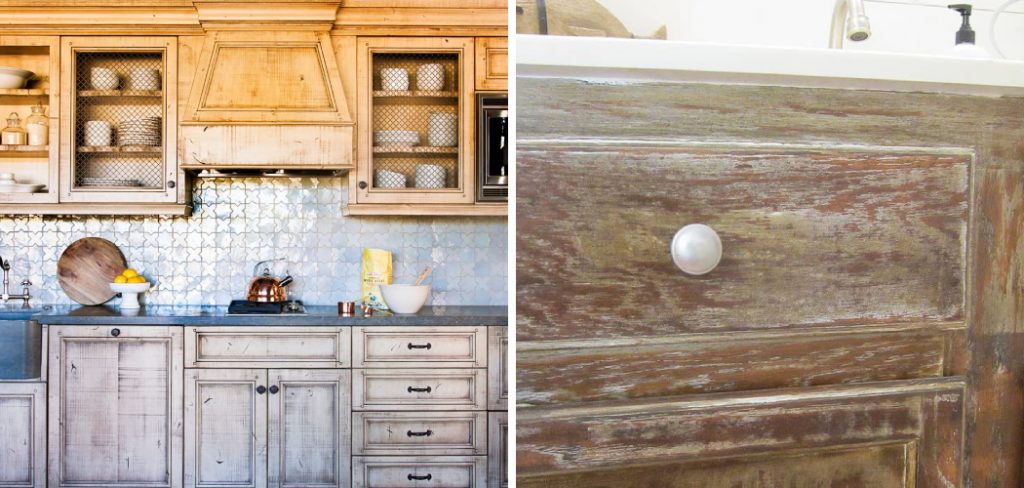
Rustic design is a style that celebrates the beauty of the natural world. Defined by its use of raw materials, earthy colors, and aged textures, this design approach brings warmth and charm to any space. The appeal of rustic aesthetics lies in their ability to evoke a sense of coziness and nostalgia reminiscent of simpler times. In-home decor and rustic elements are sought after for their unique blend of elegance and simplicity.
This article aims to guide you through how to make cabinets look rustic, providing practical steps to transform your modern cabinetry into rustic masterpieces. By incorporating these techniques, you can achieve a timeless and inviting look that enhances the character of your home.
Understanding Rustic Design
Rustic design is a style deeply rooted in the appreciation of nature and its unrefined beauty. This design approach focuses on creating a warm, welcoming, and unpretentious space by utilizing raw materials, earthy colors, and weathered textures. The essence of rustic design lies in its authenticity and simplicity, often showcasing the natural imperfections and character of the materials used.
Definition and Characteristics of Rustic Design
Rustic design can be defined by its emphasis on natural elements and a handcrafted look. Characteristics include rough-hewn wood, stone, and metal combined with a palette inspired by nature, such as shades of brown, green, and beige. These elements come together to create a timeless and rugged aesthetic that feels both homely and enduring. A key trait of rustic design is its celebration of age and wear, where weathered and distressed finishes add character and tell a story.
Key Elements
- Natural Materials: Wood, stone, and metal are quintessential materials in rustic design, valued for their durability and natural beauty.
- Earthy Colors: The color scheme draws from the natural world, with tones that evoke the feeling of being outdoors.
- Weathered Look: A worn and aged appearance is central to the rustic style, providing a sense of history and warmth.
Popularity and Appeal
The popularity of rustic design in modern homes can be attributed to its ability to create spaces that are both stylish and comfortable. In a fast-paced world, rustic design offers a retreat to the charm of simpler times. Its versatility allows it to blend seamlessly with other styles, making it a favorite among homeowners seeking to add a touch of nature and serenity to their living spaces. By incorporating rustic elements, homes can achieve an inviting ambiance that feels both cozy and timeless.

Preparing Your Cabinets
Before diving into the process of transforming your cabinets to achieve a rustic look, it’s essential to start with proper preparation. This includes assessing the type and condition of your cabinets, gathering necessary materials and tools, and ensuring the cabinets are clean and well-sanded.
Assessing the Type and Condition of Your Cabinets
Begin by evaluating your cabinets’ type and current state. Are they made of solid wood, plywood, or laminate? Solid wood cabinets are ideal for a rustic makeover due to their natural grain and durability. Next, inspect for any damage or imperfections. Minor scratches and dents can enhance the rustic charm, but significant structural issues may need addressing before proceeding.
Necessary Materials and Tools for the Project
Having the right materials and tools is crucial for a successful transformation:
- Sandpaper: Various grits (80, 150, and 220) will help prepare the surface for painting or staining.
- Paint/Wood Stain: Choose colors and finishes that match the rustic aesthetic. Consider a distressed painting technique or a stain highlighting the wood grain for a more weathered look.
- Brushes: High-quality brushes ensure smooth and even application of paint or stain.
- Hardware: Rustic-style knobs, handles, and hinges can further accentuate the look. Options include wrought iron, aged brass, or ceramic with vintage patterns.
Cleaning and Sanding the Cabinets
Start by thoroughly cleaning the cabinets to remove any grease, dirt, or residue. Use a mild detergent and warm water, then allow the cabinets to dry completely. Cleaning is a critical step, as it ensures that the paint or stain adheres properly.

Once clean, begin the sanding process. Sanding is vital because it creates a smooth and even surface that allows for better paint or stain application. Start with the coarser 80-grit sandpaper to remove old paint or varnish and any surface imperfections. Progressively move to finer grits (150 and 220) to achieve a smooth finish. Pay attention to details and ensure all surfaces, including edges and corners, are well-sanded.
Removing old paint or varnish can be labor-intensive but is essential for a high-quality rustic finish. The smoother the surface, the better the final result will look. Take your time during this step to ensure the cabinets are properly prepared before moving on to the application of paint or stain.
By thoroughly assessing, gathering the right materials, and meticulously cleaning and sanding your cabinets, you’ll lay a solid foundation for creating beautiful, rustic cabinetry that enhances the charm and character of your space.
How to Make Cabinets Look Rustic: Choosing the Right Finish
Selecting the appropriate finish is crucial in achieving the desired rustic look for your cabinets. The right finish can enhance the natural beauty of the wood, create a weathered appearance, or add a subtle sheen. Below are different types of finishes to consider and a step-by-step guide to applying them.
Types of Finishes for a Rustic Look
Stains: Enhancing Natural Wood Grain
Wood stains are excellent for highlighting the natural grain and texture of the wood, a hallmark of the rustic aesthetic. They penetrate the wood, adding depth and richness while preserving its natural beauty. Choose colors like oak, walnut, or pine to maintain an earthy feel.
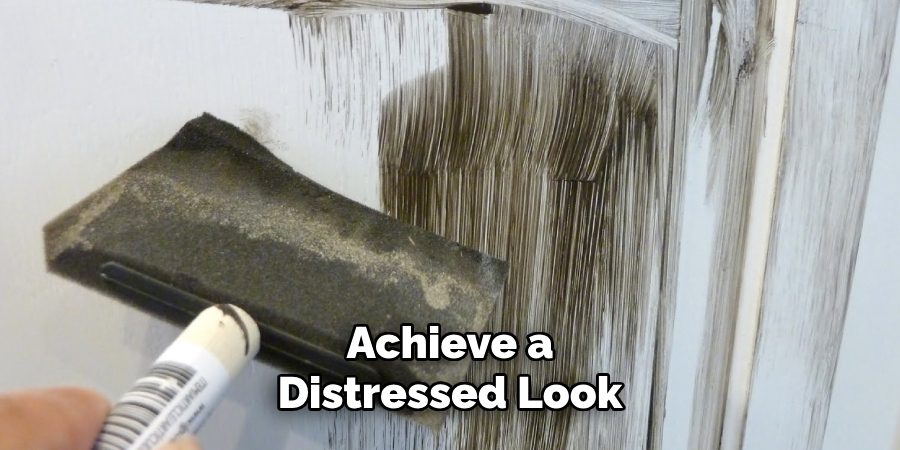
Paint: Achieving a Distressed Look
Using paint to achieve a distressed look involves layering colors and strategically sanding areas to reveal underlying layers, giving the cabinets an aged and worn appearance. Chalk paint is particularly popular for this purpose due to its matte finish and ease of distressing.
Wax and Oil: Adding a Natural Sheen
Applying wax or oil can add a subtle sheen to the cabinets while enhancing their natural color and grain. These finishes also provide a protective layer, making the wood more durable. Beeswax or tung oil are excellent choices for a soft, lustrous finish.
Step-by-Step Guide to Applying the Chosen Finish
Preparation and Application Techniques
- Preparation:
- Ensure Cleanliness: As described in the previous section, thoroughly clean and sand your cabinets. The surface must be free of dust and grime to ensure optimal adhesion.
- Gather Materials: Depending on your chosen finish, gather the necessary tools such as stain applicators, paintbrushes, or cloths for wax and oil application.
- Applying Stain:
- Application: Stir the stain thoroughly and apply it with a brush or cloth, following the wood grain.
- Wipe Off Excess: Allow the stain to penetrate for a few minutes, then wipe off the excess with a clean cloth.
- Drying Time: Let the stain dry completely, which may take several hours. Apply additional coats, following the same process, for a richer color.
- Using Paint:
- First Coat: Apply a base coat of paint and let it dry completely.
- Second Coat: Apply a second coat of a different color and allow it to dry.
- Distressing: Use sandpaper to gently sand areas where natural wear would occur, revealing the base coat and creating a distressed look.
- Applying Wax or Oil:
- Application: Use a cloth to apply a thin layer of wax or oil, working it into the wood in circular motions.
- Buffing: After allowing it to sit for a few minutes, buff the surface with a clean cloth to achieve a subtle sheen.
- Additional Layers: For more protection and sheen, apply additional layers, allowing each to dry thoroughly before buffing.

Tips for an Even Coat and Best Results
- Consistency: Always stir or shake your finished products thoroughly before use to ensure even consistency.
- Test First: Test your finish on a small, inconspicuous area of the cabinet to ensure you achieve the desired color and effect.
- Patience: Allow ample drying time between coats to prevent smudging and ensure a professional finish.
- Ventilation: Work in a well-ventilated area to speed up drying time and avoid inhaling fumes from stains, paints, or finishes.
You can create stunning rustic cabinets that exude charm and authenticity by carefully selecting and applying the right finish.
Distressing Techniques
Distressing techniques are essential to achieving the authentic rustic charm that characterizes distressed cabinets. By deliberately aging and weathering the wood, these methods provide a time-worn appearance that adds character and depth to any space. This section introduces common distressing techniques, outlines their purpose and effect, and provides a detailed, step-by-step guide for executing each method.
Purpose and Effect of Distressing
Distressing creates cabinets that appear aged and worn, as if they have endured years of use and environmental exposure. This aesthetic evokes a sense of history and nostalgia, contributing to the cozy and inviting atmosphere often sought in rustic or farmhouse decor. Distressing can highlight the natural grain of the wood, introduce irregularities, and produce variations in color and texture that add visual interest.
Methods to Distress Cabinets
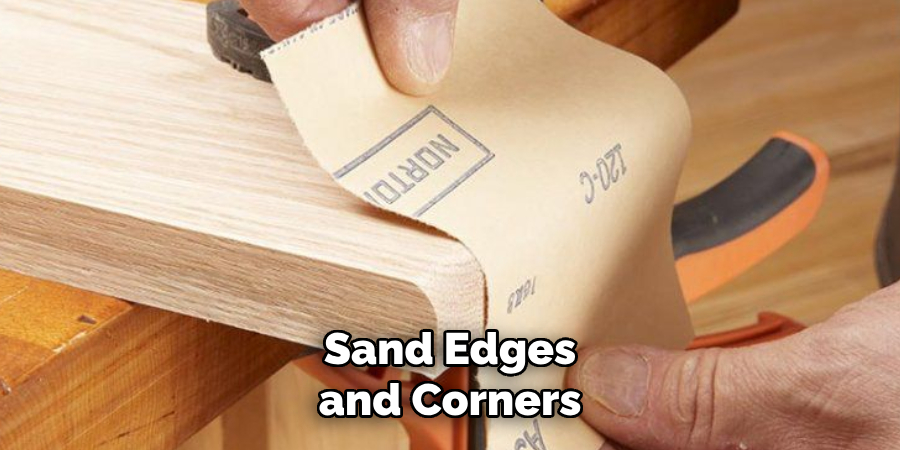
Sanding Edges and Corners
- Preparation:
- Gather fine to medium-grit sandpaper (120 to 220 grit) for precise control over the distressing process.
- Identify areas of natural wear, such as edges, corners, and spots around handles.
- Sanding:
- Lightly sand the identified areas, focusing on achieving an uneven, worn look.
- Vary the pressure and motion to create a natural gradient from worn to unworn wood.
- Finishing Touches:
- Wipe away dust with a damp cloth.
- Optionally, a clear wax or another protective finish can be applied to seal the distressed areas.
Using Chains, Hammers, and Other Tools to Create Dents and Scratches
- Preparation:
- Collect tools such as chains, hammers, screwdrivers, and nails.
- Place your cabinet doors or panels on a stable work surface.
- Creating Dents and Scratches:
- Gently strike the wood with a chain, allowing the links to create random dents.
- Use a hammer to add dings and imperfections.
- Scratch the surface with a screwdriver or nails for additional texture.
- Final Steps:
- Sand any sharp edges or splinters resulting from the dents and scratches.
- Clean the cabinet surfaces with a damp cloth before proceeding with staining or painting.
Applying a Dry Brush Technique for a Worn-Out Paint Effect
- Preparation:
- Use a stiff-bristled brush and a small amount of paint for this technique.
- Choose a light colour for a subtle effect or a contrasting colour for more drama.
- Dry Brushing:
- Dip the brush lightly into the paint, then wipe most of it off on a paper towel.
- Drag the brush lightly across the surface in short, quick strokes, focusing on raised areas and edges.
- Blending and Layering:
- Apply multiple layers to build up the desired level of wear and texture.
- Allow each layer to dry thoroughly before adding the next.
Detailed Step-by-Step Guide for Each Technique
Here is a comprehensive guide to effectively distress your cabinets:
- Sanding Edges and Corners:
- Clean and thoroughly dry your cabinets.
- Lightly sand the edges and corners with medium-grit sandpaper.
- Gradually transition to finer grit for a smooth, natural look.
- Wipe off dust and apply a clear protective coat, if desired.
- Using Chains, Hammers, and Other Tools:
- Lay your cabinet pieces on a sturdy surface.
- Gently strike the surface with a chain for dents and dings.
- Add scratches and imperfections with screwdrivers and nails, varying the placement for realism.
- Sand any rough patches and clean off debris.
- Dry Brush Technique:
- Ensure the cabinet surface is clean and dry.
- Dip the brush lightly in paint and blot off excess.
- Apply quick, light strokes across the surface, adding paint sparingly.
- Build up layers as needed, letting each one dry before applying the next.
Tips for Achieving a Natural and Balanced Distressed Look
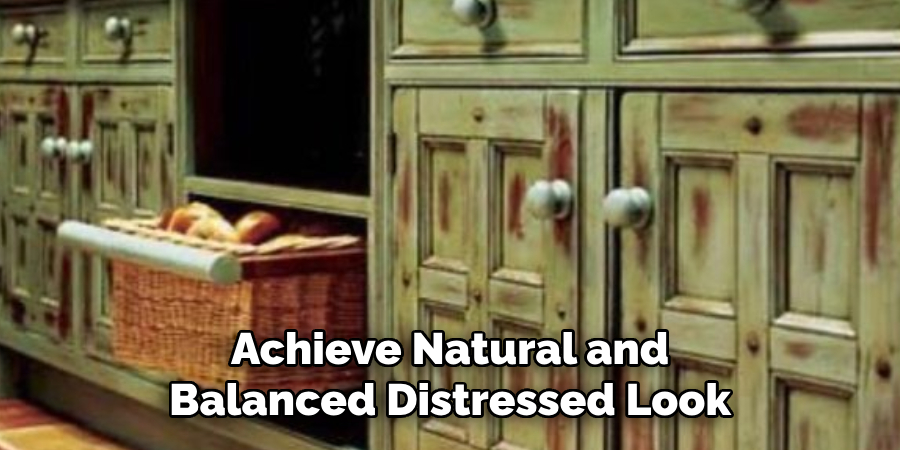
- Moderation: Less is often more. Aim for strategic, thoughtful distressing rather than overworking the surface.
- Consistency: Maintain a consistent style of wear across all cabinets to ensure a cohesive look.
- Patience: Take your time with each technique to achieve natural-looking results.
- Varied Methods: Use a combination of techniques for a more authentic and varied appearance.
- Balanced Wear: Focus on areas that would naturally see more wear and tear, such as around handles and edges.
By mastering these distressing techniques, you’ll be able to transform your cabinets into stunning pieces that reflect a timeless, rustic elegance.
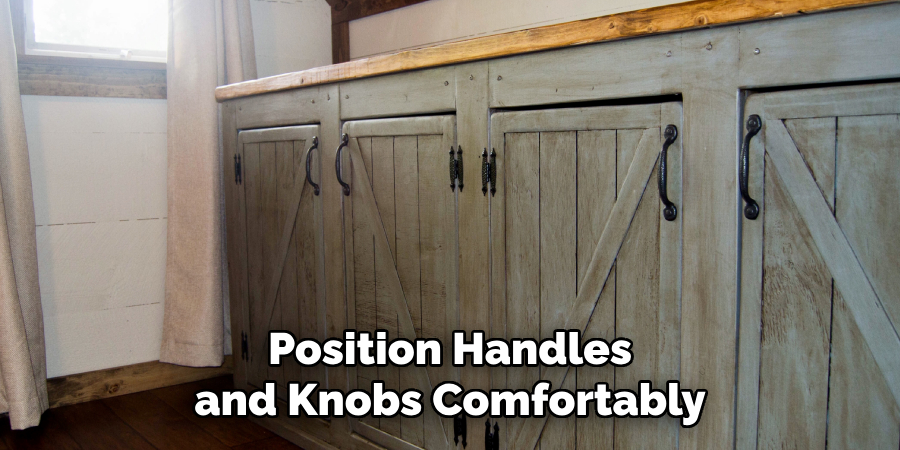
Adding Rustic Hardware
The hardware you choose plays a pivotal role in achieving a rustic look for your cabinets. Hardware such as handles and knobs can significantly enhance the character and authenticity of a rustic or farmhouse-style kitchen. Not only do these elements serve a functional purpose, but they also act as decorative accents that tie the entire design together.
Types of Rustic Hardware
- Iron or Brass Handles and Knobs: These materials offer durability and an aged appearance, complementing the rustic aesthetic. Iron and brass hardware often feature intricate designs or a patina finish that enhances their vintage appeal.
- Vintage or Antique-Style Hardware: Sourcing original vintage or high-quality reproductions can add an authentic touch to your cabinetry. Look for pieces with unique detailing and a weathered look.
- Hand-Forged or Custom Pieces: Investing in hand-forged or custom hardware ensures your cabinets have unique, artisan-crafted pieces that reflect traditional techniques and craftsmanship.
Guide to Selecting and Installing Rustic Hardware
Selecting and installing the right hardware involves careful consideration to match the overall design:
- Matching Hardware with Design: Ensure the style, material, and finish of the hardware align with the look you aim to achieve. For instance, opt for hardware with a similarly aged finish if your cabinets have a distressed look.
- Installation Tips:
- Placement: Position handles and knobs comfortably and consistently, ensuring they are both functional and aesthetically pleasing.
- Pre-Drilling Holes: Pre-drill holes to avoid splitting the wood and ensure precise alignment.
- Secure Fastening: Use the appropriate screws and tools to fasten your hardware securely.
By thoughtfully selecting and carefully installing rustic hardware, you can bring a cohesive and charming finish to your rustic cabinetry project.
Conclusion
In summary, learning how to make cabinets look rustic involves a combination of distressing techniques, selecting the right paint, and incorporating thoughtfully chosen hardware. You can achieve an authentic, worn look by sanding edges, creating dents with tools, and applying a dry brush technique. Don’t hesitate to experiment and personalize your design to reflect your unique style. Rustic cabinets can greatly enhance the character and warmth of any kitchen, making it a cozy and inviting space. Embrace the process and enjoy the transformation these charming details can bring to your home decor.
You can also check it out to Stain Wood Floors Darker