Are you looking to take your home renovation project up a notch? Have you ever considered installing wood flooring on the ceiling? Do you want to install wood flooring on your ceiling? While it may sound like an ambitious undertaking, this unique design element can add character and charm to any space.
It’s a great way to bring warmth and character to a room. While it takes patience and some DIY knowledge, installing wood floors on the ceiling is completely doable with the right tools, materials, and instructions – like this one!
In this blog post, we’ll walk you through how to install wood flooring on the ceiling, from determining which type of flooring best fits your needs to actually following the installation steps on how to install wood flooring on ceiling.
With some commitment and patience and our expert guidance, your personalized work will be complete in no time. Let’s take a look at what you need, how to measure for proper fitment, and installation tips that should help make installing your new wooden floor easier.
The Benefits of Installing Wood Flooring on Ceiling
1. Act as Insulation
Installing wood flooring on your ceiling will provide a number of advantages. It can act as insulation, help with sound reduction from outside sources, and even add a decorative touch to any room. Wood flooring is also easy to clean and maintain. Plus, there are many different types of wood you can choose from – maple, bamboo, cedar, oak – each with its own unique grain and texture.
2. Enhance Aesthetics
Wood flooring on the ceiling will give any room an elevated, sophisticated feel. The neat lines and intricate woodgrain patterns can enhance the aesthetics of your space while adding warmth and dimension to a traditionally plain surface. Additionally, wood planks are available in various widths so you can customize the look to fit your preference.
3. Reduce Noise Pollution
Installing wood flooring on the ceiling can also reduce noise pollution from outside sources, such as traffic or neighborhood dogs barking. The insulation properties of wood will absorb and dampen sound waves, creating a more peaceful environment in your home.
Required Items
To get started with installing wood flooring on your ceiling, you’ll need to gather the necessary supplies and tools. This includes:
- Wood planks of your chosen type and width
- Underlayment
- Nails or staples
- Hammer or nail gun
- Measuring tape and saw
- Drill and screws
- Safety glasses and gloves
Once you’ve collected all the items, you can begin installing your wood flooring on the ceiling. This guide will walk you through each step of the process to ensure a successful installation.
10 Instructions on How to Install Wood Flooring on Ceiling
1. Prepare the Surface
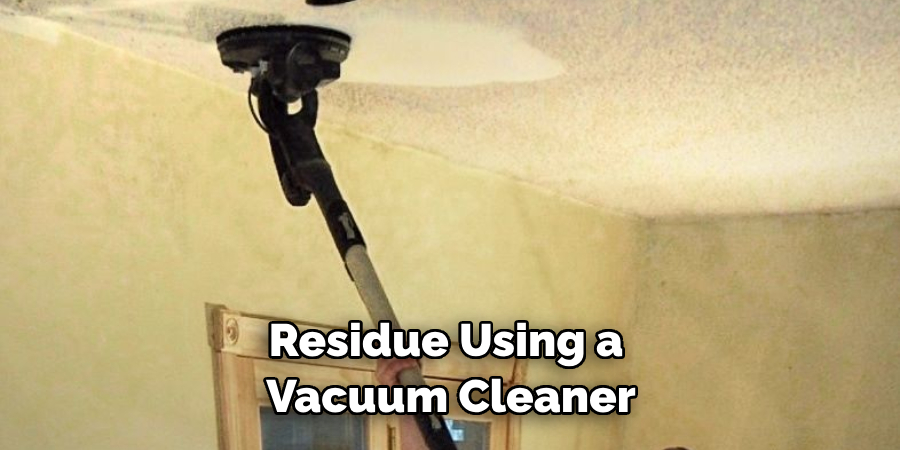
Before beginning, make sure the ceiling is properly prepared for installation. First, remove any existing trim or molding and inspect the surface of the ceiling for nails, screws, or other debris that could potentially damage the wood planks later on. Clean up any residue using a vacuum cleaner with a soft brush attachment. Also, be sure to inspect the surface of your ceiling for warping or other irregularities.
2. Install Underlayment
The next step is to install an underlayment on the ceiling. This will provide a level and even base for the wood planks to be attached to, ensuring a smooth installation process. Make sure to cut the pieces of underlayment that fit perfectly into the ceiling corners, and use a nail gun or hammer to attach them.
3. Measure and Cut
Begin measuring your wood planks and mark where you need to make any cuts with a pencil. Use a saw to cut the boards accordingly, then lay out the pieces on the floor for easy access when it’s time to install them.
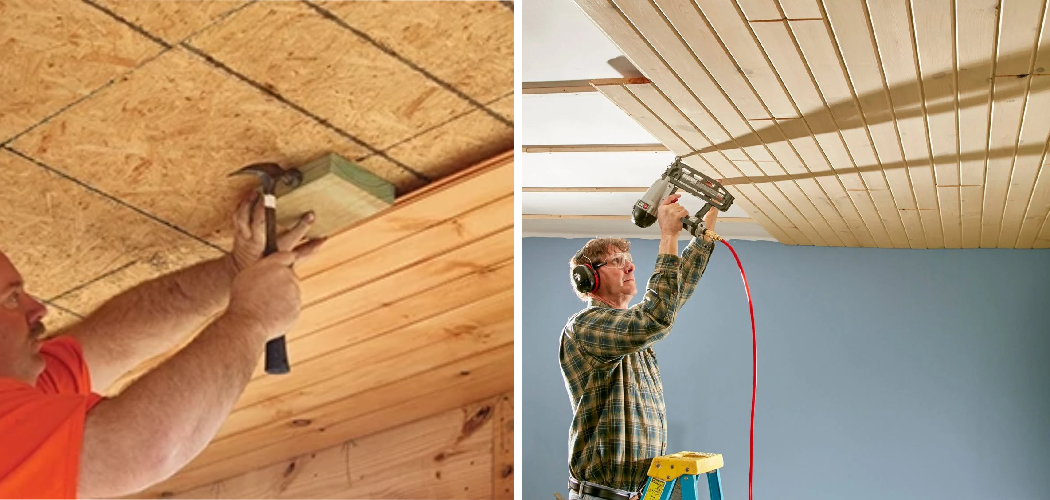
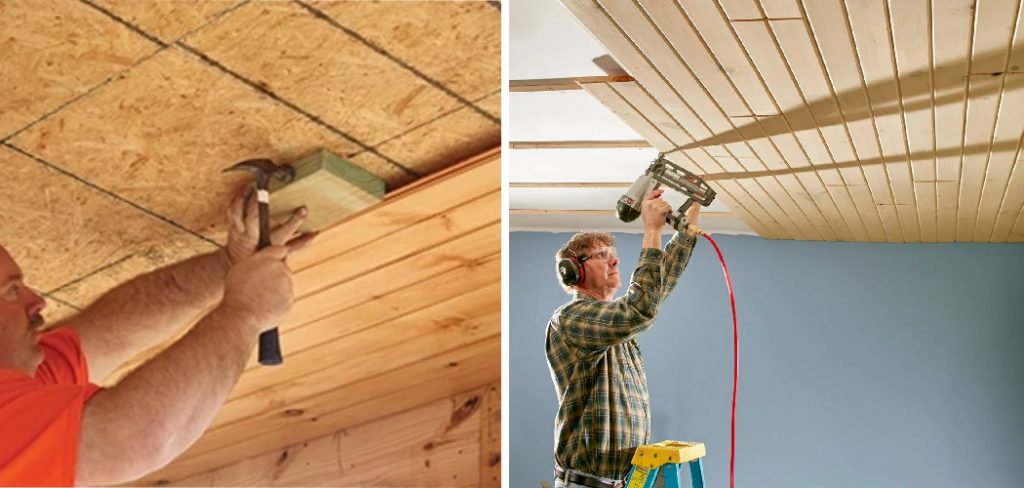
4. Nail the Planks
Starting from one corner of the ceiling, begin nailing in the first plank of wood flooring using a nail gun or hammer. Make sure to leave a 5-10mm gap between each plank for expansion and contraction purposes. Continue nailing planks along the entire length of the ceiling until it’s completely covered.
5. Drill and Screw
Once all the planks have been nailed, go back and drill screws into each plank to ensure a secure hold. This will also reduce movement or creaking when someone walks on the flooring.
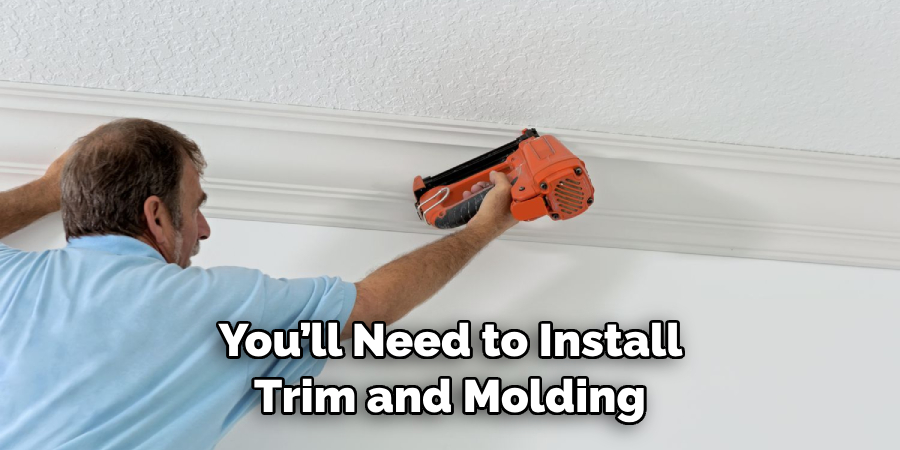
6. Install Trim and Molding
To finish off the installation process, you’ll need to install trim and molding around the edges of the ceiling. This will give your wood flooring on the ceiling an added level of detail and provide a clean, finished look.
7. Sand
Once everything is installed, use sandpaper to smooth down any rough edges or bumps along the surface. This will help prevent splinters and make walking on the floor more comfortable over time.
8. Seal the Wood Planks
To protect your wood flooring from water damage, use a sealant or wood finish to coat the planks. This will also help enhance their color and grain for a more polished look. Sealing the wood planks is an important step in ensuring they last for many years.
9. Vacuum and Clean
Use a vacuum cleaner to remove any remaining dust or debris leftover from the installation process. Make sure to regularly clean the wood flooring on your ceiling using a damp mop or cloth, as this will help maintain its longevity.
10. Enjoy the Result
Once everything is complete, you can sit back and admire your craftsmanship! Installing wood flooring on your ceiling will transform any room into something special. You’ll be pleasantly surprised by how much of a difference it makes to the overall look and feel of the space. Enjoy your beautiful new ceiling!
Follow these steps on how to install wood flooring on ceiling, and you will be successful in installing wood flooring on your ceiling. With the right tools and supplies, you’ll be able to complete this project with ease and create a stunning new look for your home.
8 Safety Measures to Take When Installing Wood Flooring on Ceiling
Installing wood flooring on the ceiling is a cost-effective way to customize and update your home. However, it requires special safety measures as there are greater risks associated with working above ground level. Here are 8 safety measures on how to install wood flooring on ceiling you should take when installing wood flooring on the ceiling:
1. Wear suitable clothing, including gloves and a hard hat. This will help protect you from any potential hazards, such as falling debris or tools. The clothing should also be protective against any cuts or abrasions you may suffer while working on the ceiling.

2. Make sure to wear safety glasses at all times when installing the wood flooring. This will protect your eyes from dirt, dust, and other debris that may be kicked up during installation. Also, take care to ensure that all tools and equipment are in working order and properly secured.
3. Secure ladders and other equipment that you use to access the area above ground level. Make sure they are securely attached to a stable surface so you don’t slip or fall while working on the ceiling. You may also need to set up scaffolding or other support structures to help you reach the ceiling.
4. Have a spotter at the ground level who can watch your movements and alert you to any hazards or mishaps that could happen while working on the ceiling. They should also have access to a telephone in case of emergency.
5. Make sure that all pieces of wood flooring are securely attached to the ceiling. This is especially important when using glue or nails, as incorrect installation could lead to injury if the wood flooring falls unexpectedly.
6. Ensure that you have good lighting to see what you are doing at all times. Working in a dimly lit area can make it difficult to see potential hazards and put yourself at risk of an accident occurring.
7. Ventilate the area as much as possible to avoid breathing in any harmful dust or chemicals that may be created during installation. It is also important to keep children and pets away from the work area while you install the wood flooring.

8. Have a first aid kit on hand in case of an emergency. This should include basic items such as bandages, antiseptic cream, and pain relief tablets.
Following these safety measures will help ensure that the installation of wood flooring on your ceiling is safe and successful. Remember to take all necessary precautions when working above ground level.
Frequently Asked Questions
How Long Will It Take to Finish the Project?
The amount of time it takes to install wood flooring on a ceiling depends largely on the size and complexity of the job. The more complex the installation, such as installing a curved or angled design, will take longer time than a simple straight install. Generally speaking, an experienced contractor can typically complete the project in 1-2 days for an average-sized room.
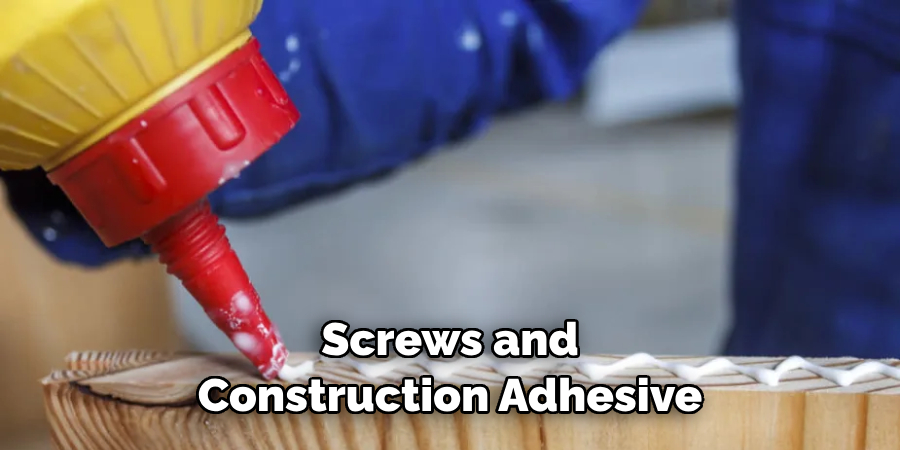
What Is the Best Way to Secure the Wood Flooring?
The most secure way to attach wood flooring to a ceiling is with screws and construction adhesive. The screws should be driven into the ceiling joists, and a construction-grade adhesive should be applied between each board.
If you’re using pre-finished flooring, make sure to use a water-resistant adhesive specifically designed for wood flooring. For added stability, you can also nail the boards in place before screwing them down.
Can You Put Wood Floor on the Ceiling?
Yes, you can install wood flooring on the ceiling. The process is relatively straightforward and involves securing the boards to the ceiling joists with screws and construction adhesive. However, since wood flooring is not naturally designed for use in this type of application, it’s important to take extra steps to ensure a secure installation and prevent any warping or buckling over time.
Conclusion
Wood flooring is a great way to add texture and interest to any room. Knowing how to properly install it on your ceiling is an important skill, and following the simple instructions outlined in this post should make the process much smoother.
No matter what design you choose or what type of flooring you opt for, layering boards onto your ceiling can have a dramatic effect. It’s not only aesthetically-pleasing but also incredibly practical; wood flooring can act as insulation and even reduce noise pollution from outside sources.
Installing wood flooring on your ceiling requires a number of steps, from laying underlayment to attaching the planks. But with the right tools and knowledge on how to install wood flooring on ceiling, you can easily complete this DIY task yourself. With bright accents and creative detail – such as intricate wood grain patterns or strategic designs – installing wood on your ceiling can truly transform any space into something spectacular.