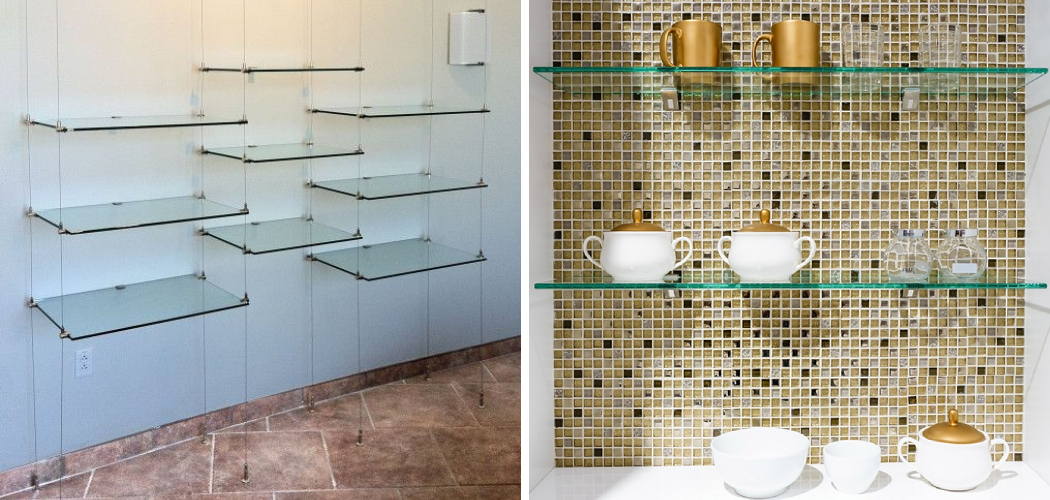
Hanging glass shelves is a stylish and practical way to add storage and display space to any room. These shelves create a sleek and modern look while allowing light to pass through, making them ideal for small or dark spaces. Whether you want to showcase decorative items, store books, or create extra space for everyday essentials, glass shelves can transform your living area.
The process of how to hang glass shelves might seem daunting at first, but with the right tools and steps, it can be a straightforward DIY project. By carefully measuring, choosing the right hardware, and ensuring a secure installation, you can achieve a clean and elegant look that enhances the overall appeal of your home. In the following sections, we’ll guide you through each step of how to hang glass shelves, ensuring a safe and visually appealing result.

The main aim of this article is to provide a detailed, step-by-step guide on how to safely and securely hang glass shelves. By following the outlined instructions, you will be able to confidently install glass shelves that not only enhance the aesthetics of your space but are also sturdy and reliable. Additionally, this guide will offer tips and techniques to ensure a professional finish, covering everything from selecting the appropriate tools and materials to the final touches that make a significant difference. Whether you’re a DIY enthusiast or a first-time installer, this article is designed to make the process easy to understand and execute.
Materials and Tools Needed
Before you begin the installation of your glass shelves, gather all the necessary materials and tools to ensure a smooth and efficient process. Here’s a comprehensive list of what you’ll need:
Materials:
- Glass Shelves: Tempered glass is recommended for safety.
- Shelf Brackets or Supports: Choose brackets that can securely hold the weight of the glass and the items you’ll place on them.
- Wall Anchors: Essential if you are not drilling into studs.
- Screws: Ensure they are appropriate for your wall type, whether it’s drywall, plaster, or concrete.
- Level: To ensure your shelves are perfectly horizontal.
- Pencil or Marker: For marking positions on the wall.
Tools:
- Drill: For creating holes in the wall.
- Drill Bits: Select drill bits that are suitable for your wall type.
- Screwdriver: For driving screws into the wall anchors and brackets.
- Tape Measure: To measure and mark the precise locations for your shelves.
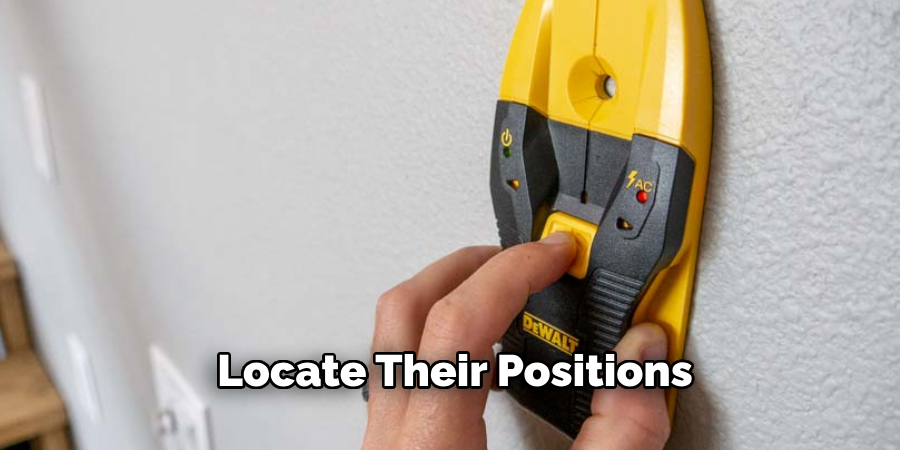
- Stud Finder: Useful if you are drilling into studs to locate their positions.
- Safety Gear: Such as gloves and safety glasses to protect yourself during the installation process.
By preparing these materials and tools ahead of time, you can ensure a safe, secure, and aesthetically pleasing installation of your glass shelves.
Preparation and Planning
Determining Shelf Placement:
Decide where you want to hang the glass shelves and measure the space carefully. Take into account the height at which the shelves will be placed to ensure they are easily accessible and functional for their intended use. Measure the length and width of the area to confirm that the glass shelves will fit appropriately without overcrowding the space. Consider the weight-bearing capacity of your walls, ensuring they can support the weight of the shelves and the items you plan to place on them. This is particularly crucial for plaster or drywall, which may require additional support.
Selecting Brackets:
Choose shelf brackets or supports that are appropriate for the size and weight of your glass shelves. Ensure the brackets are robust enough to hold the glass securely and the items on the shelves. Opt for brackets with a sleek and modern design that complements the glass shelves, enhancing the overall aesthetic. Brackets made from stainless steel or other durable materials are often a good choice for both strength and style.
Locating Studs:
Use a stud finder to locate studs in the wall, if possible, for maximum support. Studs provide a much stronger anchor point than drywall alone, which is especially important for heavy glass shelves. Mark the stud locations on the wall with a pencil or marker. If no studs are available where you wish to place the shelves, plan to use wall anchors appropriate for your wall type to ensure a strong, secure installation.

How to Hang Glass Shelves: Installation
1. Marking Drill Holes:
- Use a level to ensure the shelves will be installed evenly.
- Start by holding the shelf bracket against the wall at the desired height. Adjust it horizontally until the level shows that it is perfectly straight.
- Mark the locations for drill holes on the wall using a pencil or marker, ensuring that the markings align with the studs if possible.
2. Drilling Holes:
- Choose the appropriate drill bit size for your wall type (wood, drywall, concrete, etc.). Refer to the instructions provided with your wall anchors or screws to ensure you select the correct size.
- Drill pilot holes at the marked locations, being careful to drill straight and to the appropriate depth necessary for the wall anchors or screws.
- If you are not drilling into studs, insert wall anchors into the pilot holes. Tap them gently with a hammer if needed to ensure they are flush with the wall.
3. Attaching Brackets:
- Align the brackets with the pilot holes and attach them to the wall using screws. Start by placing the screws into the holes and manually threading them in until they hold the bracket in place.
- Use a screwdriver to tighten the screws securely, ensuring that the brackets are fixed firmly to the wall. Double-check the level to make certain the brackets have not shifted during the installation.
4. Installing Shelves:
- Place the glass shelves on top of the brackets, making sure that they are centered and level.
- Some brackets may require additional screws or hardware to secure the shelves in place. Follow the manufacturer’s instructions to ensure the shelves are safely attached. For clip-style brackets, tighten the clips to hold the shelves firmly, being cautious not to overtighten and risk cracking the glass.
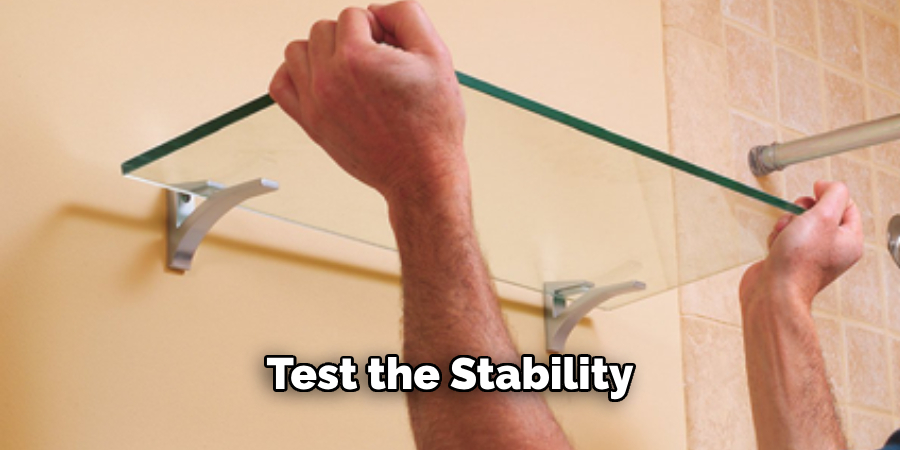
- Give the shelves a gentle test to confirm they are stable and securely installed.
By following these steps, you can ensure a safe and aesthetically pleasing installation for your glass shelves.
Final Touches and Inspection
Checking Stability:
- Test the stability of the shelves by gently pushing and pulling on them.
- Ensure they are securely attached to the wall and can support the intended weight.
Adjusting Level:
- Use a level to double-check that the shelves are still level after installation.
- Make any necessary adjustments by loosening the brackets and repositioning the shelves.
Cleaning Up:
- Remove any dust or debris from the installation process using a damp cloth or vacuum.
- Dispose of packaging materials and unused hardware properly.
Maintenance and Safety
Regular Inspection:
- Periodically check the shelves and brackets for signs of wear or damage.
- Tighten any loose screws or hardware as needed to maintain stability.
Cleaning Glass Shelves:
- Clean glass shelves regularly with a mild glass cleaner and a soft cloth to remove dust and fingerprints.
- Avoid using abrasive cleaners or rough sponges that could scratch the glass surface.
Safety Considerations:
- Warn household members to avoid placing heavy or fragile items on the shelves that exceed their weight capacity.
- Keep children and pets away from the shelves to prevent accidents.
Frequently Asked Questions (FAQs)
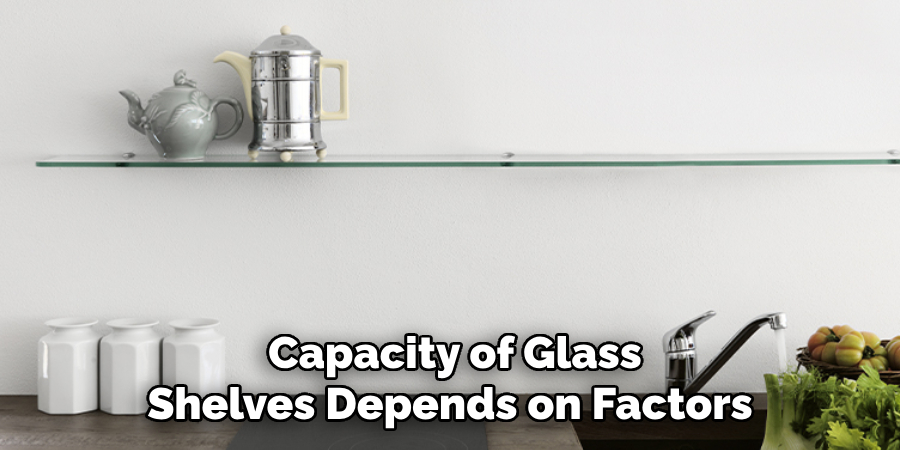
What Is the Weight Capacity of The Glass Shelves?
The weight capacity of glass shelves depends on several factors, including the type of brackets used, the quality of the glass, and the wall’s structural support. Generally, high-quality glass shelves with robust brackets can support between 20 to 50 pounds per shelf. Always refer to the manufacturer’s guidelines for specific weight capacities.
Can I Install Glass Shelves on Plaster Walls?
Yes, you can install glass shelves on plaster walls, but extra care must be taken. It’s advisable to locate studs for maximum support or use heavy-duty wall anchors designed for plaster. Always ensure the wall can support the weight of both the shelves and the items you intend to place on them.
How Do I Ensure My Glass Shelves Are Level During Installation?
To ensure your glass shelves are level, use a spirit level when marking drill holes and attaching brackets. Continually check the level throughout the installation process, especially before finalizing the placement of the shelves.
What Type of Glass Is Best for Shelves?
Tempered glass is the best choice for shelves because it is stronger and more durable than regular glass. If shattered, it breaks into small, less dangerous pieces, making it safer.
How Can I Decorate My Glass Shelves?
Glass shelves can be styled with a variety of decorative items, such as small plants, books, decorative bowls, or picture frames. Consider the weight of your items and distribute them evenly across the shelves. Use items of varying heights and textures to create visual interest.
What Should I Do if My Glass Shelves Become Loose?
If your glass shelves become loose, check the brackets and screws immediately. Tighten any loose screws or replace them if they are worn out. Ensure the wall anchors are still effective and replace them if necessary. Regular inspections can help prevent this issue.
How Do I Clean the Edges and Corners of The Glass Shelves?
Use a small, soft-bristled brush, such as a toothbrush, along with a mild glass cleaner to gently clean the edges and corners where grime can accumulate. Follow up with a soft cloth to wipe away any residue.
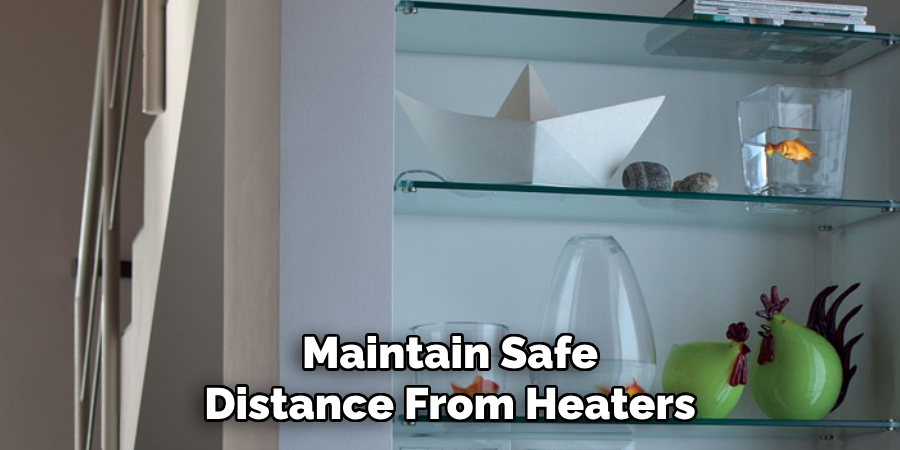
Is It Safe to Place Glass Shelves Near Heat Sources?
It is generally not advisable to place glass shelves near heat sources, as the glass can heat up and potentially become more susceptible to breakage or damage. Maintain a safe distance from heaters, stoves, fireplaces, and other heat-emitting appliances.
Conclusion
Hanging glass shelves involves several essential steps, starting with thorough preparation and planning. Begin by determining the shelf placement and selecting the appropriate brackets. Locate studs or prepare for wall anchors and mark drill holes carefully using a level. Proceed with drilling holes, attaching brackets securely, and placing the glass shelves on top, ensuring everything is level and stable. Conclude the process with a final inspection, checking stability, and making any necessary adjustments.
Approach this project with confidence, knowing that following each step carefully will lead to a successful installation. Glass shelves offer a versatile and elegant storage and display solution suitable for any room.
Hanging glass shelves is a rewarding DIY project that can greatly enhance the functionality and aesthetic appeal of your space. With the right materials, tools, and techniques, anyone can learn how to hang glass shelves safely and securely in their home.
You can also check it out to Extend Wall Framing to Raise Ceiling Height