Are you tired of wobbly table tops? Do you want a more stable surface for your daily activities? Flattening a tabletop is easier than you think, and it will make all the difference in the world. In this guide, we will provide step-by-step instructions on how to flatten a table top.

A well-leveled tabletop is essential not only for aesthetic appeal but also for functionality. Whether you are restoring an old piece of furniture or creating a new one from scratch, ensuring the surface is perfectly flat can make a significant difference in the final product.
This guide will take you through the step-by-step process of flattening a tabletop, from assessing its current condition to applying the finishing touches. With the right tools and techniques, you can achieve a smooth, even surface that enhances your table’s look and usability.
What Will You Need?
Before diving into flattening a tabletop, let’s first gather all the necessary materials and tools. You will need:
- A tabletop that needs flattening
- Sandpaper (various grits – coarse to fine)
- Hand sander or sanding block
- Level
- Wood filler
- Putty knife
- Paintbrush
- Stain or paint (optional)
Make sure you have everything on this list before starting the process. When working with wood and chemicals, it is also recommended that you wear protective gear such as gloves and goggles.

10 Easy Steps on How to Flatten a Table Top
Step 1: Assess the Table Top
Before beginning the flattening process, it’s crucial to assess the current condition of your tabletop. Start by placing the table on a flat, stable surface. Using a level, check various points across the table’s surface to determine any high or low spots. Move the level around, and make note of areas that are uneven. It’s helpful to mark these spots with a pencil for easier identification.
Next, visually inspect the tabletop for any visible damage, such as cracks, warping, or gouges. These issues must be addressed before proceeding with sanding. If the table top has significant damage, consider using wood filler to repair these areas. Apply the filler with a putty knife and allow it to dry completely before proceeding to the next steps.
It’s also beneficial to understand the type of wood and its grain pattern, as this will influence your sanding technique and the direction in which you sand. Assessing the table top thoroughly will help you achieve a more even surface and ensure that you are prepared to address any underlying issues that might affect the final outcome.
Step 2: Prepare the Surface
Once you have assessed the table top and made any necessary repairs, it is time to prepare the surface for sanding. Begin by cleaning the table top to remove any dust, dirt, or debris that may have accumulated. Use a soft cloth and a mild cleaner if needed, ensuring that the surface is clean and dry before proceeding.
Step 3: Start Sanding with Coarse Grit Sandpaper
Attach coarse-grit sandpaper (60-80 grit) to your hand sander or sanding block. The coarse grit will help remove any high spots and level out significant imperfections on the table’s surface. Move the sander toward the wood grain, applying even pressure as you go. Continuously check the surface with your level to monitor your progress, ensuring you achieve a flat, even surface.
Step 4: Progress to Medium Grit Sandpaper
Once the majority of the high spots are removed and the surface feels relatively flat, switch to medium-grit sandpaper (120-150 grit). This will further smooth the surface and eliminate the scratches left by the coarse-grit sandpaper. Continue to sand in the direction of the grain, checking regularly with your level to ensure an even finish.
Step 5: Finish Sanding with Fine Grit Sandpaper
Change to fine-grit sandpaper (220 grit) to achieve a perfectly smooth surface. This final sanding step will remove any remaining imperfections and create a silky-smooth finish. Make sure to follow the wood grain and apply consistent pressure. After this step, the tabletop should feel smooth to the touch and be free of visible scratches.

Step 6: Clean the Surface
After sanding, cleaning the table top thoroughly to remove all sanding dust and debris is important. Use a vacuum cleaner with a brush attachment to suck up the majority of the dust, followed by a tack cloth to wipe down the surface. Ensuring a clean surface is crucial before applying any finishes.
Step 7: Apply Wood Filler to Any Remaining Imperfections
Inspect the tabletop for any small cracks or holes that were not filled in the initial assessment. Use wood filler to address these remaining imperfections. Apply the filler with a putty knife, smooth it out, and allow it to dry according to the manufacturer’s instructions. Once dry, lightly sand the filled areas with fine-grit sandpaper to ensure they are flush with the rest of the surface.
Step 8: Choose Your Finish
After achieving a smooth and even surface on your tabletop, the next step is to choose and apply a finish. The type of finish you select will not only enhance the appearance of the wood but also provide protection against moisture, stains, and general wear and tear. There are several finishes to choose from, including varnish, polyurethane, oil, and wax.
Step 9: Apply the Finish
Carefully apply your chosen finish according to the product’s instructions. For stains, use a paintbrush to apply an even coat, working in the direction of the wood grain. Allow the stain to penetrate the wood for the recommended time, then wipe off any excess with a clean cloth. For paint, apply thin, even coats with a paintbrush, allowing each coat to dry completely before applying the next.
Step 10: Apply a Protective Coat (Optional)
Consider applying a protective coat such as polyurethane or a clear varnish once your stain or paint has dried for added durability. This will help protect the tabletop from scratches, spills, and general wear and tear, prolonging the life of your newly flattened and finished table top. Following the manufacturer’s instructions, apply the protective coat with a clean brush and allow it to dry thoroughly before using the table.
By following these steps, you can transform a wobbly or uneven tabletop into a smooth, attractive, and functional piece of furniture.
5 Additional Tips and Tricks
- Use a Straight Edge: Before you begin anything, check for high or low spots on your tabletop. Use a straight edge or a long level to identify areas that require more attention. Mark these spots clearly for targeted sanding or planning.
- Check for Moisture: Wood can warp or change shape based on its moisture content. Use a moisture meter to ensure your tabletop is properly dried to avoid future warping. If the moisture content is too high, allow it to acclimate in your workshop environment until it stabilizes.
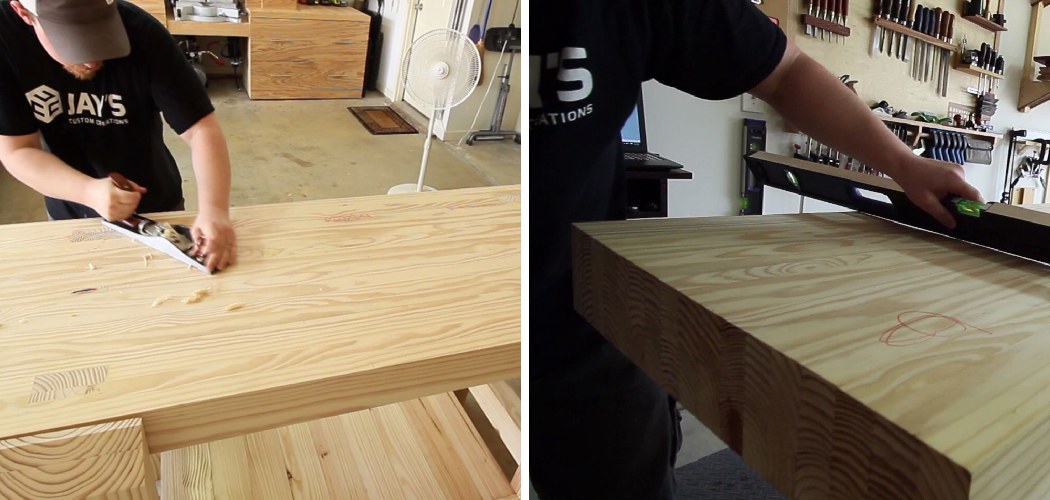
- Hand Planes for Precision: While a belt sander can handle a large area quickly, hand planes offer more control for leveling specific troublesome spots. A well-sharpened plane brightens up your tabletop, offering an unmatched smooth surface.
- Cross-Sanding Technique: For a perfectly flat surface, use a cross-sanding technique. Start sanding with the grain, then switch to a 45-degree angle, and finally sand along the grain again. This method helps level the surface evenly and effectively remove imperfections.
- Check for Gaps: Small gaps can often occur between the boards when gluing up boards to create a tabletop. Place a light source under the tabletop to check for any visible gaps.
5 Things You Should Avoid
- Skipping the Moisture Check: Never overlook the importance of checking the moisture content of the wood. Proceeding with high moisture content can lead to warping and an uneven surface after you’ve flattened the tabletop.
- Rushing the Sanding Process: Avoid rushing through the sanding stages. Using a coarse grit too aggressively can remove too much material and create dips or valleys that are hard to correct.
- Using Dull Tools: Working with dull blades or sandpaper can tear or gouge the wood surface, affecting the final finish. Always ensure your tools are sharp and in good condition.
- Ignoring Surface Contamination: Make sure the surface is free from dust, glue, or other contaminants before flattening. Any residue can interfere with the tools and result in an uneven surface.
- Inadequate Clamping During Glue-Ups: When gluing boards together, improper clamping can lead to gaps and uneven joints. Ensure even pressure across the entire surface to prevent these issues and achieve a smooth table top.
Conclusion
How to flatten a table top requires a combination of patience, skill, and the right tools.
By following the tips and avoiding the common pitfalls outlined above, you can achieve a perfectly flat and smooth surface that enhances your table’s functionality and aesthetics. Start by carefully assessing the condition of your wood, paying special attention to moisture content and surface irregularities. Use precision tools like hand planes and adopt effective sanding techniques to ensure evenness. Finally, take your time, and don’t underestimate the importance of thorough preparation and accurate clamping during glue-ups.
With these practices in mind, you’ll be well-equipped to craft a stunning, flat tabletop that stands the test of time.