Building a loft bed ladder can be a rewarding DIY project that provides both functional and aesthetic benefits to your living space. Whether you’re looking to save room in a small bedroom or simply add an element of customized craftsmanship, constructing your own ladder allows you to tailor it perfectly to your needs.

In this guide on how to build a loft bed ladder, we’ll walk you through the materials required and the step-by-step process to create a sturdy, safe, and visually appealing loft bed ladder.
Why Build a Loft Bed Ladder?
Building a loft bed ladder can be a cost-effective alternative to purchasing one from a store. Plus, it allows you to have complete control over the design and dimensions of your ladder. Instead of settling for a generic ladder that may not fit your loft bed perfectly, building your own allows you to customize it to suit your specific needs and preferences.
Additionally, constructing a loft bed ladder can be a fun and fulfilling project. It provides an opportunity for creativity and hands-on work, making it a great activity for individuals or families who enjoy DIY projects.
Needed Materials
Measuring Tape:
The measuring tape is essential for taking accurate measurements of the space where your ladder will be placed, as well as the length and width of each step.
Wood:
Choose a sturdy and durable wood that can support your weight and withstand frequent use. Popular options include oak, pine, or plywood.

Saw:
A saw is necessary for cutting the wooden boards into the desired lengths and shapes.
Drill:
You’ll need a drill to create holes in the wood for screws and other fasteners. Make sure you have a variety of drill bits on hand to accommodate different sizes of screws.
Screws:
Choose screws that are appropriate for the type and thickness of wood you’re using. It’s always better to have a few extra screws on hand, just in case.
Sandpaper:
Sandpaper is necessary for smoothing out any rough edges or surfaces on the wooden boards.
Paint or Stain (optional):
If you want to give your ladder a finished look, consider painting or staining it. Make sure you choose a non-slip finish if safety is a concern.
8 Step-by-step Guidelines on How to Build a Loft Bed Ladder
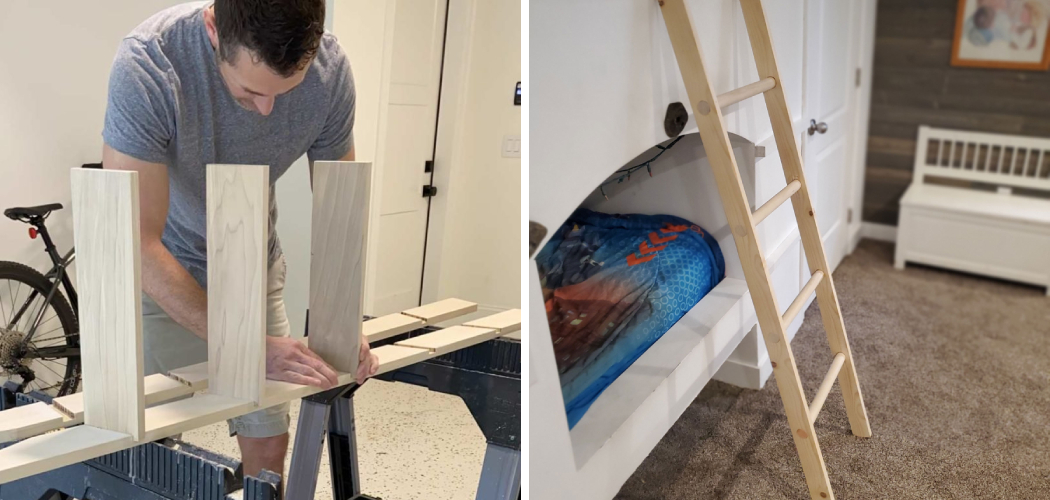
Step 1: Measure and Cut the Ladder Rungs
Begin by determining the number of rungs you’ll need for your loft bed ladder. The ideal spacing between rungs is typically around 10 to 12 inches, but this can vary based on your specific design and comfort preferences. Use the measuring tape to measure and mark the length for each rung on the wooden boards.

Once you have marked the measurements, use a saw to cut the wood into individual rungs. Make sure each rung is cut to the same length for uniformity and stability. After cutting, use sandpaper to smooth out any rough edges to prevent splinters and ensure a safe, comfortable grip.
Step 2: Cut the Side Rails
Next, you’ll need to cut the side rails for your loft bed ladder. The side rails will provide the main support structure for the rungs and must be cut to the correct length to match the height of your loft bed. Measure the vertical distance from the floor to the top of the loft bed frame, as this will be the length of your side rails.
Using these measurements, mark the desired length on your chosen wood. Ensure that the side rails are long enough to provide a comfortable incline but not so steep that climbing becomes difficult. Typically, side rails are angled between 15 to 20 degrees from vertical for optimal safety and comfort.
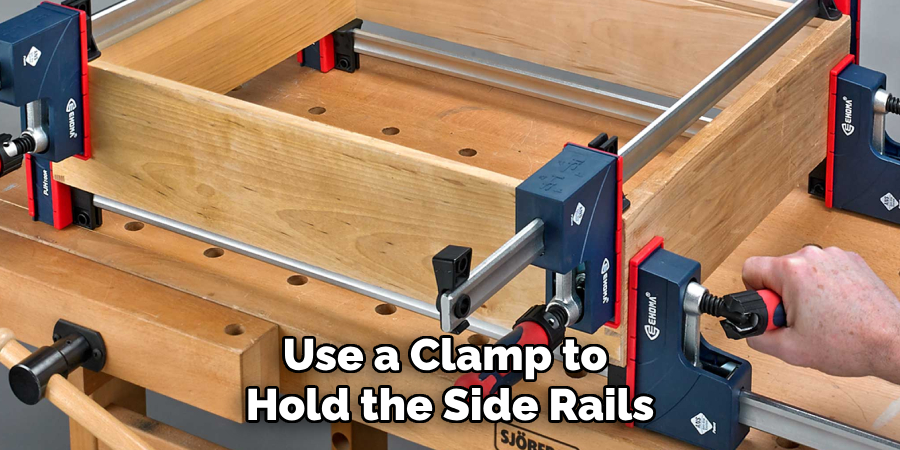
Step 3: Drill Holes for Rungs
Using a drill, create evenly spaced holes along the inside edges of the side rails. These holes should be large enough to fit the rungs snugly but not so large that they weaken the overall structure. The top and bottom holes should be around 1 inch from the ends of the side rail, while the remaining holes can be placed according to your desired ladder rung spacing.
You can also use a clamp to hold the side rails together while drilling to ensure that the holes are properly aligned.
Step 4: Attach Rungs
Now that you have drilled the holes, it’s time to attach the rungs to the side rails. Start by applying a small amount of wood glue into each hole on the side rails to create a stronger bond between the rungs and the side rails. Insert each rung into its corresponding hole, ensuring they are properly aligned and level. A mallet or a hammer with a cushioning material can be used to gently tap the rungs into place if needed.
Once all the rungs are inserted, use screws to secure them firmly in place. Drill pilot holes through the side rails into the ends of the rungs to prevent the wood from splitting, then drive the screws in. Make sure each rung is fastened tightly and securely to the side rails, as this will ensure the stability and safety of your ladder. After all rungs are attached and the glue has dried, inspect the ladder to ensure all connections are solid and the structure is stable.
Step 5: Add Cross Braces (Optional)
For additional stability, you may choose to add cross braces to your loft bed ladder. Cross braces can help distribute weight more evenly and reduce wobbling. To add cross braces, measure the distance between the side rails and cut wooden boards to fit diagonally between the rungs.
Determine the placement of the cross braces, ensuring they do not interfere with the rungs or create an obstacle when climbing. Using a drill, secure the cross braces to the inside of the side rails with screws. Drill pilot holes before inserting the screws to avoid splitting the wood. You can use two cross braces for added stability, forming an “X” shape between rungs if desired.
Step 6: Paint or Stain (Optional)
Once your loft bed ladder is assembled and all the connections are secure, you can enhance its appearance with paint or stain. Before you begin, make sure to sand the entire ladder thoroughly to ensure a smooth surface that will absorb the finish evenly. Choose a paint or stain that suits your decor and personal preferences. If you’re using paint, consider applying a primer first to help the paint adhere better and last longer.
When painting, use evenly applied strokes and multiple thin coats rather than one thick coat to avoid drips and achieve a professional finish. If you opt for staining, apply the stain with a brush or cloth, following the wood grain, and then wipe off any excess with a clean cloth to reveal the wood’s natural beauty. Allow the paint or stain to dry completely between coats, and follow up with a clear protective finish if desired for added durability. Importantly, if safety is a concern, ensure to choose a non-slip finish to prevent accidents while climbing the ladder.
Step 7: Attach to the Loft Bed
Once your loft bed ladder is fully assembled and finished, it’s time to attach it to your loft bed. Carefully position the ladder against the side of the loft bed frame and ensure that it is stable and secure. If necessary, you can use brackets or screws to fasten the ladder to the bed frame for added stability.
Once attached, test the ladder by gently putting weight on each rung to ensure it can handle your weight comfortably. Make any necessary adjustments or reinforcements before using it regularly.
Step 8: Safety Precautions
Building a loft bed ladder requires careful planning and precision to ensure its construction is safe for use. Always follow the instructions closely and double-check all connections before using the ladder. Additionally, consider these safety precautions when using your loft bed ladder:
- Always face the ladder when climbing up or down.
- Do not overload the ladder with more weight than it can safely handle.
- Use caution when wearing socks or slippery footwear while climbing.
- Keep the area around the ladder clear of any objects or obstacles that could cause tripping hazards.
By taking these precautions on how to build a loft bed ladder and regularly inspecting and maintaining your loft bed ladder, you can enjoy a safe and convenient way to access your loft bed.
Overall, building a loft bed ladder is a fun and rewarding DIY project that can save you money while also customizing your loft bed to meet your specific needs and style. With proper care and caution, your loft bed ladder will provide safe and easy access to your elevated sleeping space for years to come.
Frequently Asked Questions
Q1: Can I Use a Metal Ladder for My Loft Bed Instead of Building One?
A1: Yes, you can purchase a metal ladder specifically designed for loft beds or repurpose an existing ladder if it is sturdy enough to support your weight and has appropriate rung spacing. However, building your own wooden ladder allows for customization and may be more cost-effective.
Q2: How Do I Determine the Best Rung Spacing for My Ladder?
A2: The recommended rung spacing is 10-12 inches apart, but you can adjust this according to your personal preference and height. Keep in mind that closer rungs may be easier to climb, while wider spacing provides more room for your feet.
Q3: Can I Build a Loft Bed Ladder Without Drilling Holes in the Side Rails?
A3: Yes, you can use metal brackets or screws to attach the rungs directly to the side rails without drilling holes. However, this method may not be as sturdy and secure as drilling pilot holes and using screws. It is important to ensure the ladder is properly anchored to avoid any accidents.
Conclusion
Creating your own loft bed ladder is a practical and rewarding project that brings both functionality and personal satisfaction. By following these detailed steps on how to build a loft bed ladder, you can ensure that your ladder is sturdy, safe, and tailored to your individual needs.
The process allows for customization in terms of design, finish, and additional stability features, making it a perfect match for your loft bed setup. Always remember to prioritize safety in every step and enjoy the fruits of your labor once the project is complete. Not only does a custom-built ladder enhance the usability of your loft bed, but it also provides a unique touch that reflects your craftsmanship and style.