
Are you tired of looking at your old furniture and are considering replacing it entirely? Before you do, have you considered restoring its finish? Restoring the finish can bring new life to an old piece of furniture and save you money in the process.
Restore a Finish is a popular product used to restore and rejuvenate the appearance of wooden furniture. However, there may come a time when you need to remove it, whether because it has become worn or because you wish to apply a different finish. Removing Restor a Finish can be a simple process if you follow the correct steps and use the appropriate materials.
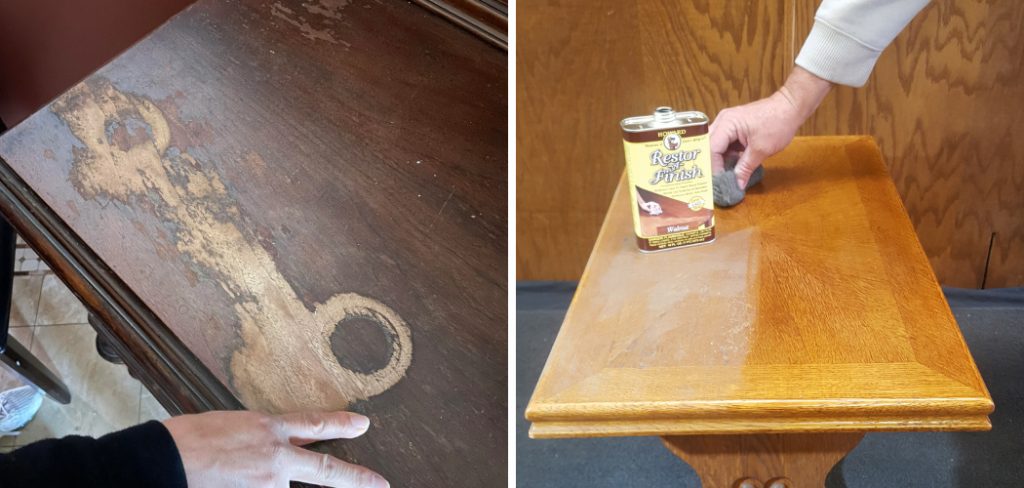
In this guide on how to remove restor a finish, we will walk you through the process of effectively stripping away Restor a Finish, ensuring that your wooden surfaces are properly prepared for the next stage of their treatment or a new look altogether.
What Will You Need?
Before starting the process, gathering all the necessary materials and tools is important. Here are the items you will need:
- Restor a Finish remover
- Clean rags or towels
- Mineral spirits or denatured alcohol
- Fine grit sandpaper (220-grit)
- Steel wool (0000 grade)
- Safety goggles and gloves
When working with chemicals like Restor a Finish remover, it’s crucial to wear protective gear such as safety goggles and gloves. Also, work in a well-ventilated area to avoid inhaling fumes.
10 Easy Steps on How to Remove Restor a Finish
Step 1. Prepare Your Workspace
Ensure that your workspace is well-ventilated and free of clutter. Lay down a drop cloth or old newspaper to protect your floors from any spills or drips. Position your piece of furniture on the drop cloth, ensuring that it is stable and at a comfortable working height.
Gather all your tools and materials within easy reach so you don’t have to interrupt your process to find something. It’s also advisable to have a small trash can or disposable container nearby to properly dispose of used rags, steel wool, and other waste materials. Taking a few minutes to set up your workspace will make the entire process more efficient and help prevent any accidents or messes.
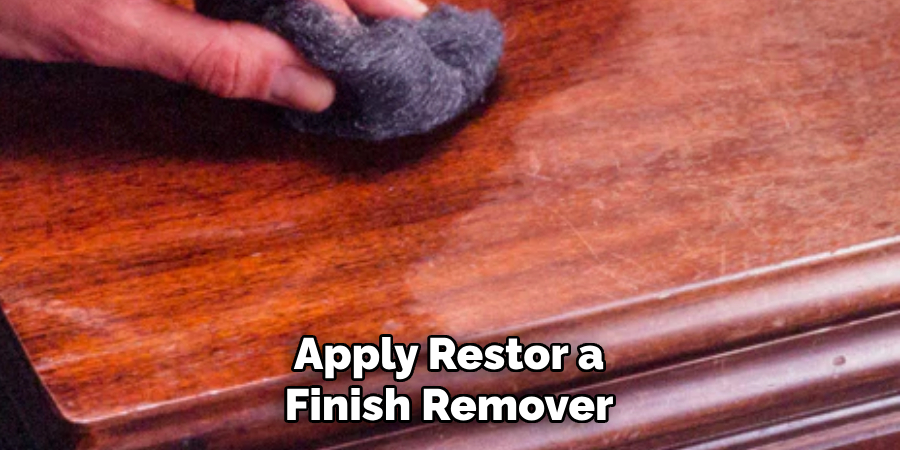
Step 2. Apply Restor a Finish Remover
Using a clean rag or towel, apply the Restor a Finish remover to the furniture’s surface. Make sure to follow the manufacturer’s instructions for the correct application method and amount. Work in small sections to ensure the remover is evenly distributed and has time to break down the finish. Allow the remover to sit on the surface for the recommended amount of time, usually around 5-10 minutes.
Step 3. Wipe Off the Finish
After the remover has had time to work, use a fresh rag or towel to wipe off the dissolved finish. You may need to apply some pressure to completely remove all traces of the finish. Be sure to change out rags as they become saturated with the old finish. This step may need to be repeated several times for heavily finished surfaces.
Step 4. Clean the Surface with Mineral Spirits
Once you have wiped off most of the finish with the Restor a Finish remover, cleaning the surface thoroughly to remove any remaining residue is important. Dampen a clean rag or towel with mineral spirits or denatured alcohol, and gently wipe down the entire surface of the furniture. This will help lift any leftover remover and finish, ensuring the surface is completely clean and free of contaminants.
Work in small sections, frequently rinsing and wringing out your rag to avoid spreading the removed residue back onto the furniture. This step is crucial for preparing the surface for sanding and any subsequent treatments or finishes. If you notice any stubborn areas where the old finish is still present, you may need to apply a bit more mineral spirits or denatured alcohol and use fine-grade steel wool (0000 grade) to gently scrub those spots. Make sure to work toward the wood grain to avoid scratching or damaging the wood.
Step 5. Sand the Surface
After thoroughly cleaning the surface with mineral spirits or denatured alcohol and allowing it to dry completely, the next step is to sand the surface. Using fine-grit sandpaper (220-grit), gently sand the entire furniture surface. This will help to smooth out any remaining inconsistencies and prepare the wood for a new finish. Be sure to sand in the direction of the wood grain to avoid creating scratches or marks that could be visible later. Periodically wipe the surface with a clean, dry rag to remove any sanding dust.
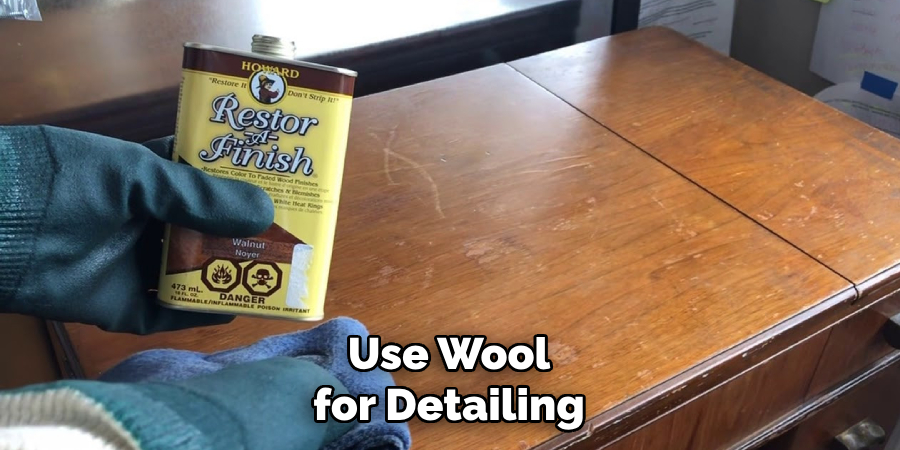
Step 6. Use Steel Wool for Detailing
For any detailed or intricate areas that are difficult to reach with sandpaper, use 0000-grade steel wool. The steel wool is gentle enough to avoid damaging the wood but effective in removing any remaining finish and smoothing out the surface. Work carefully around carvings, corners, and edges, ensuring that every part of the furniture piece is thoroughly prepared.
Step 7. Remove All Dust
Once the sanding is complete, removing all dust and debris from the furniture’s surface is crucial. Using a vacuum with a brush attachment can help pick up most of the dust. Follow up by wiping down the entire surface with a tack cloth or a slightly damp rag to remove every bit of dust. This will leave you with a clean surface that is ready for the next steps.
Step 8. Inspect the Surface
Take a moment to inspect the entire surface of the furniture piece. Look for any spots that may still have traces of the old finish or any areas that may need additional sanding or cleaning. Ensuring the surface is completely clean and smooth is critical for achieving a professional-looking final result.
Step 9. Condition the Wood
Before applying a new finish, you may want to condition the wood to help it absorb the new finish more evenly. Apply a wood conditioner according to the manufacturer’s instructions, and allow it to penetrate the wood for the recommended amount of time. Wipe off any excess with a clean rag. This step is especially important for softwoods or wood prone to uneven absorption, like pine or cherry.
Step 10. Apply the New Finish
Finally, you can apply the new finish to your furniture piece. Whether you choose paint, stain, varnish, or another type of finish, follow the manufacturer’s instructions for the best results. Apply the finish in thin, even coats, allowing each coat to dry completely before applying the next. Sand lightly between coats if necessary to achieve a smooth, professional finish.

By following these steps, you can effectively remove old finishes from your furniture and prepare the surface for a new, beautiful finish. Remember to always work in a well-ventilated area and wear protective gear when using chemicals or sanding.
5 Things You Should Avoid
- Skipping the Workspace Preparation: Neglecting to set up a clean and organized workspace can lead to accidents and messes, making the whole process more cumbersome. Always place protective coverings over surrounding areas and have all your tools and materials within easy reach.
- Applying Too Much Remover: Over-applying the Restor a Finish remover can result in an overly saturated surface, leading to uneven removal and potential damage to the wood. Always follow the manufacturer’s instructions on the correct amount to use.
- Rushing the Removal Process: Rushing through the removal process without allowing sufficient time for the remover to work can result in incomplete finish removal, making subsequent steps more difficult. Patience is key; ensure the remover has adequate time to break down the old finish.
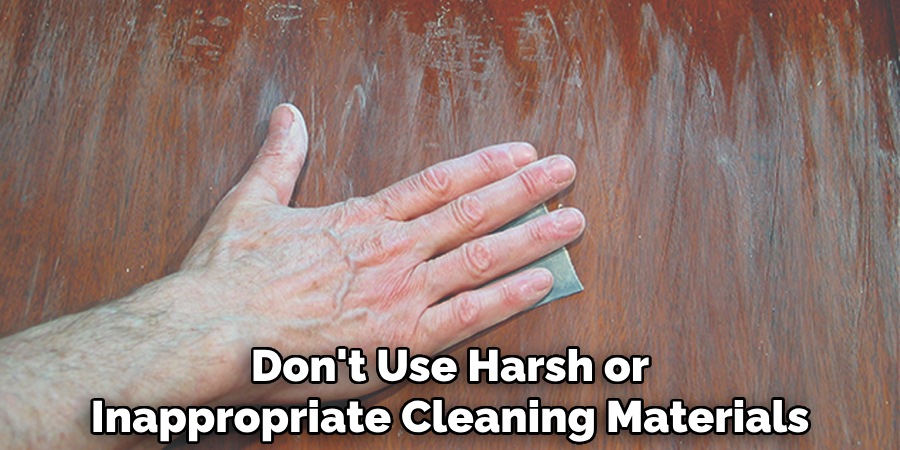
- Using the Wrong Cleaning Materials: Utilizing harsh or inappropriate cleaning materials, such as coarse steel wool, can scratch or damage the wood’s surface. Always opt for fine-grade steel wool and the recommended solvents, like mineral spirits or denatured alcohol.
- Neglecting Safety Precautions: Failing to wear protective gear, such as gloves, masks, and goggles, can expose you to harmful chemicals and dust. Always work in a well-ventilated area and prioritize your safety by following all recommended precautions.
By avoiding these common mistakes, you can successfully remove old finishes from your furniture and achieve a beautiful, professional-looking result.
Conclusion
Successfully removing Restor a Finish from your furniture requires a methodical and careful approach. By meticulously working through each step, from preparing your workspace to applying the final wood finish, you ensure that your furniture is beautifully restored. It is essential to clean and sand the surface properly, use the right materials, and follow safety precautions to achieve the best results. Taking your time and paying attention to detail will result in a stunning final product that you can be proud of for years to come.
With these tips and techniques on how to remove restor a finish, you can confidently tackle any furniture restoration project and bring new life to your favorite pieces. So go ahead, grab your supplies, and give your old furniture a fresh start!
Remember to enjoy the process and have fun with it; after all, there’s nothing more satisfying than seeing a piece of furniture transformed into something beautiful through your own hard work and dedication. Happy restoring!