
“Seeing the joy on my child’s face as they sat at a table I built with my own hands was a moment I’ll cherish forever.” Crafting furniture for children not only provides a sense of accomplishment but also creates invaluable memories. The importance of DIY projects extends beyond just the finished product. When you learn how to make a childs table, you unlock a world of benefits that include the ability to customize the piece to match your child’s needs and preferences, create bonding moments with your family, and save money compared to store-bought options.

In this guide, we’ll walk you through the main steps involved in making a child’s table, from selecting the right materials to assembling and finishing the piece. Whether you’re a seasoned DIY enthusiast or a beginner, you’ll find this project both rewarding and fun.
Materials and Tools Needed
List of Materials
- Wood
- Screws
- Nails
- Wood glue
- Sandpaper
- Paint or stain
- Wood filler (optional)
- Varnish (optional)
List of Tools
- Saw
- Drill
- Screwdriver
- Measuring tape
- Sander
- Paintbrushes
- Clamps (optional)
Safety Gear
- Safety glasses
- Gloves
- Dust mask
Ensuring you have these materials and tools at hand, along with the appropriate safety gear, will set you up for a successful and safe DIY project as you create a delightful child’s table.
How to Make a Childs Table: Planning and Designing the Table
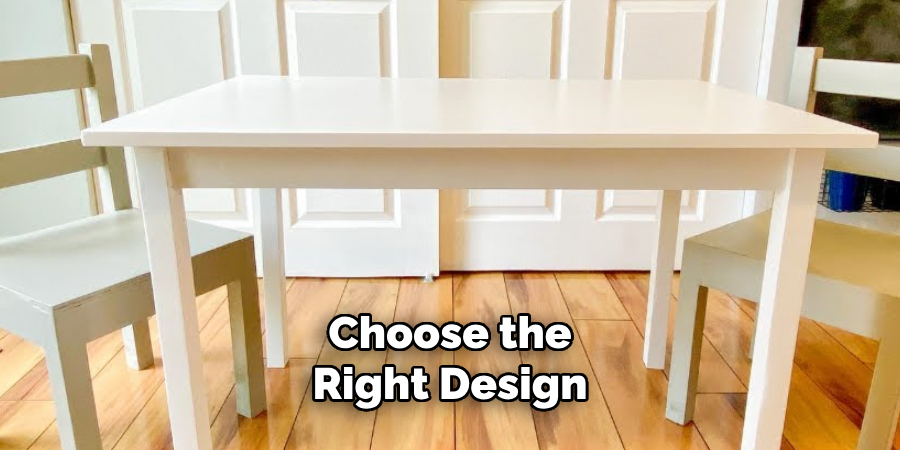
Choosing the Right Design
When planning your child’s table, the design you choose should align with both your skill level and your child’s needs. Beginners might opt for a simple design with straight cuts and basic assembly, which is easier to manage and less time-consuming. More experienced DIYers could consider elaborate designs that feature decorative carvings, adjustable heights, or integrated storage compartments. It’s also important to consider your child’s age and height. Younger children benefit from tables with rounded edges and a lower height to ensure safety and accessibility.
Measurements
Standard dimensions for a child’s table generally include a height of around 20 to 22 inches, with a tabletop size of approximately 24 inches by 36 inches. These dimensions should be comfortable for children aged 2 to 6 years. However, you can adjust these measurements to better fit your child’s specific needs. For younger toddlers, you may opt for a table height closer to 18 inches, while for older children, a height of 24 inches may be more appropriate. Always take into account the chairs that will accompany the table, ensuring they are proportionate in height.
Sketching the Plan
Creating a basic blueprint or sketch of your table is a crucial step in the planning process. Start by outlining the overall dimensions of the table on a sheet of paper. Label the length, width, and height clearly. Include details such as leg placement, supports, and any additional features like storage shelves. Using graph paper can help maintain accurate proportions and spacing. A well-drafted sketch will serve as a valuable guide during the construction phase, helping you stay organized and focused.
Cutting the Wood
Selecting Wood Type
Choosing the right type of wood is paramount for ensuring the durability and ease of working on your child’s table. Hardwood species like oak, maple, and birch are excellent choices for their strength and longevity. They can withstand the daily wear and tear of an active child. If you’re looking for something more affordable and easier to cut, pine is an ideal choice, though it may be slightly less durable than hardwoods. Additionally, consider using plywood for the tabletop, as it offers a stable and smooth surface that can be easily painted or stained.
Measuring and Marking
Accurate measurements and marking are essential for a well-proportioned table. Begin by measuring each piece of wood according to your sketch, using a measuring tape to ensure precision. Mark your measurements with a pencil, making clear, straight lines that will guide your cuts. Use a carpenter’s square to check that your lines are perfectly perpendicular or parallel where necessary. Double-check all measurements before cutting to avoid any mistakes that could compromise the integrity of the table.
Cutting Techniques
When it comes to cutting, the type of saw you use can significantly impact the quality of your work. A circular saw is great for straight cuts and can handle larger pieces of wood with ease. For more detailed cuts or if you’re working within a confined space, a jigsaw can offer more flexibility. Always prioritize safety by wearing safety glasses and using a dust mask to protect against sawdust. Secure the wood in place with clamps to prevent any movement while cutting, and follow the marked lines carefully, allowing the saw to do the work without forcing it. This will ensure clean, smooth cuts that will fit together seamlessly during assembly.
Assembling the Tabletop
Arranging the Planks
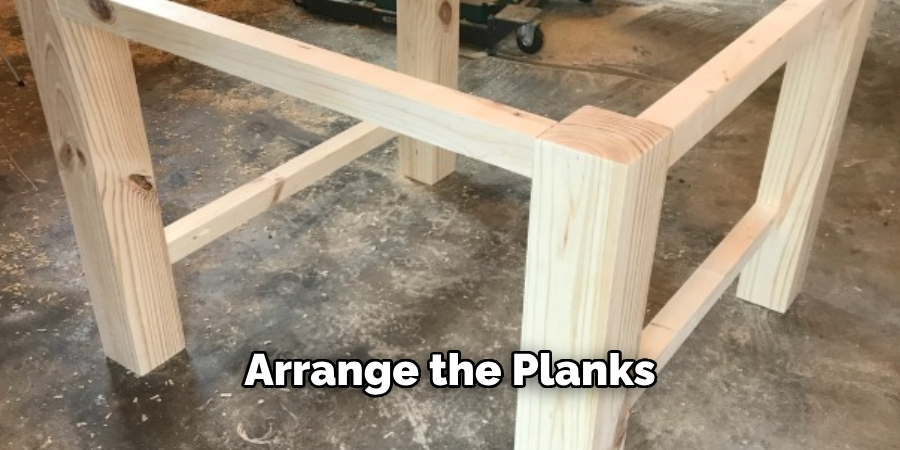
Begin the assembly of your child’s table by laying out the wood pieces for the tabletop. Ensure each plank is straight and free of defects, as these could affect the table’s stability and finish. Lay the planks side by side on a flat, level surface, aligning their edges as closely as possible. This initial arrangement will give you an overview of how the planks fit together, and you can make any necessary adjustments for the best visual alignment.
Joining the Pieces
Joining the planks together securely is crucial for a sturdy tabletop. There are several methods to consider:
- Wood Glue: Apply wood glue along the edges of each plank. Spread the glue evenly using a brush or your finger to ensure full coverage. Once glued, press the planks together and use clamps to hold them in place until the glue dries.
- Biscuits: Using a biscuit joiner, cut slots in the adjoining edges of each plank. Insert wood biscuits into these slots with a dab of wood glue. Biscuits expand upon contact with the glue, creating a strong bond between the planks.
- Dowels: Drill holes along the edges of each plank for dowels. Insert dowels coated with wood glue into these holes, ensuring they align perfectly with corresponding holes in the adjacent plank. This method provides additional strength and alignment for the tabletop.
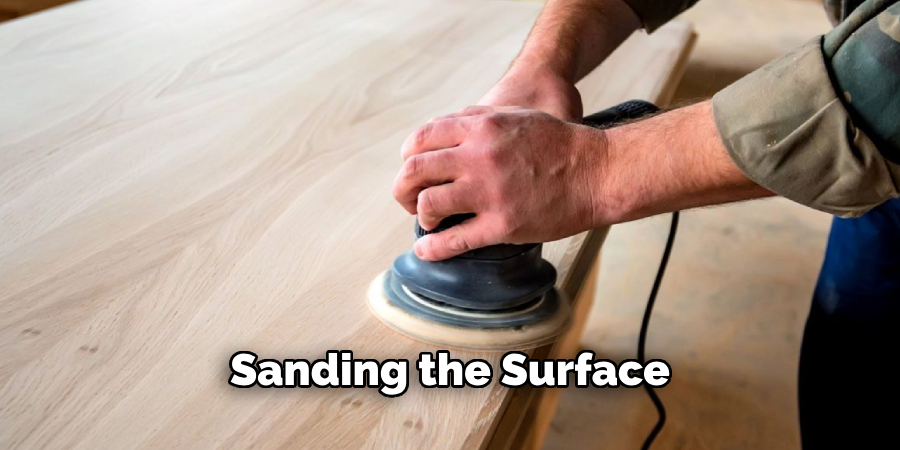
Sanding the Surface
Once the planks are joined and the glue has dried, the next step is sanding the tabletop surface. Begin with medium-grit sandpaper to smooth any rough edges or uneven surfaces. Gradually transition to finer grit sandpaper to achieve a smooth, splinter-free finish. Sand evenly over the entire surface, paying particular attention to the joints to ensure they are flush with the rest of the tabletop. Sanding not only enhances the appearance but also prepares the wood for staining or painting, ensuring a professional-quality finish.
Building the Table Legs
Design Options
When building the legs for your child’s table, the design can greatly influence both the aesthetics and stability of the finished product. Here are a few different styles to consider:
- Straight Legs: Simple and classic, straight legs provide a clean look and are relatively easy to construct. They offer a timeless design that can match any decor.
- Angled Legs: Angled legs can give the table a modern or mid-century feel. They are slightly more challenging to build but provide a unique visual appeal.
- Turned Legs: Crafted using a lathe, turned legs feature intricate designs and curves. This style adds a touch of elegance and can make the table a standout piece.
Measuring and Cutting
Precise measurements are essential to ensure all four legs are the same length, which is critical for the table’s stability. Using your desired design, measure the length of each leg from the same starting point. Use a measuring tape and mark the length of each piece of wood with a pencil. A miter saw or table saw is ideal for making straight, clean cuts. Place the wood on a flat, stable surface and clamp it securely before cutting. After cutting, use a carpenter’s square to check that each leg is cut accurately and is the same length.
Attaching Legs to the Tabletop
Securely attaching the legs to the tabletop is vital for the overall durability and safety of the table. Here are a few methods:
- Screws: Position each leg at the corner of the tabletop. Drill pilot holes through the leg and into the tabletop. Insert screws through the leg’s top end into the tabletop, ensuring they are tightened securely.
- Brackets: Metal brackets can provide added stability. Attach the brackets to the inside of each leg and then to the underside of the tabletop using screws. This method adds additional support and keeps the legs firmly in place.
- Wooden Apron: Another option is to construct a wooden apron around the inside perimeter of the tabletop, which the legs can attach to. Screw the legs into the apron for a robust and stable structure.
Regardless of the method chosen, ensure that the legs are positioned accurately and that the table stands evenly on a flat surface before final tightening.

Conclusion
In summary, learning how to make a childs table involves several key steps. Begin by carefully measuring and cutting the wood to ensure precision. Use appropriate cutting techniques and tools such as a circular saw for straight cuts and a jigsaw for more intricate work. Secure the tabletop by arranging, joining, and sanding the planks to create a smooth, cohesive surface. For the table legs, choose a design that matches your aesthetic preferences, measure and cut with accuracy, and securely attach them to the tabletop using screws, brackets, or a wooden apron.
Building a table for your child can be a rewarding and enjoyable project. It’s a great way to develop your woodworking skills and create something unique and functional for your home. Don’t hesitate to give it a go—mistakes are part of the learning process, and each step will bring you closer to mastering how to make a child’s table.
For additional success, remember to double-check all measurements, take your time with each step, and always prioritize safety by using protective gear and appropriate tools. Happy building!