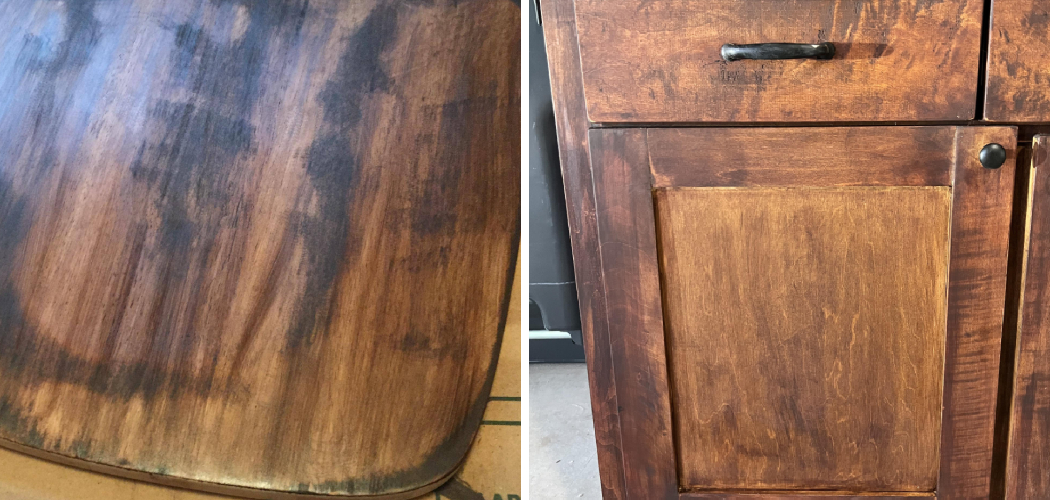
Fixing blotchy stain on wood can be a frustrating challenge, especially when you’ve put time and effort into staining a piece only to have uneven or patchy results. Blotchy stain occurs when the wood absorbs stain unevenly due to variations in its porosity or improper application techniques.

Fortunately, there are effective methods to rectify this issue and achieve a smooth, consistent finish. From using pre-stain wood conditioners to seal the wood and promote even absorption to employing techniques like sanding or applying additional coats of stain strategically, there are various approaches to address blotchy staining. This article will provide a comprehensive guide on how to fix blotchy stain on wood, offering step-by-step instructions, practical tips, and expert advice to help you achieve professional-quality results and restore the beauty of your stained wood projects.
Identifying the Cause of Blotchy Stain
Before diving into the solutions, it’s essential to understand the reasons behind blotchy stain on wood. Identifying the cause can help you choose the most appropriate method to fix the problem and prevent it from recurring in future projects. The primary factors contributing to blotchy stains include:
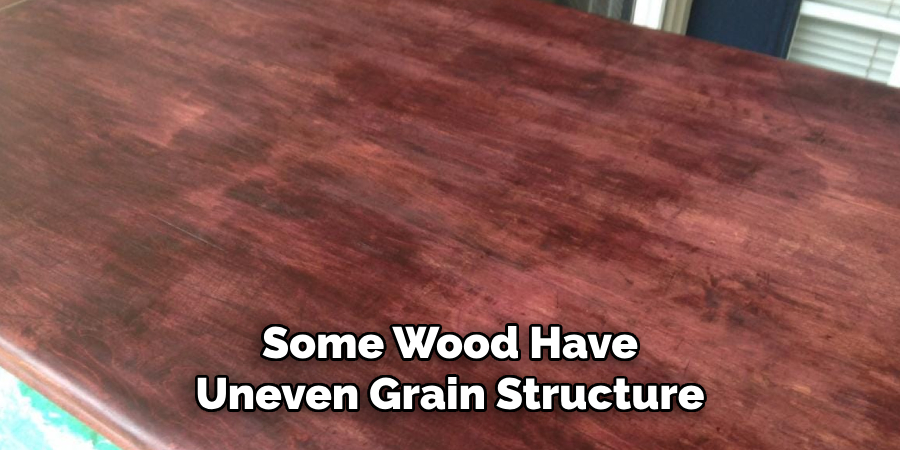
- Wood Type: Some types of wood, such as pine, cherry, and maple, have a dense and uneven grain structure, making them more prone to blotchiness. The natural variations in grain can lead to differential absorption of stain.
- Wood Preparation: Inadequate preparation of the wood surface can contribute to uneven stain absorption. Failing to sand the wood properly or skipping grain raising steps can leave the surface uneven and more susceptible to blotching.
- Moisture Content: Wood that is too wet or too dry can absorb stain unevenly. High moisture content can prevent the stain from penetrating, while overly dry wood can soak up the stain too quickly, leading to uneven coloration.
- Stain Application Techniques: Improper stain application techniques, such as using a dirty brush, applying the stain too thickly, or not wiping off excess stain, can cause blotchiness. Consistent application is key to achieving an even finish.
10 Methods How to Fix Blotchy Stain on Wood
1. Assessing the Blotchy Stain
Before attempting to fix blotchy stain on wood, it’s crucial to assess the extent of the issue and identify the underlying cause. Blotchy stain occurs when the wood absorbs stain unevenly, resulting in areas of darker and lighter color. Common causes of blotchiness include uneven sanding, wood grain variation, and inadequate preparation of the wood surface.
Begin by examining the stained wood to determine the pattern and severity of the blotchiness. This assessment will guide your approach to fixing the problem and ensure that you address the root cause effectively.
2. Sanding the Wood Surface
One of the most effective ways to fix blotchy stain on wood is to sand the surface to remove the unevenly absorbed stain and create a smooth, uniform base for refinishing. Start by using a fine-grit sandpaper (around 220-grit) to sand the entire surface lightly, focusing on the areas with blotches.
Sand in the direction of the wood grain to avoid creating scratches or swirl marks. If the blotchiness is severe, you may need to use a coarser-grit sandpaper (around 150-grit) to remove more of the stained wood. Be careful not to sand too aggressively, as this can damage the wood surface. Once you’ve sanded away the blotchy areas, wipe the surface clean with a tack cloth to remove any sanding dust.
3. Applying a Wood Conditioner
To prevent future blotchiness and ensure more even stain absorption, consider applying a wood conditioner before restaining the wood. Wood conditioners are clear solutions that help to seal the wood pores and promote more uniform staining. Apply the wood conditioner evenly to the entire surface of the wood using a brush or cloth, following the manufacturer’s instructions for drying time and application method. Allow the conditioner to penetrate the wood for the recommended time before wiping off any excess with a clean cloth.

4. Using a Gel Stain
Gel stain is a thicker, more viscous type of stain that can help to minimize blotchiness on wood surfaces. Unlike traditional liquid stains, gel stains sit on top of the wood rather than penetrating deeply into the grain, which can help to achieve a more even color. To fix blotchy stain using gel stain, apply a thin, even coat of the gel stain to the wood surface using a brush or cloth. Work in small sections and wipe off any excess stain with a clean cloth before it dries. Allow the stain to dry completely according to the manufacturer’s instructions before applying additional coats if desired.
5. Using a Wood Toner
Wood toner is a type of tinted topcoat that can help to even out the color of blotchy stain on wood surfaces. It contains a small amount of pigment that adds color and evens out variations in the wood tone. To fix blotchy stain using a wood toner, apply the toner evenly to the wood surface using a brush, roller, or sprayer. Work in small sections and ensure even coverage to achieve a consistent color. Allow the toner to dry completely before applying additional coats if necessary.
6. Using a Sealer or Sanding Sealer
Applying a sealer or sanding sealer to the wood surface before staining can help to minimize blotchiness by sealing the wood pores and promoting more even stain absorption. Sealers are clear coatings that create a barrier between the wood and the stain, preventing the stain from being absorbed unevenly.
Sanding sealers, on the other hand, are thin, fast-drying sealants that also fill in small imperfections in the wood surface, such as pores and grain irregularities. Apply the sealer or sanding sealer evenly to the wood surface using a brush or cloth, following the manufacturer’s instructions for drying time and application method.
7. Blending with Pigmented Stain
If blotchiness is still noticeable after sanding and conditioning the wood, you can try blending the blotchy areas with a pigmented stain that matches the overall color of the wood. Choose a stain that closely matches the existing color of the wood and apply it selectively to the blotchy areas using a brush or cloth.

Work carefully to blend the pigmented stain with the surrounding wood to achieve a seamless transition. Allow the stain to dry completely before assessing the results and applying additional coats if necessary. Pigmented stain can help to camouflage blotchy areas and create a more cohesive appearance on the wood surface.
8. Applying a Second Coat of Stain
In some cases, applying a second coat of stain can help to even out blotchy areas and achieve a more consistent color on the wood surface. After allowing the first coat of stain to dry completely, assess the color and blotchiness of the wood. If blotchy areas are still noticeable, lightly sand the surface with fine-grit sandpaper (around 220-grit) to smooth out any imperfections.
Wipe the surface clean with a tack cloth to remove any sanding dust, and then apply a second coat of stain using a brush or cloth. Work quickly and evenly to ensure consistent coverage and avoid overlap marks. Allow the second coat of stain to dry completely before assessing the results and applying additional coats if needed.
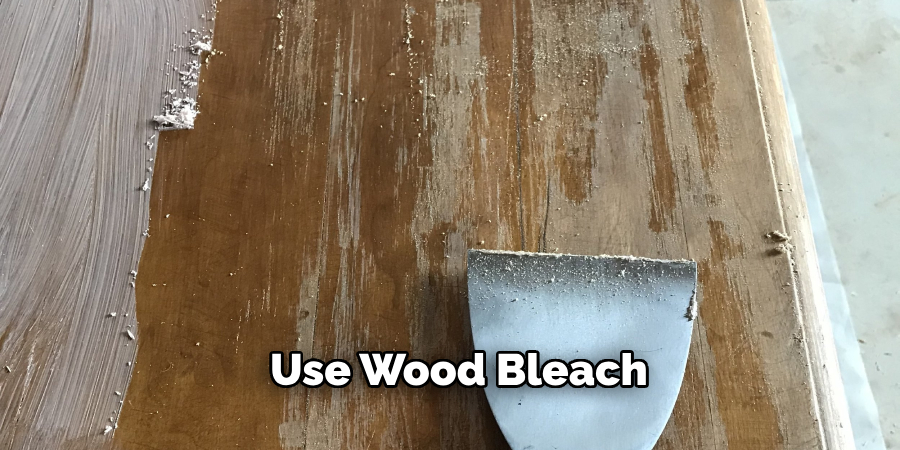
9. Using Wood Bleach
In cases where blotchiness is severe and other methods have been unsuccessful, you may need to use wood bleach to lighten the affected areas and create a more uniform base for restaining. Wood bleach is a chemical solution that can lighten or remove pigment from wood surfaces. Follow the manufacturer’s instructions carefully when using wood bleach, as it can be caustic and potentially harmful if not handled properly.
Apply the wood bleach to the blotchy areas using a brush or cloth, and allow it to penetrate the wood for the recommended time. Once the desired level of lightening has been achieved, neutralize the wood bleach according to the manufacturer’s instructions and allow the wood to dry completely before restaining.
10. Seeking Professional Help
If you’ve tried multiple methods to fix blotchy stain on wood without success, or if the blotchiness is severe and you’re unsure how to proceed, consider seeking professional help. Professional woodworkers, furniture refinishers, or restoration specialists have the experience, tools, and expertise to assess the problem and recommend appropriate solutions.
They can help identify the underlying cause of the blotchiness and provide expert guidance on how to fix it effectively. While professional services may incur additional costs, they can save you time and frustration by ensuring that the blotchy stain is addressed properly and the wood surface is restored to its desired appearance.
Conclusion
Achieving a smooth and uniform stain on wood surfaces can be challenging, especially when dealing with blotchiness. However, by using the methods outlined in this guide, such as sanding, wood conditioners, gel stains, and sealers, you can significantly improve the finish of your wood projects.
Additionally, applying a second coat of stain, blending with pigmented stain, or using wood bleach can be effective solutions for more stubborn blotchy areas. If all else fails, seeking professional help ensures that your wood surface is treated with expert care. Thanks for reading, and we hope this has given you some inspiration on how to fix blotchy stain on wood!