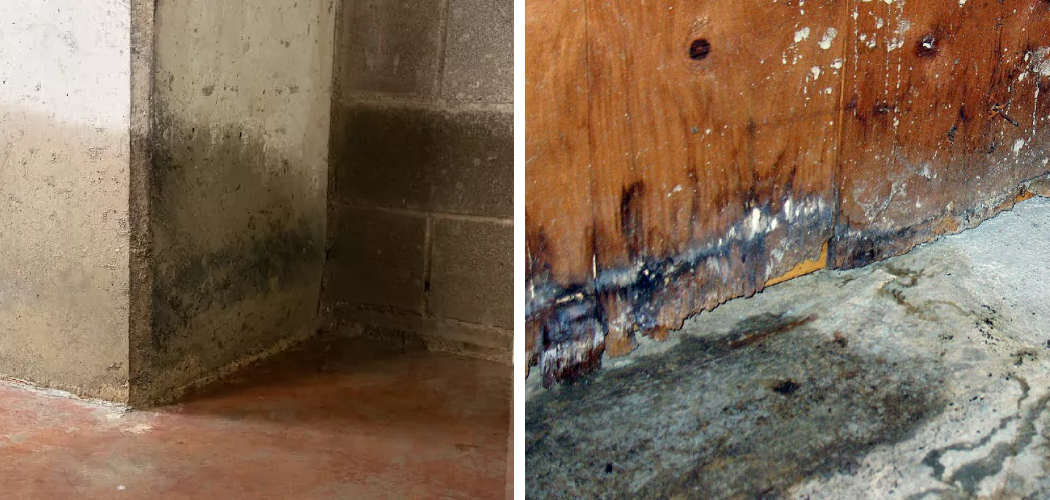
Have you ever had a water leak in your home that left your newly laid concrete floor soaked? These kinds of disasters can be incredibly stressful and leave us wondering how we will fix the problem efficiently. Well, don’t worry! We’ve put together this guide outlining the steps you need to take to dry out concrete floors after a water leak.

Whether you’re dealing with a small leak or a major flood, these tips will help you return your concrete floor to its original state in no time.
From dealing with excess moisture to preventing further damage, these tips will help you get back on track quickly and effectively. Read on for more information about how to dry concrete floor after water leak!
What Will You Need
Before drying your concrete floor, it’s important to gather all the necessary materials. The following items will help you effectively dry out your floor and prevent any further damage:
- Wet/dry vacuum cleaner: This powerful machine is designed specifically for sucking up water from surfaces, making it an essential tool when dealing with a water leak on a concrete floor. They can be rented at most hardware stores if you don’t have one.
- Dehumidifier: This machine helps regulate the humidity levels in a room, making it an important tool for drying out concrete floors. They can also be rented at most hardware stores if you don’t have one.
- Fans: Having a few fans on hand will help circulate air and speed up drying. Use industrial fans for more efficient air circulation.
- Buckets and mops: These will come in handy to collect and remove any standing water that the vacuum cleaner might have missed.
- Clean towels and cloths: These can be used to soak up excess moisture from the floor.
Once you have all these tools at your disposal, it’s time to get to work!
10 Easy Steps How to Dry Concrete Floor After Water Leak
Step 1: Ensure Safety First:
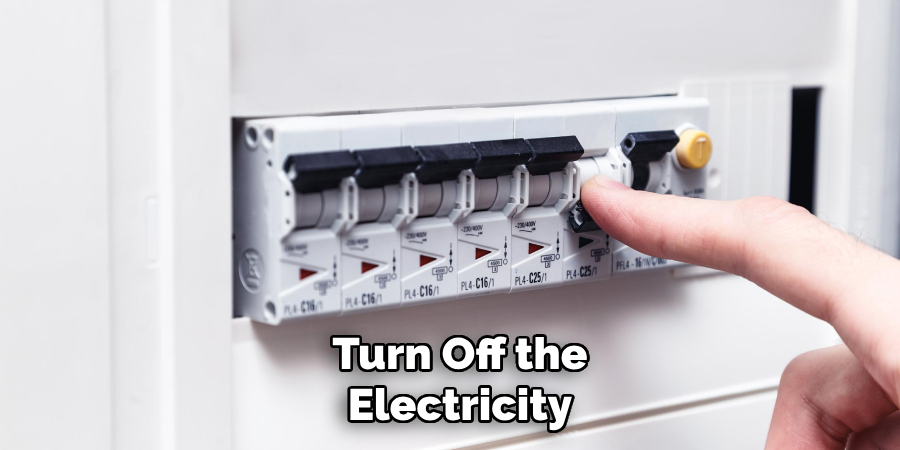
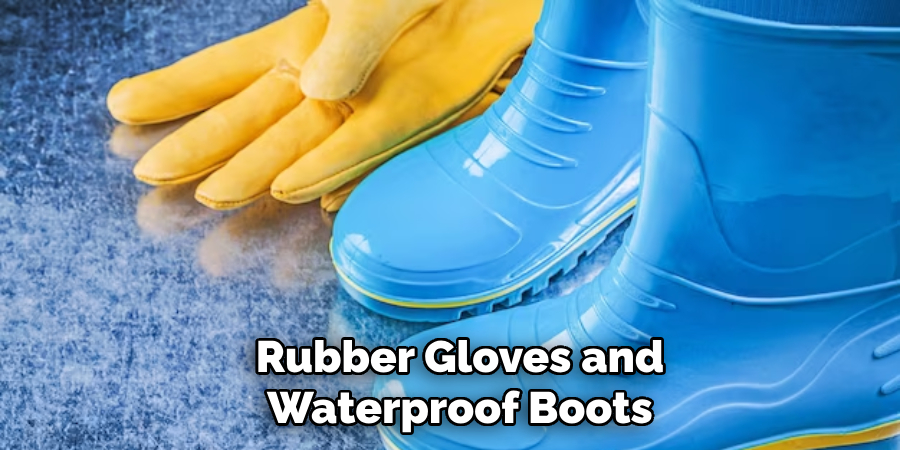
Before you start the process, safety should be your utmost priority. Turn off the electricity in the affected areas to avoid any electrical hazards. If the water leak is extensive, you might need to vacate the premises until it’s safe to return. Always remember to wear rubber gloves and boots to protect yourself while cleaning. Call a professional to handle the situation if the water is contaminated or sewer-related.
Step 2: Remove Excess Water:
The first step in drying is to remove as much excess water as possible. Using the wet/dry vacuum cleaner, suck up any standing water on the concrete floor. This will not only make the drying process more manageable but will also prevent the water from seeping further into the concrete. Use clean towels or cloths to soak up the water for smaller puddles or hard-to-reach areas. Dispose of the water safely and under local regulations.
Step 3: Dry the Area:
After removing the excess water, it’s time to start drying. Set up the fans in the room, aiming them at the wet concrete floor. The airflow will help speed up evaporation. Next, place your dehumidifier in the room and turn it on. This will assist in pulling moisture from the air and the floor, speeding up the drying process.
Remember to empty the dehumidifier’s water container regularly. This process may take a few days, depending on the extent of the water leak. It’s important to take your time with this process, as any residual moisture can lead to problems, such as mold growth or structural issues.
Step 4: Check for Residual Moisture:
Once the concrete floor appears dry, it’s crucial to check for any residual moisture that might not be immediately visible. Use a moisture meter, purchased or rented from a hardware store, to ensure that all the moisture has been removed from the floor. If the meter detects any remaining moisture, continue drying until the floor is arid. Skipping this step could lead to future problems, such as mold or mildew growth, which can harm your health and damage your property.
Step 5: Clean and Sanitize the Area:
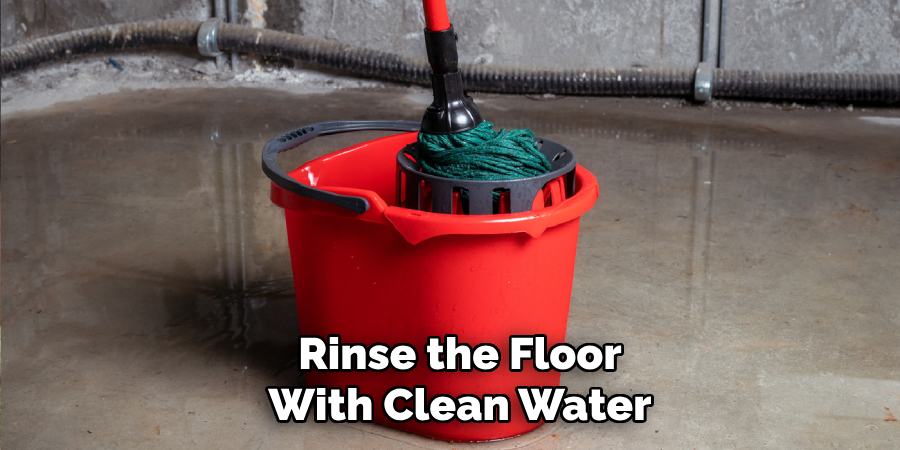
After ensuring the concrete floor is completely dry, it’s time to clean the area to eliminate any potential contaminants left by the water leak. Use a concrete cleaner or a mixture of mild detergent and warm water to scrub the surface. Be sure to cover every inch of the floor to ensure all dirt and grime is removed. After scrubbing, rinse the floor with clean water and let it dry.
For sanitizing, use a commercial-grade disinfectant or a mixture of 1 cup of bleach with 1 gallon of water. Apply the solution to the floor using a mop or a spray bottle, let it sit for a few minutes, then scrub the floor again. Rinse the floor with clean water and allow it to dry completely. This step is critical to prevent mold or mildew growth and ensure the room is safe for use.
Step 6: Seal the Concrete Floor:
After the floor is arid, cleaned, and sanitized, it’s time to seal it. Sealing the concrete floor can provide an extra layer of protection against future leaks and spills by making it more resistant to water absorption. Use a high-quality concrete sealer, following the manufacturer’s instructions regarding application and drying time.
Usually, you’ll need to apply the sealer evenly over the surface using a roller or sprayer, leaving it to dry fully before stepping on the floor. Depending on the specific product and the environmental conditions, this can take anywhere from a few hours to a couple of days.
Step 7: Monitor the Area:
After the floor has been sealed, keeping a close eye on the area is important, especially if the water leak is severe or recurrent. Monitoring the area will allow you to catch any signs of residual moisture or the recurrence of leakage as soon as possible. You can use the moisture meter occasionally to check for any hidden moisture.
If any signs of moisture or leakage are detected, it’s best to call professionals to assess the situation and provide a comprehensive solution. Regularly inspecting your plumbing system and maintaining humidity levels can also prevent future leaks.
Step 8: Restore the Area:

It’s time to restore the area once you are confident that the concrete floor is thoroughly dry, cleaned, and sealed. Return any furniture and other items to the space, ensuring you place them carefully to avoid damaging the newly sealed surface. If you had to remove baseboards or wall panels during drying, you could reinstall them, ensuring they are also scorched. Take preventive measures, such as using waterproof mats or rugs in areas prone to spills or leaks, to protect your floor in the future.
Step 9: Maintenance and Care:
Maintaining your concrete floor and area is crucial in preventing future water leaks. Regular cleaning and sealing of the concrete floor can preserve its durability, while periodic inspection of the surrounding plumbing system can help identify potential issues before they escalate. Consider investing in a good-quality water sensor that can alert you to leaks or excess moisture.
Keep the humidity levels in check within your home or building, as high humidity can also affect the concrete. If you find any signs of water damage in the future, do not hesitate to repeat this process or seek professional help.
Step 10: Enjoy Your Dry Concrete Floor:
Following these simple steps, you can successfully dry your concrete floor after a water leak. It may seem daunting at first, but with patience and proper care, you can effectively restore your concrete floor to its original state. Remember to prioritize safety and follow all the necessary precautions while handling water damage situations.
By following these steps, you can enjoy a dry and safe concrete floor for years. Remember, it’s always better to be prepared and take preventive measures rather than dealing with the consequences of water damage.
5 Things You Should Avoid
- Delaying Action: Avoid delaying the drying process. The longer the water sits on your concrete floor, the higher the chance of it causing structural damage or leading to mold growth.
- Ignoring Hidden Moisture: Look into hidden areas where moisture might be trapped. This includes beneath carpets, inside wall cavities, or underneath baseboards.
- Overuse of Heat: While heat can aid in drying, excessive heat can cause the concrete to crack. Balance the use of space heaters with adequate ventilation.
- Skipping Safety Measures: When handling water damage, remember to wear appropriate safety gear, such as rubber gloves and waterproof boots. Also, be aware of potential electrical hazards.
- Neglecting Maintenance: Regularly inspect and maintain your plumbing system to prevent future leaks. Take preventive measures before another leak. Doing so can prolong the life of your concrete floor and save on costly repairs.
By avoiding these common mistakes, you can effectively dry your concrete floor and prevent potential issues in the future.
Conclusion
In short, how to dry concrete floor after water leak can be a challenging process. There are many methods out there that can be used to try and dry it, but some take more time than others. Regardless of the method chosen, the main thing to remember is to keep the area well-ventilated to help speed up the drying process and prevent any further damage from occurring. If these steps are followed correctly, your concrete floor should dry and look better quickly.
While it’s never a good idea to have a water leak occur inside your home or business, hopefully, this article will make the situation more manageable if you ever find yourself with one on your hands.
So don’t worry, follow these simple steps and you’ll have a dry concrete floor again – no matter how much water spilled! Now get out there, cuz. It’s time to get mopping!