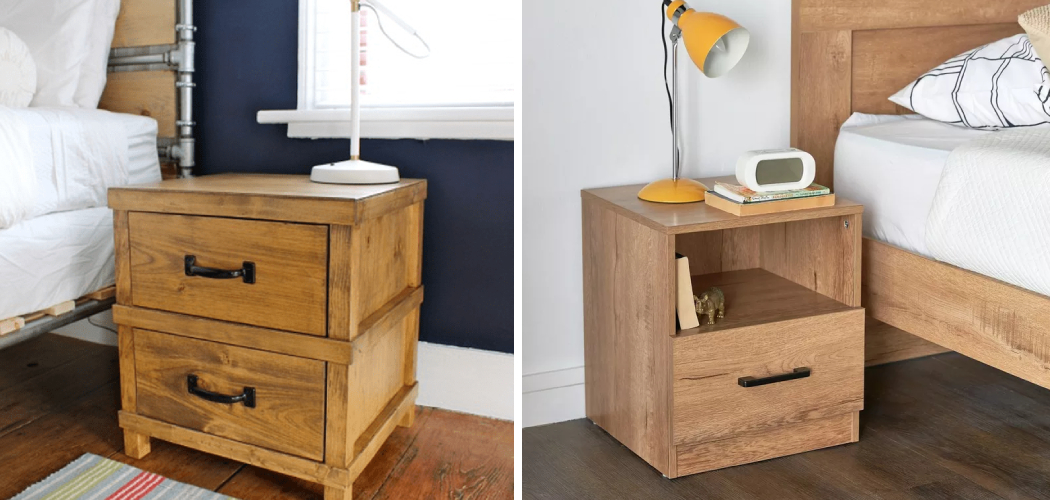
Do you need a little extra storage in the bedroom or workspace? If so, building your nightstand with two drawers is a great way to create additional storage space and add some style to any room. Not only can this project be completed relatively quickly, but it’s also an ideal opportunity for beginner DIYers eager to get into woodworking!

Whether you’re looking for a modern or traditional style, this easy-to-follow guide will show you how to build a nightstand with 2 drawers that look great and provides plenty of storage. Always measure twice and cut once, and you’ll be proud of the final product.
In this blog post, we’ll take you through all the steps necessary to construct your custom nightstand from start to finish. Let’s get started!
What Will You Need?
Before you begin building your nightstand, be sure to gather all the necessary tools and materials. You’ll need:
- Wood glue
- Hammer
- Screws/nails
- Painter’s tape
- Wood dowels
- Tape measure
- Pencil or pen for marking measurements
- Miter saw, or circular saw
- Drill
- Sandpaper
- Stain and paint of your choice
- Wood boards for construction (plywood, MDF, etc.)
- Drawer slides (2 sets)
- Hardware for attaching the drawer slides to drawers and nightstand base.
Once you have all the above supplies, you can move on to the next step.
10 Easy Steps on How to Build a Nightstand With 2 Drawers
Step 1. Measure the Area:
Before you start cutting wood or building anything, measure the space in which your nightstand will reside. This will help ensure that the finished product is the correct size and will only take up a little space. If you’re using existing furniture for reference, account for other furnishings when measuring.
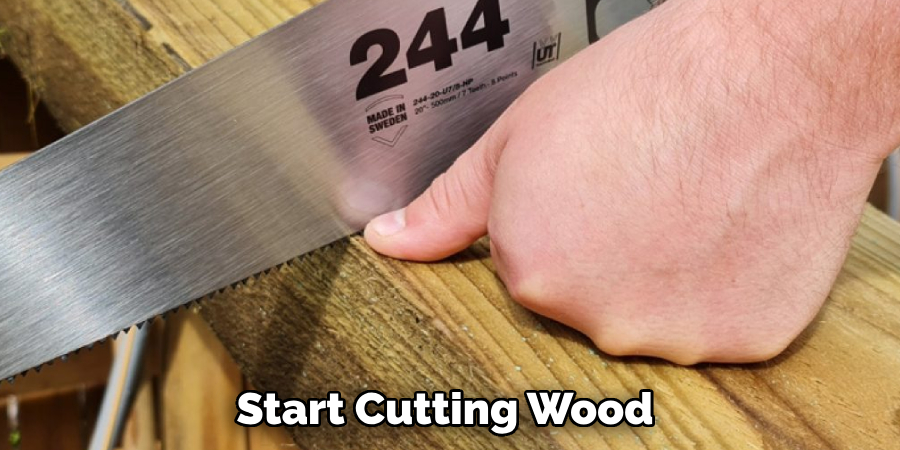
Step 2. Cut Your Wood:
Using your preferred saw, cut the wood boards according to your measurements and the schematic of the nightstand design. Remove any splinters or sharp edges on the cuts before moving on to the next step. Additionally, it’s a good idea to sand down all the surfaces of the wood for a smoother finish.
Step 3. Assemble the Frame:
Start by laying out the four sides of the nightstand frame on your work surface, ensuring they are aligned properly, and forming a square shape (or whatever shape you chose for your design). Attach them with wood glue and screws or nails. Be careful not to over-tighten the screws, as you may splinter the wood.
Step 4. Create the Drawers:
Now, it’s time to focus on the drawers. Firstly, cut the wood for the drawer boxes based on the dimensions of the drawer openings in the nightstand frame. Remember to account for the thickness of the drawer slides while doing so.
Assemble the drawer boxes using the same wood glue and nails/screws method. Ensure the boxes are square by checking the diagonal measurements; both should be equal. Once you have a sturdy box, attach the base of the drawer. Cut a piece of wood (plywood is a suitable choice here) to the correct size and secure it to the bottom of the drawer box using wood glue and nails.

Repeat this step for the second drawer.
Step 5. Install the Drawer Slides:
It’s time to attach the drawer slides to your nightstand frame and drawers. Start by attaching the slides to the sides of the nightstand frame, not over-tightening any screws or nails. Use a few wood dowels between the slide and the frame for added stability.
Then, attach the slides to the drawers themselves. Make sure that they are level with one another and that there is equal space on both sides for the drawers to move freely.
Step 6: Attach Drawer Pulls:
Once you have installed the drawer slides, it’s time to add the drawer pulls—measure and mark where each one should go before drilling a hole for the screws. Tighten them securely but don’t overtighten them, as this could damage the wood.
Step 7: Sand Everything Down:
Use sandpaper to eliminate any splinters or rough spots on your nightstand to ensure a smooth finish. Be careful not to use too much pressure when sanding, and start with a lower grit paper before switching to a higher one for the final touches. Check for any imperfections in the wood and remove them if necessary.
Step 8: Finish with Paint or Stain:
Now, it’s time to finish your nightstand! You can paint over your nightstand using a brush or roller or stain the wood depending on the look you’re going for. If you opt for paint, use painter’s tape along the edges to prevent paint from bleeding onto other surfaces.
Step 9: Attach the Legs:
If you’re going for a nightstand with legs, now is the time to attach them. Start by drilling pilot holes in the bottom of your nightstand frame, then inserting wood screws into them. Alternatively, you can use glue and nails to affix the legs.
Step 10: Enjoy Your New Nightstand:
Once your nightstand is complete, it’s time to enjoy! Place it in your bedroom or workspace and start filling those two drawers with whatever items you need close at hand. Congratulations on creating something useful and stylish all by yourself!
Whether you’re a beginner or an experienced woodworker, this guide should help you build a nightstand with two drawers you can be proud of. The best part is that the design is completely customizable, so feel free to make it unique. You can add extra storage space by adding shelves or drawers if needed.

5 Additional Tips and Tricks
- Plan Your Project: Before building your nightstand with two drawers, have a clear plan. This should include the overall design, measurements, and the type of wood you’ll be using. A plan will help you avoid making unnecessary mistakes during the building process.
- Pre-drill Holes: To make it easier to attach the sides of your nightstand, pre-drill a few holes in each side for the screws to fit into. This will also help keep everything aligned and evenly spaced.
- Sand Before Finishing: Make sure you sand down the wood before applying any type of finish. This will help ensure a smooth and even surface and ensure that the finish adheres properly.
- Measure Twice: It’s important to double-check your measurements before cutting any wood for your nightstand project. Take extra time to measure twice so you don’t make costly mistakes!
- Consider Installing a Shelf: Installing an additional shelf in the nightstand can be a great way to store extra books or other items. Just ensure you measure and cut your wood correctly before attaching it to the nightstand.
By following these tips and tricks, you’ll be able to build a beautiful, sturdy nightstand with two drawers that are both stylish and functional. Have fun building!
5 Things You Should Avoid
- Avoid Rushing: Patience is crucial when building a nightstand with two drawers. Rushing can lead to accidental cuts and poorly fitted pieces, so take your time with each process step.
- Avoid Using Cheap Materials: Although it might be tempting to save money, don’t compromise on the quality of your materials. Cheap wood or screws may not withstand the test of time and could compromise the longevity of your nightstand.
- Avoid Neglecting Safety: Always remember to prioritize safety. This includes wearing proper safety equipment like gloves and goggles and ensuring you use tools correctly.
- Avoid Skipping Steps: Even if a step seems unimportant or unnecessary, don’t skip it. Each process in the plan contributes to your nightstand’s overall quality and stability.
- Avoid Ignoring Mistakes: If you make a mistake, fix it right away. Ignoring or covering up mistakes could lead to structural issues with your nightstand down the line.

By avoiding these common pitfalls, you can ensure the success of your project and build a nightstand with two drawers you’ll be proud to use and display.
5 Different Design Ideas
- Rustic Charm: Use reclaimed wood and other rustic materials to create a nightstand with a vintage feel. Add some weathered hardware for an extra touch of charm.
- Contemporary Chic: For a modern look, opt for sleek lines and geometric shapes. A glossy black finish will contribute to the contemporary aesthetic.
- Mid-Century Modern: If you’d like to incorporate some mid-century style into your home, opt for an angled nightstand with tapered legs. Natural wood and metal accents will help capture the look.
- Nautical Theme: Incorporate a bit of the nautical vibe in your bedroom by building a nightstand with two drawers painted white and navy blue stripes. Add some brass handles to complete the look.
- Industrial Edge: For an industrial feel, choose a nightstand with two drawers made of metal and wood. Combine natural wood tones with steel accents for a unique aesthetic.
By experimenting with different design ideas, you can build a one-of-a-kind nightstand that perfectly matches your style and home decor.
What’s the Difference Between a Nightstand and a Night Table?
A nightstand and a night table are similar in purpose, but they can look very different. A nightstand is typically taller than a night table and usually has at least one drawer for storage. On the other hand, a night table is usually shorter and has no drawers or extra storage space.
A night table is often part of a bedroom set that includes other furniture pieces, such as a dresser and bedside tables. A nightstand can stand alone or be grouped with other furniture pieces to create a cohesive look.
No matter which type of furniture you build, a nightstand or night table will be a great addition to your bedroom. By following the tips and tricks above, you can build the perfect piece for your home!

What Size is a Standard Nightstand?
A standard nightstand is usually around 24-30 inches in height and 18-24 inches in width. The depth can range from 12 to 15 inches, depending on the type of furniture you are looking for. Before starting your project, measure the space where your nightstand will be placed.
Another important factor to consider is the height of your bed. The top of the nightstand should be at least level with the mattress or slightly lower if desired. This will ensure that you can easily access items stored on your nightstand without bending down too much.
By following these size guidelines, you’ll be able to build a nightstand that fits perfectly in your space. With these tips and tricks, you can now create the perfect nightstand with two drawers for your bedroom!
Can I Use My Desk as Nightstand?
Yes, you can absolutely use your desk as a nightstand! Depending on the size and shape of your desk, it can be an ideal piece for this purpose. Just make sure that the height is appropriate for your bed and mattress. You may also need to add an extra shelf or two to make sure there’s adequate storage space.
If you don’t have a desk available, you can also purchase ready-made nightstands from most furniture stores. However, if you’re looking for something unique, why not create your own? Building a nightstand with two drawers is an excellent way to add a personal touch to your bedroom decor while providing convenient storage space.

Conclusion
After following this blog post on how to build a nightstand with 2 drawers, you can now proudly display your very own handmade two-drawer nightstand. This project was relatively easy and gave you insight into the basics of woodworking. Think about all the possibilities that come from this project as you are only limited by your creativity when building furniture!
With the right skills and materials, you can continue to upgrade or modify this model or design more sophisticated projects. Crafting is an incredible art form, and with enough practice, devotion, and patience, you can take immense pride in creating objects with your hands.
Now that you have built a two-drawer nightstand with your own two hands—what will come next? Thank you for giving us your valuable time. Good luck!